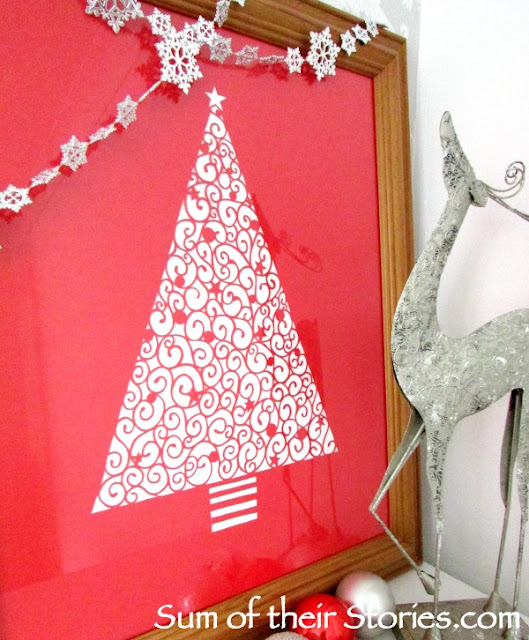
Make a unique piece of Christmas art for your home with paper and a craft knife. It's not especially difficult, simple drawing skills and then quite a lot of patience is all that's needed!
I made this picture for our home last year but it was too late to share it with you then as it was almost Christmas day itself by the time I finally finished it!
If you'd like to make a papercut like this for your home or as a gift, I would suggest starting it now.
Papercutting is a lovely, almost magically craft. It's very soothing to do, quite meditative but one thing it is not is quick!
To make your own picture you will need:
- A frame
- Paper or thin card to fit your frame, one in your main colour and one to go behind.
- Scrap paper to practice your design
- A soft pencil
- A craft knife and spare blades. I have an xacto knife and used 3 blades on this picture.
- A cutting mat
First you need a design. I sketched a few on scrap paper.
These are just sketched ideas, they need developing into proper designs, but they might spark your imagination.
Keep it fairly simple, remember the more complicated the design is the longer it will take to cut out. All your lines must touch another line, or when you cut big sections will just fall out.
Where you have a line, that is what will be left behind. Consider using little joining lines if necessary.
That's why I introduced the stars and baubles into my swirly design, once I was drawing in the large scale I wanted to join swirls in an interesting way, add another design element.
Once you have decided what you are doing trim your paper or thin card to fit your frame.
I used a 110gsm card, this is a little it thicker than I would normally use for a papercut but it was all I could get in the large size I wanted. The thicker the paper the harder it is to cut and the more blades you will get through.
Now draw you design onto the back of the paper using your soft pencil. I would recommend measuring from the top bottom and sides just to make sure it is central. Use a ruler for straight lines and don't press too hard, you want to rub it out if you go wrong or change you mind.
Take your time on this step, make sure you are happy before you start cutting. pencil lines are temporary, knife cuts are permanent!
Now you just need to cut it out.
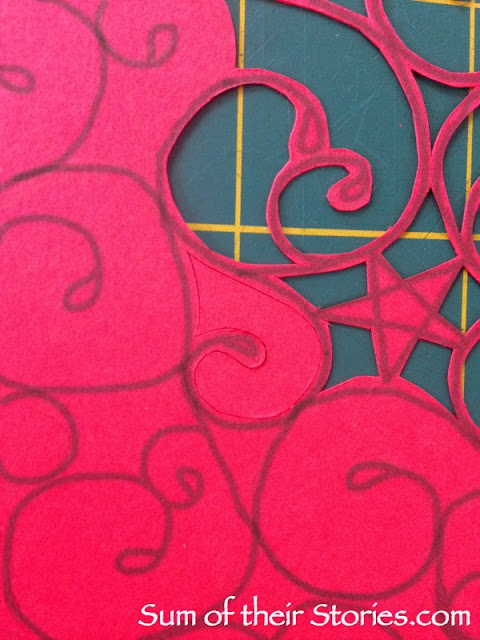
Choose a starting point and just work from there. You are cutting either side of the lines you have drawn - to remove the little shapes that are formed between the lines.
In real life my pencil lines were not so bold. I could see them easily but the paper has a slight sheen so they didn't show up on the photo. I've done a little post production editing just so you can see them.
As you can see from my close up my papercutting is not awesome. The curves are not completely smooth. I'm ok with that. The finished picture is exactly what I hoped for and no one is looking at it with a microscope.
The thing I love most about papercutting is how the design appears like magic. It's hard to stop yourself from regularly picking up your work, turning it over and holding it up to the light. It just looks so good as it gradually appears.
When all the paper cutting is done, I think you should turn your beautiful work of art over and spend at least 10 minutes admiring it!
All the pencil marks are on the wrong side of the paper so under NO circumstances should you try to rub them out when you are finished. It's just not worth it, no need at all and you risk ripping your papercut. I've done it, it was awful, just don't do it!
Pop it in the frame with a contrast paper behind and you are done.
I chose the red paper for my papercut but I think it would look good on white paper with a colour behind it too. Maybe even a pattern behind if your paper cut in very simple and have large pieces removed.
I started this last year on 25th November and did it little and often, whilst the dinner was in the oven etc. I finished on 17th December (thank you Instagram for the dates, I shared a little of the process there last year)
I'm so pleased with how this papercut turned out, so I'm really looking forward to getting it out again in a few weeks (no Christmas decorating here till December) One day I might paint this frame but I'm not sure if it should be gold or silver. Gold would be nice in our living room, but silver would be better in the dining room (which is where it is in these photos)
What do you think?
You might also be interested in:
 |
| Sequin Christmas Tree |
|
 |
| Framed Christmas Tree Print |
|
 |
| Wooden Christmas Gift Tags |
|
 |
| Christmas Pudding Chocolate Buttons |
|
I'll be linking up at these great link parties, where you can find loads of lovely ideas.


I love this. This is a great gift idea for people on an Christmas budget. Its inexpensive and beautiful.
ReplyDeleteThanks Leanna, yes paper cutting is really cheap. You do need to invest in a half decent knife but then it's just paper, and it's easy enough to recycle old frames form charity or thrift shops.
DeleteLove paper cuts, so intricate and admire the talent needed to do them. so pretty
ReplyDeleteGlad you like it Carolee, it's actually not an especially difficult craft, but you do need time and patience for anything sizable!
DeleteWhat a unique idea! Definitely keeping this in mind for holiday gifts.
ReplyDeleteIt would make a lovely gift, it would be nice as a family gift you could add their name in some way, personalise it maybe.
DeleteThe patience of that is incredible! It looks so good. I think a silver frame would be fabulous. Jo x
ReplyDeleteI think I need to whip out my cans of spray paint whilst it's still November Jo, the wooden frame is just not doing it for me now. In real life it's ok, but seeing it photographed has made me realise how much nicer a metallic frame would look.
DeleteWhat a cute idea! I'm not always the craftiest person, but I'd love to try my hand at this.
ReplyDeleteIt's just about having a go at something you enjoy Shelley, my papercutting is SO far from perfect if you look close - the answer to that is to not look close!
DeleteSuch a cute idea. Hope to see you at Family Joy Blog Link Up Party this week. Check us out http://ow.ly/GgRU305TyOz
ReplyDeleteThat is lovely. I've tried paper cutting and know how difficult it is. Especially a design as intricate as that. I wish I had your patience!
ReplyDeleteIt certainly did need patience that's for sure! I did really enjoy the first 7/8ths of it, the last bit was a bit of a slog as I just wanted it finished!
DeleteThis is so pretty, esp. that you DIY. I can only imagine the time and patience this took! Visiting from Saturday Sharefest.
ReplyDeleteI'm so pleased you came for a visit Victoria, and glad you like my papercut.
DeleteI did enjoy the process until the last few days, then I have to confess I just wanted it done and framed before Christmas day!
Super cute! Not sure I could pull it off, but super cute!
ReplyDeleteThanks Paula, this is something to build up to rather than a beginners project - I started with greeting cards, much quicker so more instant gratification!
DeleteI LOVE your paper cut tree, Julie. Wish I had the patience to do something as intricate as this. I'd most probably lose a finger in the process. The gold frame looks good, but I'd go for silver.
ReplyDeleteThank you Pam, I'm so pleased you like it.
DeleteThese knifes are super sharp so you do need to be a bit careful as they would do some damage of you slipped. (thankfully I never have ...yet!)
This is the most beautiful Christmas decoration I have seen in many years. I don't think I'd have the patience and my fine motor skills are not up to scratch either. I remember my mum making quite amazing paper cuts and I always assumed she would have used scissors, not blades. Must ask her.
ReplyDeleteAwh, that's such a lovely compliment Christina thank you. I can't pretend it was quick, patience is required for this one but I did enjoy the process as well as the result.
DeleteI'd love to know if your mum used scissors for papercutting, I've only tried that on things like snowflakes where you fold the paper. I do love my craft knife - one of my favourite presents ever!
This is just beautiful! I used to do a lot of Scherenschnitte, but I used a tiny pair of scissors. And I never drew my own designs. I just love your tree! Smiles, Linda at Paper Seedlings
ReplyDeleteScherenschnitte sounds so much nicer than papercutting. I can't imagine how hard it would be to do with scissors but I guess it's what you are used to. Thanks for stopping by.
DeleteThis is so amazing! I can't believe you cut this by hand. Really just beautiful!
ReplyDeleteAwh, thank you Kati, I'm so pleased you like it.
DeleteThis is beautiful! I'm rubbish at drawing - can't even draw stick figures! - so would you consider sharing your design o I could have a go? Would love to make one for my gran. Thanks x
ReplyDeleteHi, I'm really sorry, I just drew my design straight onto the red paper and started cutting. All I have are the sketches in the post which you are welcome to copy.
DeleteTo draw something like this all you need to do is a big triangle for the tree and then pop in a load of swirls. If Drawing is not your thing I'd miss out the stars and baubles I put in.
If the swirls seem like too much how about the geometric idea, that way you can just draw a load of lines using a ruler and then cut out the shapes that are created. That would be easy peasy and involve no freehand drawing.
Good luck if you decide to have a go.