Thursday 30 January 2014

Owl Granny Square Cushion

I mentioned this months ago when I showed you the little Crocheted Owl Brooch. Well here it is at last, my Granny Square Owl Cushion. (Actually not mine because this was one of our daughters Christmas pressies!)

This is not my own pattern but I've added links to the various elements I used and information about how I went about it, in case you want to have a go at making your own.


This was made using up left over bits and pieces of wool from my stash, but it was all DK (in the US I think you call it light worsted) It turns out that some DK is thicker than others, so my squares varied a little in size but not so much that it matters too much, and it's nice to use up all your leftovers.

I used the lovely pattern from the brilliant Sarah at Repeat Crafter Me to make the owl squares and matching plain granny squares for the other squares, you can use these super clear instructions from Little Tin Bird if you don't already know how to make them.

This is my diagram for how to position the colours - wow what an artist I am!

I made all the squares first then joined them using this join as you go method from the very talented ChiWei at OneDogWoof.
 Once you have tried this joining method you may never go back to any other!

The back is one big granny square for two reasons:
1) I didn't have any more navy blue to go round the smaller squares
2) Those owls would get squashed if they were on the back!
All the colours are the same ones used on the front, with the exception of navy blue (as I had run out!) You just make your normal plain Granny Square but don't stop after 4 rounds, just keep going until it's the same size as your front. (well, not your front, the front of the cushion!)

I found the ears of the Owls were starting to fold forwards so I caught them down with a tiny stitch on each one.
French knots for eyes made of wool seemed like a good idea so the cushion stays soft (I didn't have enough little black buttons anyway)

I joined the sides together with a dc (or sc to those in the US)
After joining three sides, I inserted an inexpensive plain grey cushion from Ikea and joined the fourth side. If it needs washing I'm thinking a gentle hand wash just as it is, rather than worrying about taking the cover off.
Owl Granny Square cushion

You might also be interested in:

Pom Pom Scarf Refashion
Earphone Wire Tidy
Earphone Wire Tidy
Harry Potter Scarf Pattern
Crochet Owl Brooch
Crochet Owl Brooch
I'll be linking up to all these great link parties, why not go and have a look!

read more

Friday 24 January 2014

Circle Card Crazy

Birthday card with circles

Look what my lovely son gave me for Christmas:
A 2" and a 1" circle punch!
Now that it's easy peasy for me, I've been a bit circle card crazy over the last week or two! It's such a great way to use up scrappy little bits of lovely paper that you just can't bear to throw away.
card with circles
birthday card with circles
This is a large 8" x 8" card blank. I used my two lovely new circle punches, and a couple of flowers and a butterfly punch that I already had. I just punched out a load of shapes then layered them up and added a few gems. The little writing banner is just made on the computer in word. It's a banner autoshapes with a text box on top, printed on card, cut out carefully and attached with foam pads.


birthday card with circles
For these I cut card just a little bit smaller than the base card and punched circles from it. The one of the left I stuck patterned paper on the base card. For the one on the right I glued the patterned paper to the smaller top piece BEFORE punching the circles. The top layer is attached with foam pads to lift it a bit. The words are a stamp.


birthday cards with circles
On the left, just little polka dot (love polka dot!) circles, mounted on white then yellow. The writing is a stamp that came free with a magazine. On the right is a load of circles and stars, the writing was just printed on the computer. Some of the larger circles have smaller circles or stars ones punched out of them. 


birthday card with circles
I just went to town using up scraps here, I think it's pretty self explanatory! I raided my stash of little bits recovered from old cards (flowers,buttons etc)


birthday card with circles
My favourite thing about having my lovely new punches is the fact I can print some words on the computer then, with the punch upside down, I can now properly position the writing where I want it. Whoop Whoop! I cut the brown paper to size, then added the circles and attached the embroidery thread and word circle before sticking it all down to the base card. I prefer this method so the thread is not inside the card, even though it is a bit lumpy and therefore tricky to glue down.


birthday card with circles
All this coloured paper is just old envelopes. I keep all coloured envelopes that come through the door as they are such a great supply of lovely coloured paper. They are just kept in another large envelope but in rainbow order so I can find what I'm looking for. The tiny circles are just from a hole punch.


birthday card with circles
This is also pretty self explanatory, the bottom photo is terrible, but it does show the inside and cut outs on the front, which you can't really see in the other photo. I think when I write this card I'll follow round the circles inside with the message in a wiggly line of writing.

I have a pinterest board "Card Ideas" here and I've been collecting images of cards with circles for a while now (along with non-circle ones too) - do have a look for more inspiration if you like making cards.

You might also be interest in:
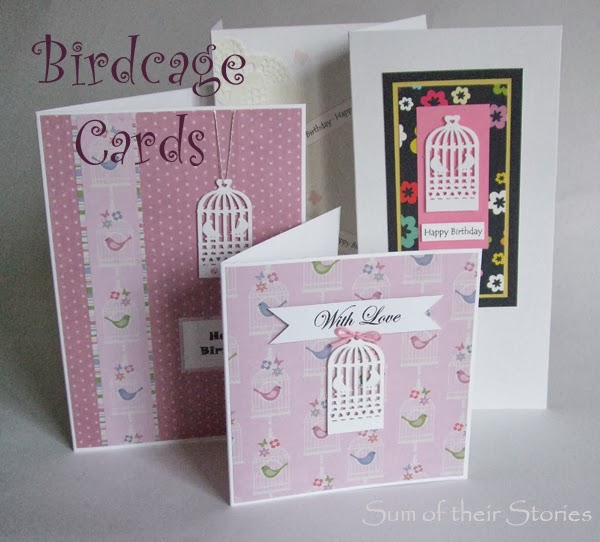
Birdcage Card Ideas
Birdcage Card Ideas
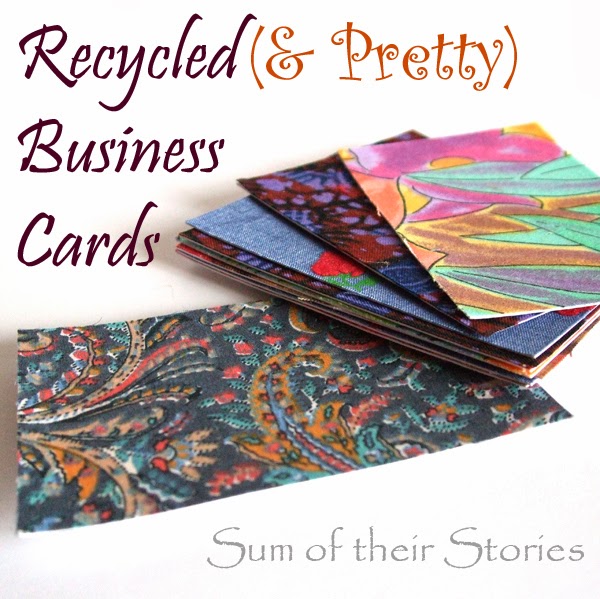
Recycled Business Cards
Simple Speech Bubble Cards
Recycled Pen Tub Tutorial
I'll be linking up this project at all these lovely link parties, pop over for a look at loads of projects from other blogs

read more

Tuesday 21 January 2014

Pom Pom Scarf Refashion

Giant Pom Pom Scarf from sumoftheirstories.com
Another wool based project, it must be winter! My lovely Sister-in-law (same one who gave me the extremely useful tea towels) made me a beautifully soft grey scarf for Christmas year before last.

I've worn it quite a bit but as a "bright colours" kind of girl I thought I might give it a quick upgrade for 2014. I must stress that I had my sister-in-laws permission for this, we spoke about it this Christmas and she is completely on board.
It is made of a lovely soft bouclé type wool, and looks like it was made in garter stitch. It measures 30cm x 134cm (12" x 53")
I am going a bit pom pom mad at the moment. I learnt the quick, wrap round your hand technique from Creature Comforts Blog youtube video just before Christmas and taught our daughter whilst she was home from Uni. I came home from work one day and she'd spent the day making loads, using up all the little bits of wool we had that wasn't really any good for anything else. We used them to finish off all our Christmas gift wrapping this year.

I digress. I wanted to make BIG pom poms for this scarf and found this brilliant method from www.vintagerevivals.com.

I used one 100g ball of bright blue DK wool to make 2 big pom poms... 
... following Vintage Revivals instructions
I took one of the long ends, threaded into onto a big old needle and did a big running stitch along one end of the scarf.
I pulled it tight and tied a knot with the other long thread coming out of the pom pom.
I gave it a couple more knots to secure and trims the ends off to match the rest of the pom pom.
On reflection a chunkier wool might have been better, certainly quicker I think, but I just love this vivid blue with the grey.
giant pom pom scarf from sumoftheirstories.com
This was a really quick project, I did it start to finish whilst watching The Incredible Hulk with my boys (apparently they were shocked to discover I'd not seen it yet and thought it needed remedying asap) 
You might also be interested in:

Harry Potter Scarf Pattern
Earrings Organised Update
Earrings organised Update
Knitted Mini Christmas Tree Pattern
Crocheted owl Brooch
Crocheted Owl Brooch
I'll be linking up at these great link parties

read more

Friday 17 January 2014

Heart Elbow Patch Cardigan Makeover


Two things:
  • I've always loved taking an item of clothing and making it a bit more interesting/unique.
  • I do love a cardigan - cardigans are cool.
I don't however, need 3 plain black cardigans, so when I discovered this was in fact the case I set about a couple of cardigan makeovers.
First up was a plain long line cardie with pockets.

I was inspired by a chunky jumper I had pinned a while ago which had lovely heart elbow patches. Turned out when I followed the pin link properly that this lovely jumper had the patches embroidered on and I fancied adding knitted patches to this cardie.
I couldn't find a free knitted heart pattern that suited what I wanted so had a little play and came up with my own.

To do a makeover like this you will need:
a plain cardigan or jumper
approx 25g ball of DK (worsted) wool in a colour of your choice
A small amount of contrast colour for attaching the patches
3.75mm knitting needles
Buttons in a matching colour
A sharp sewing needle with a eye large enough for your wool

First you need to knit two hearts:
Knitted Heart Pattern from www.sumoftheirstories.com

Knitted Heart Pattern:
Using the DK wool and 3.75mm needles
inc = knit twice into stitch

cast on 3 stitches
row 1: k
row 2: k
row 3: inc in first st, k1, inc in last st (5 stitches)
row 4: k
row 5: inc in first st, k to last st, inc in last st (7 stitches)
row 6: k3,p1,k3
row 7: rep row 5 (9 stitches)
row 8: k3,p3,k3
row 9: rep row 5 (11 stitches)
row 10: k3,p5,k3
row 11: rep row 5 (13 stitches)
row 12: k3,p7,k3
row 13: rep row 5 (15 stitches)
row 14: k3,p9,k3
row 15: rep row 5 (17 stitches)
row 16: k3,p11,k3
row 17: rep row 5 (19 stitches)
row 18: *k3,p13,k3
row 19: k
repeat from * 4 more times (27 rows in total)
row 28: k3,p6,k1,p6,k3
row 29: k
row 30: k3,p5,k3,p5,k3
row 31: k2tog, k to last 2 stitches, k2tog
row 32: k3,p3,k4 pass last but one stitch worked over last st (like you are casting off) k1,p3,k3
row 33: k2tog,k6 turn (you are now just working on these 7 right side stitches, the others just stay on the end of their needle for a minute)
row 34: k3,p1,k3
row 35: k2tog,k3,k2tog (5 stitches)
row 36: k
row 37: k2tog,k1,k2tog (3 stitches)
row 38: k
row 39: cast of those 3 stitches

Rejoin the wool in the middle
row 40: k6,k2tog
row 41: k3,p1,k3
row 42: k2tog,k3,k2tog (5 stitches)
row 43: k
row 44: k2tog,k1,k2tog (3 stitches)
row 45: k
row 46: cast off
knitted heart pattern

I made this up as I went along then checked it as I made the second one (hopefully it makes sense, out of interest this is what it looked like before I typed it up here - classy eh!)

Now put your cardigan on and pin your elbow patches over where your elbow comes to. This is MUCH easier if you get someone to help you! 
Knitted Heart Pattern from www.sumoftheirstories.com
Contrary to what this picture show you need to sew those ends in before you attach the patches. I thought at first I would get away with just tucking them in but no, please sew them in first!

Now take a length of contrast wool threaded on your large sharp needle and blanket stitch in the patches in place. You could use the same colour thread, that would be nice too, or a different colour altogether.
Heart Elbow Patch Cardigan Makeover from www.sumoftheirstories.com
I seem to be sewing from right to left here, I think I normally blanket stitch from left to right. I conclude it doesn't matter. (unless someone knows better, please let me know!)

I added pink blanket stitch all round the edge of the button band to add a little more colour and changed the buttons for pink too. (the buttons are not all the same, I didn't have enough but I kind of like that effect)
Heart Elbow Patch Cardigan Makeover from www.sumoftheirstories.com

Ta-Dah!
Heart Elbow Patch Cardigan Makeover from www.sumoftheirstories.com

Heart Elbow Patch Cardigan Makeover from www.sumoftheirstories.com

Heart Elbow Patch Cardigan Makeover from www.sumoftheirstories.com

Heart Elbow Patch Cardigan Makeover from www.sumoftheirstories.com
(Slightly over exposed photo - I am wearing a white top underneath, honestly!)
My youngest son & I had fun and games again taking these photos, on reflection it may have been better not to include the bird table and the dead leaves! It's a messy time of year in the garden!
You might also be interested in:
Harry Potter Scarf Pattern
Lace Top Refashion
Lace Top Refashion
Evening Cardigan Makeover
Birdcage Card Ideas
Birdcage Card ideas
I'll be linking up at these great link parties, go and have a look if you have a minute or two!

read more