Sunday 30 August 2015

Silent Sunday 30th August 2015

I've shared what I was making when I was "playing" with these ribbons now - if you want to check it out it's here.
OneDad3Girls
Sunday Snap

read more

Friday 28 August 2015

Geometric DIY art

Using an old canvas and a little paint to make a new piece of geometric art is pretty simple and inexpensive. I had a few issues on the way and slightly overcomplicated mine. I'm sharing today so maybe you can learn from my mistakes!
easy DIY art with canvas, paint and masking tape
This post contains affiliate links, if you click through and make a purchase then the cost to you is the same but Sum of their Stories receives a small commission.

The pinterest challenge is back today, a group of creative folks sharing things they've made inspired by something they saw on pinterest. I wanted to make some art for our bedroom, had seen these two ideas on pinterest and thought the whole thing looked simple enough.
On the left is a beautiful metallic canvas from While they Snooze, it's made by painting then taping over an existing painting. On the right is some herringbone pastel loveliness from Laura Wadsworth, funnily enough Laura's piece was also part of a pinterest challenge! She used a new white canvas, taped a design and then splodge painted all over it.

I started with a rather unattractive canvas that I picked up from a major supermarket for £4. I haven't photographed it as it was as I thought it might be a little bit insulting to the original artist and also to anyone else who has chosen to buy this for their home. It was quite a wishy washy picture with brown and cream tones and that's all I'm prepared to say!
I painted over it with some gold spray paint I had left over from my various gold spray paint projects. (here, here and here) I also splodged on some regular cream and white emulsion and left some bits of the canvas original picture showing too.
When that was dry I taped out a geometric design with decorators tape.
As you can see I went for more of a triangle design than the herringbone in the pinterest inspiration tutorials. I just googled "geometric designs" and then picked one that looked fairly simple to mark out.

Then I stopped and realised I wasn't doing this art quite the same as either of the pinned inspirations.
To use the same method as While they Snooze I should have taped off the triangles, then I could paint over in white to form the lines.
To use the same method as Laura Wadsworth I should have painted the whole canvas white to start with, then taped off, then splodged the gold etc on.

I felt I was past the point of no return with this so I soldiered on and tried to find a way to make this work.
I used my trusty air disappearing pen, the one I use for marking embroidery designs (herehere and here) and marked the decorators tape a little at a time, removed the tape, then painted in between the lines with a small paintbrush and white emulsion paint.
The white paint needed two coats, and this is my finished result.
Geometric canvas tutorial
I like it enough to have it hanging on the wall but I don't LOVE it as much as I'd hoped I would. Either the lines are just too thick or the canvas is just not quite big enough. 
I might try again at a future point with another variation on this idea, I'm keeping my eyes open in Charity Shops for a suitable canvas. For now art hangs where previously there was just plain wall so that's an improvement!
Don't forget to visit the other Pinterest Challengers for this months crafty inspiration.


You might also be interested in:
Simple Cross Stitch Mural
Papercut Quotes
Papercut quotes
Share a Coke With Picture
Wall of Wisdom
Wall of Wisdom
I'll be linking up this project at all these lovely link parties, pop over for a look at loads of projects from other blogs.

read more

Monday 24 August 2015

2nd Blogiversary

I can't believe another year has gone already.
close up 2 tape measure
Today is my 2nd Blogiversary - well that went quick!

In this last year there have been a few changes:

I've become a contributor on The Pinning Mama. That has been a fabulous experience, the lovely Kimber (the Pinning Mama) is so generous with her experience and expertise and I've thoroughly enjoyed sharing just a few of my ideas with her readers.
2B pencil
I finally took the plunge and joined instagram. Turns out it's not just for celebrity selfies! It's fast becoming one of my favourite social medias, it's so easy to loose yourself on their for 15 minutes. (who am I kidding, more like an hour!) 
2mm knitting needle
I've been a regular participant in the Pinterest Challenge, where a group of craft bloggers share something they've made inspired by something they saw on Pinterest once a month. I love this sort of collaborative thing, other craft bloggers are so inspiring.
2oz weight
I've tweaked rather than changed my blog layout. I know lots of people regularly change their look but I'm really loathe to change my header, it was the first thing I did in preparation for starting the blog and it still says everything I want to about Sum of their Stories. I also get compliments about it and that's always nice! One person who was especially generous in giving their advice on achieving some things I have tweaked was the lovely Jennifer from The Life of Jennifer Dawn. Thanks Jennifer x

Most things are exactly the same though. I'm just sharing the projects that I've enjoyed doing and hope you might feel inspired enough to try making something yourself. Thanks for stopping by!

read more

Sunday 23 August 2015

The Handmade Fair 2015

I have a feeling my instagram account will have a sudden flurry of activity in about a month's time.
Something just for my UK peeps today I'm afraid - The Handmade Fair 2015.
Kirstie Allsopp and a host of other crafty people are back for the 2nd Handmade Fair in just a few weeks and I'm super excited because this year I'm going!
I had to miss last year as I'd just had an op and a day walking round The Green at Hampton Court Palace was not on the cards for me - no matter how many lovely things there were to see.
Last year in that final week of September UK craft blogs were full of people sharing their photos of all the amazing things they had seen and done. I have a feeling this year will be even better.

There are workshops, interviews and lots and lots of shopping opportunities - I can't wait!
If you are in the UK at the end of September and want to pop along then full details on how to get tickets and more information about the event can be found here:

There is also a Handmade Christmas Fair running this year in November in Manchester. More details of that can be found here.

If you are going to the Handmade Fair have a fabulous time and keep an eye out for me. I'll be the one in comfy shoes, carrying dozens of shopping bags and instagraming EVERYTHING.

read more

Wednesday 19 August 2015

Appliqued and Embroidered Cushion

Take a ready made cushion cover, scraps of fabric and a few simple embroidery stitches and you can make a pretty cushion / pillow. 
Appliquéd and embroidered cushion DIY
This project was one I originally created for Cut out and Keep over a year ago and now, with their permission of course, I thought I could share it with you here.

To make one you will need:

  • A cushion cover - ready made or homemade
  • A design transfer sheet
  • Hemming tape (that stuff you can use instead of stitching a hem up, the advert promises doesn't come off in the wash but we all know it really does!)
  • Embroidery thread in various colours
  • Scraps of fabric
  • An iron

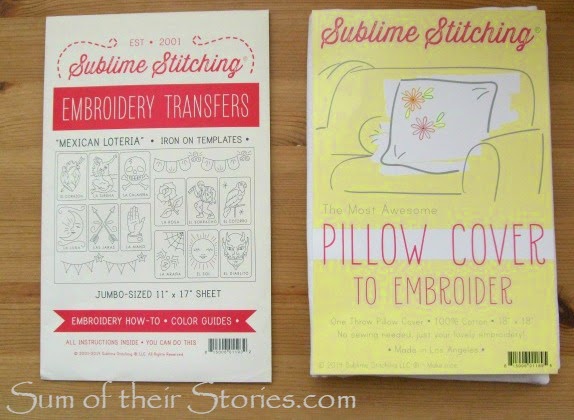
I was sent a lovely pre-made envelope style cushion cover by Sublime Stitches and a fun embroidery transfer sheet to try.
Sublime Stitches tends to put a very modern twist on embroidery design but I actually ended up with something fairly traditional looking. I guess that shows how versatile their designs can be! The sheet I received is called Mexican Loteria.
I'd not used a transfer sheet since I was a kid but it is very easy. Cut out the design element you want, then place it face down on your fabric and iron. You get full instructions explaining how hot and how long with the transfer.
I chose the bunting and La Rosa and ended up arranging them with the rose in the centre and bunting above and below. Originally I had thought I would have a bunting frame but I miss calculated the spacing a little and had to improvise. Be warned, once your ironed the design on - it's on - no rubbing it out and starting again so plan carefully!

Rather than just embroidering the outlines I thought I would try a little appliqué. 
I ironed the bunting onto scraps of pretty fabric and cut them out. You can use each bit of transfer multiple times, I used each one about 8 times and although the last one was a lot fainter it was still fine.
I then cut little pieces of hemming tape in the same shape and made a "fabric sandwich".
Basically it is: Cushion cover - hemming tape - fabric scrap 
You'd think I would take a photo of this vital step wouldn't you ? Hummm. 
You press this "sandwich" with the warm iron and the hemming tape acts like a super thin double sided fuseable interfacing. The pretty fabric shapes are now attached to the cushion.
This pink fabric is tiny leftover from a nightie my mum made for me when I was little. I remember it had an elasticated top, ribbon ties on the shoulders and a wide gathered frill at the bottom. That's the thing about fabric scraps, they can be full of memories... I digress, back to the cushion!
At this point the cushion looked like this:
Now for some embroidery. I kept it pretty simple, with blanket stitch round the fabric, with backstitch details. I used two strands of my six strand embroidery thread throughout.
I wanted to personalise the cushion cover for a gift so I just chose a font I liked on the computer, mine is "Vladamir Script" and printed the name in font size 140. 
I just placed the paper inside the cushion cover, positioned it nicely and then traced over the letters with my air disappearing pen. A faint pencil line would work too. The printed words showed through the white fabric with no problem.
Then it was just a case of embroidering them too. I used backstitch and three strands of embroidery thread this time, just to make the lettering stand out a little.
Appliquéd and embroidered cushion tutorial
You can see I did little ribbon roses at the top of each bunting "swag". I'll show how I did that another time, this post has gone on long enough for today! 
Spoiler - they are very easy and fun to make, it feels a bit like magic and my family can confirm how excited I got as I made them.
You might also be interested in:
Simple Embroidered Tote
Making Toys from Kids Drawings
Cornishware Ruffle Tote
Running Stitch Embroidered Cushion Cover
I'll be linking up at these great link parties

read more

Monday 3 August 2015

Liberty Fabric and Bead Bracelet

I used precious scraps of beautiful Liberty fabric to make a beaded bracelet.
DIY Liberty Fabric and bead bracelet

Some of the products I used to make this bracelet were provided by Pandahall.com
I love this Liberty fabric, I only have a few scraps left and wanted to make something worthwhile with them. After the ribbon and bead bracelet I made a few weeks I tried using strips of this fabric instead of the ribbon and I'm really pleased with how this has turned out.

To make this you will need:
A Selection of Jewellery Finding:
2 Ribbon Ends (mine are these silver colour 6mm ones from Pandahall) 
2 small round jump rings (mine are these 4mm from Pandahall)
1 larger jump ring (mine is a 7mm oval, from my stash)
1 lobster clasp (mine is this one from Pandahall)

And:
Scraps of fabric
Beads (mine are these porcelain ones from Pandahall)

The method is almost exactly the same as the Ribbon and Bead Bracelet except we are substituting ribbon for fabric. I cut 3 fabric strips each one 19cm x 3.5cm (that's about 7.5" x 1.5"). You can see how to calculate the right length for you on the ribbon and bead bracelet post, where I try hard not to overcomplicate!
I only used 3 lengths and I just pushed the ends into the beads with the end of a unravelled paper-clip instead of using a needle. These beautiful porcelain beads have a slightly larger hole then the little pearl ones I used before so that made it much easier with the fabric. Liberty lawn is so fine though it wasn't difficult to push it through.
Tutorial Liberty Fabric and bead bracelet
Each bracelet I make like this is my new favourite AND I still have a little of the Liberty fabric left as this hardly used any - bonus!
Tutorial Liberty Fabric and bead bracelet
DIY Liberty Fabric and bead bracelet
Do you have precious scraps of fabric that you just can't bear to throw away? Would you consider making a bracelet with them? 
You might also be interested in:
Marbled Clay Jewellery
Earrings Organised Update
Earrings organised Update
Old Bracelet to New Statement Necklace
Old bracelet to new statement necklace
Fabric Twine Bracelet
I'll be linking up at these great link parties,

read more