

Monday, 30 December 2013
Friday, 20 December 2013
Part 5 of my recycled wrapping ideas, using wall paper offcuts and left over bits of wool.


I'll be linking up this project at all these lovely link parties, pop over for a look at loads of projects from other blogs

You do need to have thought ahead for this one, and saved offcuts of wallpaper from pattern matching, ends of roll etc. You could go into the DIY shop and take a few sample lengths of wallpaper and I wouldn't judge you, but really the idea of recycling is to use what you have already!
Just wrap the pressie in wallpaper. I find sellotape doesn't really stick very well so that's why I've used wool to secure it all and the tassels just add a little something extra.
Secure your parcel with a doubled up length of wool and tie a bow.
Then make the tassels:
Holding the end with your thumb, wrap the wool around three fingers.

Keep wrapping till you have a little bundle. I didn't count, just stop when it looks a bit like this. (Just a quick hint: see how my fingers are slightly apart and I've not wrapped too tightly? That is on purpose, wrap too tightly and it's really hard to slide the bundle off and your fingers will start to go purple!)

Slide the bundle gently from your fingers and lay it on top of a short (4" ish) length of wool.

Bring the short length round and tie a knot. You want the knot to be about 3/4 to 2/3 of the way up the bundle.

Pull it nice and tight and do another knot for good measure.

Cut across the looped bottom of the bundle like this. (I recommend good scissors not old ones like this with a bit of sellotape stuck to them!)

Then trim the bottom of the tassel off level, including the ends of the short thread that you used to tie it up.
Thread one strand of one end of your parcel wool onto a big needle.

Poke it through the lopped end of your tassel.

Tie a little knot with the other strand of the parcel wool and then swivel it round so that the knot is hidden inside the tassel loop.

Tie a knot just above the tassel loop then repeat for the other end of your parcel wool.

Easy Peasy!
You might also be interested in:
|
|
|
|


Sunday, 15 December 2013
Here's a really quick last minute Christmas present idea.


You will need:


You might also be interested in:
I'll be linking up at all these great link parties, why not have a little look.
You will need:

A packet of Giant Chocolate Buttons
Icing sugar to make water icing or about 8 squares of white chocolate
A piping bag with a fine nozzle
Something to decorate the top, cranberries, silver balls, red/green sprinkles
I made some with icing and some with melted white chocolate, the piping bit is the same whichever you choose.
If you choose to use icing just make up a bit of water icing: half fill a little bowl with icing sugar and add water just a drop at a time, mixing really well with a teaspoon until it forms thick icing. It needs to be thick enough to not spread everywhere but not so think that you can't pipe it.
Put it in the piping bag and pipe a icing outline on the chocolate button.

Then fill it in with a rough wiggle of icing

Then just prod at it with the tip of the icing nozzle till it spreads to fill in the gaps.
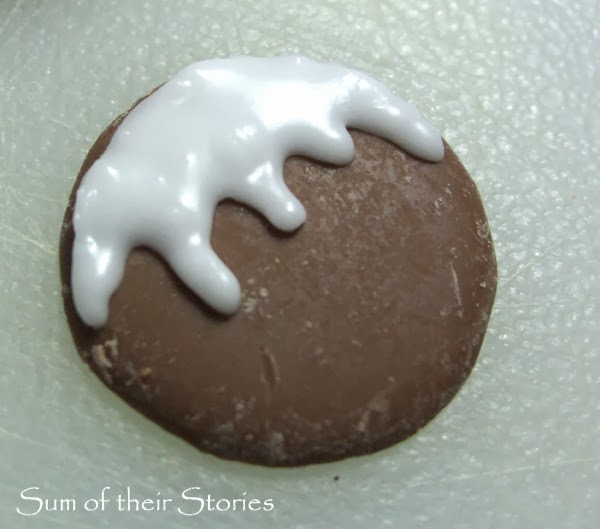

Piping chocolate and me are not BFF's however, it just solidifies in the nozzle for me! You have to be really quick so I recommend a helper to add the decoration for you if you use chocolate. I did try popping just the metal nozzle into a shallow bowl of hot water between piping's which helped a bit, I wiped it with a paper towel to dry each time but if anyone has any great tips for this I for one would be really grateful!
Now just pop whatever you fancy on the top to decorate, I experimented with a few ideas:
Mini Smarties
Silver Pearls (they are soft nowadays not rock hard like they were when we were kids)
Little round cake sprinkles (not so happy with these, the colours aren't very bright)
Little chopped bits of cranberry (looked ok but they did keep dropping off so I was forced to eat this one!)
Then I found these lovely Christmassy sprinkles in TK Max:
These are my favourites, I know the green bits are supposed to be trees but close enough for holly I think!

|
|
|
|


Wednesday, 11 December 2013
I came across this cute idea on pinterest and traced it back to the lovely Kate from Kate Hadfield Designs, She produces beautiful hand drawn designs for scrap booking, card making etc and has a lovely little selection of freebies on her site (as well as loads of gorgeous designs available to buy)
If you are young and related to me - LOOK AWAY NOW - you might be getting one of these for Christmas!


A stapler (not photographed but I guess you know what that looks like!)
Download the printable bag header from here. I had to make mine a little bit smaller as my bags were only 6cm wide. I chose to download the zip file with the jpeg version, which I opened then copied and pasted into word. Then I could resize it easily by just selecting the "format picture" tool (just right click the picture) then select "size" and pop in the size you want.
I imagine techie people across the internet cringing at this method, but it works for me (ain't broken don't fix it!)
Once it was the size I needed I just copied and pasted it until I had a page full, then printed onto card.
They came out so lovely, I'm really pleased with them.
Then you just put a few malteasers in the bag, add 1 red sweet, then fill the bag with the malteasers almost to the top.
Fold the beautiful topper in half, place over the top and staple as neatly as you can.


and made a cute card with one, adding tiny googly eyes and a sequin red nose.

I'll be linking up at all these great link parties, pop over and have a little look round at all the lovely ideas.
If you are young and related to me - LOOK AWAY NOW - you might be getting one of these for Christmas!

I pretty much followed Kate's instructions but had to make a couple of changes due to what was available in the supermarket.
This is what you need:

Round brown sweets (I have used Malties which is just the supermarket version of Malteasers)
Round red sweets (the same supermarket actually had packets of round red sweets called reindeer noses - result!)
Sweet gift bags (I could only find long thin bags for pretzels. Hobbycraft was running pretty low on stock)
Kate's lovely printableA stapler (not photographed but I guess you know what that looks like!)
Download the printable bag header from here. I had to make mine a little bit smaller as my bags were only 6cm wide. I chose to download the zip file with the jpeg version, which I opened then copied and pasted into word. Then I could resize it easily by just selecting the "format picture" tool (just right click the picture) then select "size" and pop in the size you want.
I imagine techie people across the internet cringing at this method, but it works for me (ain't broken don't fix it!)
Once it was the size I needed I just copied and pasted it until I had a page full, then printed onto card.
They came out so lovely, I'm really pleased with them.
Then you just put a few malteasers in the bag, add 1 red sweet, then fill the bag with the malteasers almost to the top.
Fold the beautiful topper in half, place over the top and staple as neatly as you can.


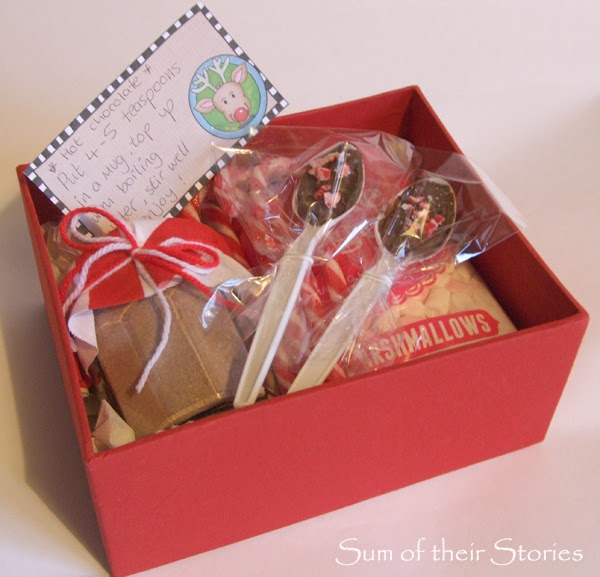
I also used the back of one these printables as a label for a hot chocolate gift box,

You might also be interested in:
|
|
|
|


Saturday, 7 December 2013
So, here is a round up of all my recycled gift wrapping ideas so far.
Just click on the photos to see the tutorial.


You might also be interested in:
|
|
|
|

Subscribe to:
Posts (Atom)
Welcome

Hello, I'm Julie. I love making things and this is where I share my enthusiasm.

Subscribe

Follow Along!


Popular Posts


Homemade Monday Link Party

Instructions: Select all code above, copy it and paste it inside your blog post as HTML
Featured

Women Get Social


My Blog Designer- Linda
