Showing posts with label Wedding. Show all posts

Wednesday, 31 August 2016

Framed Scrabble Tile Quote

Turn old scrabble tiles into a piece of art by spelling out a favourite quote.
Framed scrabble Tile quote wedding gift idea
I have another wedding gift from our summer of weddings to share with you today. I nearly called this "Another Scrabble Tile Picture" as making things with Scrabble tiles is something I've shared before. I always buy Scrabble games when I see them in charity shops but that has led to my discovery that the type of tiles they make has changed over the years. I now have a right old assortment but try not to mix the different tiles in any one project.
scrabble tiles
Basically that means I spend ages sitting with a heap of tiles trying to see what words and phrases I can make! 
This gift was for a lovely couple who like handmade and homemade (the bride made her own invitations) and their home decor is warm, cosy, country so I chose a wooden box frame and a pretty floral paper for the background.
Together is a beautiful place to be
To make something similar you need:
A box frame
Scrapbook paper
Old scrabble tiles*
Strong Glue - I used a hot glue gun
Scrap card, a pencil and masking or washi tape
A suitable quote

This whole thing is super easy to make, basically you are just glueing the Scrabble tiles onto your fancy scrapbook paper to spell out your chosen quote and popping it into a box frame - easy!

The only slightly tricky thing is getting the words central and straight.
DON'T draw pencil marks onto your pretty paper, once those tiles are glued on you just won't be able to get to them properly to rub them out.

This is what worked for me:
  • Cut your pretty scrapbook paper to the size of your box frame first then play around with the tiles until you are happy with the arrangement of words on the paper.
  • Measure the gap top and bottom of your arrangement and cut a bit of scrap card to that width - that's the blue card in the photos below.
  • Push the tiles for the top row together (it's SO much easier to keep things straight if you don't leave gaps between each tile) and mark either end on the scrap card. Shown in big ol' black arrows on the photos.
  • Tape the scrap card to the top of the pretty paper, making the word gap you've marked central. 
  • Now it's easy to glue the tiles into place, as you can push them right up against the scrap card.
  • Just make sure you remove your scrap card straight away before it gets stuck down too!
Framed scrabble Tile quote wedding gift idea
  • Repeat on the bottom, obviously leave gaps between the words as I have here!
  • Once the top and bottom rows were firmly in place I measured the gap needed between the other 3 rows in my quote and cut a strip of scrap card the right width.
  • I actually didn't mark any more for these middle lines, I just used the top and bottom lines to help me centre everything by eye. You could measure if that's your thing. 
  • It was really useful to have the card to push the tiles up against to help to keep them straight.
Framed scrabble Tile quote wedding gift idea
*If you don't have access to any old scrabble sets at the right price, maybe you could get the same effect by printing them on card and mounting them with foam pads. A quick google search should find you free printable scrabble tiles.

We gave the couple their gift a week or so before their big day so I was so honoured when we arrived at the reception to find they have used this picture as part of their wedding decorations on the top table! 
Framed scrabble Tile quote wedding gift idea
Isn't their cake topper fab! As you can see they come from 2 different parts of the world which is why I chose this quote for them.
Framed scrabble Tile quote wedding gift idea
It's so lovely when you give a handmade gift and then discover they really do like it - for real!
I've been looking for the source of this quote but I've not been able to find it to properly attribute it, I just found it on Pinterest. Please let me know if you know where it comes from.
I'll be sharing over at these Link Parties
You might also be interested in:
Wedding Gift Wrap Nespresso Boxes
Crochet Flower Gift Wrap
Personalised Wedding Picture
Simple DIY Name Canvas

read more

Sunday, 21 August 2016

Wedding Gift Wrap Nespresso Boxes

A fun wedding gift wrap idea for giving Nespresso capsules (or some other long thin boxes)
Bride and Groom gift wrap Nespresso boxes
I'm guessing that giving boxes of Nespresso capsules might be a really niche wedding gift. If you follow on Instagram you may have seen we are having a summer of weddings, we have 4 altogether, in a 7 week period! 
As you would expect I have a few wedding gift things to share. You can find a crochet flower gift wrap and romantic paper cut here, and today is quick gift wrap idea - just in case there is anyone else out there who is wanting to find a fun wedding way to gift wrap tall thin boxes.

I was inspired by something I found on Pinterest from a German Stampin' Up Demonstrators blog First Hand Emotion. They had made a Bride and Groom from tall thin boxes containing what I think is tall thin bottles of some sort of spirit. I have had to rely on Google Translate so I'm not entirely sure!
We needed to pack ours in a suitcase to take abroad so I simplified mine a little. You can check out their beautiful original idea here or pin it from here.

To make some like mine you will need:
  • white paper
  • black paper
  • scraps of white and glossy black card
  • 2 large paper doilies
  • a selection of papercrafting bits and pieces, gems, ribbon etc
Wrap your boxes, one in white paper and one in black. I only had white regular printer paper so my Nespresso box took 2 sheets to cover it.
If you are off to a traditional wedding, like we were, add details to make a traditional bride and groom as shown in the photos. But the beauty of this is that you can personalise these however you want to, so you can adapt the colour scheme, type of outfits, genders of the couple etc to suit.

The groom was pretty simple, I just cut a long thin triangle of shiny black card then added a slightly thinner triangle of white card on top. 
A teeny bowtie cut from black paper, some gem buttons and a gem flower from a broken earring finished him off.
Bride and Groom gift wrap boxes
To make the doily skirt for the bride I cut 4 shapes from paper doilies, 3 times the width of the box and half the length. My doilies were dinner plate size and I was able to get 2 from each.
I folded them over the box, then creased the sides back on themselves. The photos show this better than I can explain.
Then I just glued them onto each side of the box and added a bit of ribbon and a bow to cover the join. 
A few gems round the neck make a necklace and I added a few little flowers and gems to a punched shape with more ribbon to make the bouquet.
Bride and Groom gift wrap boxes
As we had to travel with them, we just made sure the groom was on the right so the bouquet overlapped onto that box and didn't get damaged. We put them head first (so the doily skirt didn't get creased) into a wine gift bag to keep them together and so we could add a gift tag as I didn't know where to write on them.
Wedding gift wrap Nespresso boxes
The couple loved them, they are big coffee drinkers and get a lot of use from their Nespresso machine.
I just want to apologise for the poor quality of these photos, I made them a little bit last minute and once you've given someone a gift you can't have it back for a second photo shoot!
It has just occurred to me that you could always fill tall thin boxes with something else, making this idea a little less niche "for Nespresso machine owners only" and a little more suitable for anyone.
I'll be sharing over at these Link Parties
You might also be interested in:
Button Envelope
Button Envelope
Crochet Flower Gift Wrap
Personalised Wedding Picture
Papercut Quotes
Papercut quotes

read more

Monday, 1 August 2016

Crochet Flower Gift Wrap and a Romantic Papercut

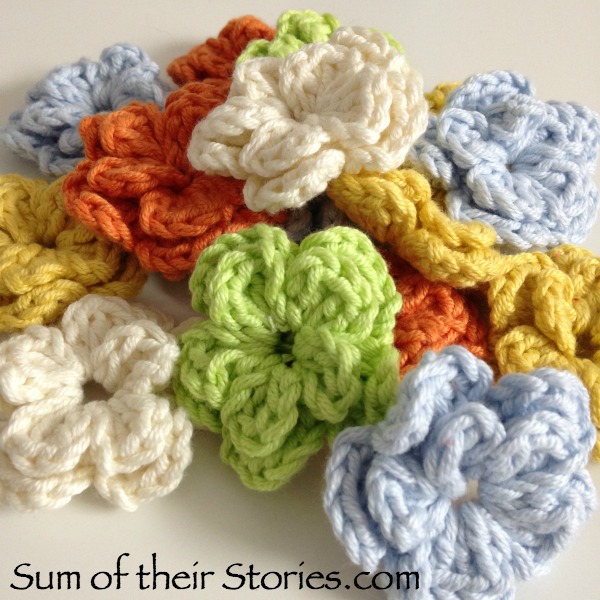
I learnt to crochet years ago especially so I could make flowers! 
Crochet flowers for gift wrapping
Fortunately I discovered you can crochet all sorts of other things but sometimes I still like to rustle up a heap of crocheted flowers.
heap of crochet flowers
This lovely free crochet flower pattern comes from Annemarie's HaakBlog. These flowers are so quick and easy, each one takes about 10 minutes. You make them with just 3 rounds and then the middle petals are turned in through the centre hole which makes them sit forward nicely.
I've made mine with DMC Natura Medium yarn which is a lovely soft cotton that is an equivalent to an aran weight I think and I used a 4mm hook. 
My flowers have ended up approx 5cm or 2" in diameter.
This is another fabulous stash buster project, you can just use up whatever little bits you have left over from other projects.

I am planning to make a flower garland like the one on Annemarie's lovely blog but I needed a pretty pastel gift wrap idea for a wedding gift. We are having a summer of weddings this year, 4 in all! (I've been sharing bit from all these weddings over on Instagram and trying REALLY hard not to overdo it!). This was for wedding no.1 and the bride is a person who enjoys all sorts of crafts so I knew she would appreciate some crochet flowers (Is it bad that I wouldn't waste them on someone who wouldn't appreciate them???!)
I made them in the same way as the pattern but left a long tail at the beginning and again at the end, about 25" or so. You would have to vary that depending on the size of the gift.
Crochet flowers ready for gift wrap
When you finish one of these flowers the ends are both in pretty much the same place, the back looks like this:
To use these for gift wrapping I wanted the flowers to lay flat and the ends to be opposite each other, so I simply threaded one end onto a needle and through some of the loops on the back like so:
Then it was just a case of wrapping them twice round the wrapped gift and securing each one in a bow on the back. I did these one at a time, the ends are pretty long and it would be easy to get in a tangle it you tried to do them all at once!
Crochet flowers used or gift wrap
Photo credit C Nyanyo
We gave a jar of sweets too with a roll of card in the middle with money inside (which was the proper present) so to co-ordinate everything I added a flower to the jar too.
Crochet flowers used for gift wrap sweets in a jar
Photo credit C Nyanyo
The original idea of the sweets and roll of cash is one I saw on pinterest here years ago.
Crochet flowers for gift wrapping
Photo credit C Nyanyo
The card is just a little doodled thing inspired by several pretty doodles and designs l've pinned recently.
Crochet flowers used in gift wrapping
Photo credit C Nyanyo
The gift wrap paper I used was just white tissue paper so it has creased a little at the edges, if I were doing this again I would try to find a thicker, crisp wrapping paper.
The present inside was this papercut. 
Home is wherever I'm with you papercut
Anyone who follows on Instagram will have had a sneaky peek of this already. It's the bride and groom's favourite line from the song "Home" by Edward Sharp and the Magnetic Zeros, with their initials and the wedding date tucked in at the bottom.
papercut wedding gift
It's not perfect by any means but it was made with love.
This wedding had so much prettiness going on, with a pastel colour scheme which I'd tried to match with the crochet flowers and sweets. So I'll finish with just a tiny glimpse of some of the loveliness from the day:

 
I'll be sharing over at these Link Parties
You might also be interested in:
Rainbow Heart Garland
12 Ideas for Novelty Yarns
12 ideas for novelty yarns
Personalised Wedding Picture
Papercut Quotes
Papercut quotes

read more

Friday, 24 July 2015

Wedding Day Emergency Kit

When my lovely friend and colleague got married a little while ago I gave her an emergency jar full of little things she might need on the day.
decorated jar for a wedding day
Back in February I'd seen a couple of really beautiful wedding gifts using jars by Desiree at 36th Ave, check her's out here and here, they are just gorgeous. Now I look again, mine are nothing like Desiree's masterpieces. I improvised and used what I had, let's just say I was "inspired by" rather than actually attempting to recreate!

Really what I did here was a tweak of the Gold Heart Pot I made for my makeup brushes, I did this at the same time using mostly the same materials.

To make one you need:

  • A jar with a lid. Mine was just an old chocolate spread jar. Another time I would use a bigger jar, it was hard to fit everything in here that I wanted to
  • Gold spray paint
  • A sticker, mine was a heart
  • Washi tape or low tack masking tape
  • Paper
  • Ribbon or thread
  • A button with a shank
  • Strong glue - mine was superglue
  • Small bits and pieces you might need on your wedding day
I washed and dried the jar then prepared it in the same way as the Gold heart Pot. A sticker in the middle and washi tape to secure paper to the top.
As my jar had a ridge top and bottom I used that as a guide and used the washi tape and paper to mask off the top and bottom areas.

The whole thing got a coat of gold spray paint.

Then I peeled off the washi tape and sticker. The lid also got a spray of gold but apparently I didn't take any photos.

As the wedding had a blue colour scheme I made a simple tag in Picmonkey, you can right click on the image below and save it to your computer if you'd like to use it, but it is very easy to make your own.

Once I printed and cut that out I assembled the contents.

You can include whatever you like, depending on the size of your jar. I added:
Mini deodorant
Breath freshener
Tissues
Sample size perfume
Lipstick
Lip balm
Sewing kit
Headache tablets

I attached the gift tag with blue twine and then as a finishing touch glued a sparkly button to the lid. I chose one with a shank (I think that's what you call that sticking out bit) so it would stick up and form a knob of sorts.
If I do this again I would use a bigger jar, just so I have more options with what to include. I would also think ahead and find a small drawer knob or similar to use instead of the button. I think the button is ok on this small jar but would be too small on a larger jar. 
decorated jar for the bride
You might also be interested in:
Gold Heart Pot
Gold Heart Pot
Rings and things dishes
Rings and Things Dishes
Plastic Tub Planter
Plastic Tub Planter
Personalised Wedding Picture
I'll be linking up to all these great link parties, why not go and have a look!

read more