Showing posts with label Home Decorating. Show all posts

Wednesday, 11 October 2017

Easy DIY Abstract Art

You really don't need lots of mad artistic skills to make a passable piece of abstract art for your home.
Easy DIY Abstract Art
This post contains affiliate links. This means if you click through and make a purchase the cost to you will be the same but Sum of their Stories will receive a small commission.
Our dining room has needed a something to go on the wall in a big ol' space for the 2 1/2 years since we moved here. 
I finally found a suitable old canvas in a local charity shop to paint over and last week I got to work. It's really easy and quite a lot of fun to make your own art and if you don't like it or get tired of it after a while you can just paint over it!

To make you own DIY Abstract Art you will need:

A canvas - buy new or pick up one in a charity shop or garage sale maybe
Household emulsion paint (latex)
Spray and/or acrylic paint in your choice of secondary colours 
A couple of brushes, nothing special - just use what you have
Ideas - pinterest is your friend here, I've a board of ideas to get you started.

I found this red canvas for £4, it's about 24" x 31" (61cm x 79cm) - perfect.
The first thing you want to do is get rid of any colour you don't want. 
I wanted our new art to be shades of white & grey with a touch of blue and pink. So I painted the whole canvas with 2 coats of regular household emulsion paint (I believe you call it Latex in the US)  
Now you are going to create your masterpiece. 
It's all about splodging on layers of paint until you are happy. How you do this will depend on the look you want and the paint you have.
I had a very small bit of spray paint left over from something else in the perfect shade of blue so that's where I started.
It may be hard for you to believe but this is not the final look I was going for!!! My husband pulled a doubtful face at this point, I don't blame him!
You can see I also had a teeny tiny bit of silver spray paint hanging around so I squirted that on too. If I had had more silver I think I would have done much more of that and much less of the blue. But this is ok, because we are working in layers these early stages don't really matter too much. Just keep going!

Next I mixed my grey acrylic paint with the emulsion (latex) and just painting in on randomly. I gave the middle a bit of interest with a band just the grey on it's own and a bit of a line up the right side. I just left a few bits of blue showing properly, but there are a few areas where the white/grey mix is pretty thin and the blue shows through lightly. 
Once you have the bare bones like this I'd recommend letting it marinate. You want to leave it to dry anyway, but give yourself a day or so to look at it again with fresh eyes. 
I decided this needed to be lighter all over and it needed some proper points of interest. 
I added a few areas of pink, a few grey and white lines with the finer brush. It was all very add hock, just a few bits here and there. Stand back every now and again, make a cuppa then return to your art and see what you think it needs more of. 
Just keep going with random blocks, lines or even dots and whirls if you like. Stop when you think it's enough.

To finish I used the larger of my brushes, with just the smallest amount of white paint to go over most areas. This softened the whole thing and lightening up some of the areas that felt too dark.
You can see here how the almost dry brush softens the pink area.
This is probably the busiest part of the artwork. Those lines through the white blob were done with the thinner brush and grey paint whilst the white shape underneath was still wet, to give a variable effect.
You can see the almost dry brush effect in this close up too.

And here it is in all it's glory in situ.
Make your own abstract art
I'm sure the light balance is all off in this photo, the sun was streaming in the window - hooray! But it gives you an idea. One day I'm going to paint those wooden chairs white. 
You can also see my globe makeover and where it lives ....
... and those are my Autumn Apothecary jars on the table 

I really enjoyed making my unique piece of abstract art and as a complete bonus, I hardly spent a thing. 
Make your own abstract art
The main rule seems to be there are no rules, it's art so you can do what you like. 
Easy DIY canvas art
If you paint a bit and the next day decide you don't like it you can just paint over it. Have fun, I can honestly say it was much easier than I thought it would be to create something that's not embarrassing to hang on the wall. Do you fancy having a go?
 

read more

Saturday, 16 September 2017

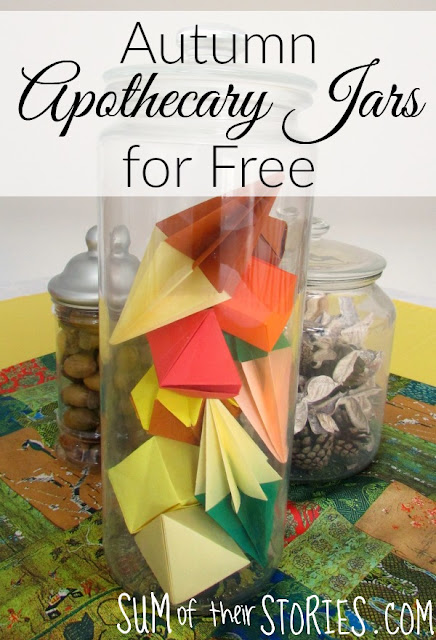
Autumn Apothecary Jars for free

Introducing just a little autumn or fall decor into your home for free (or almost free)
Today I'm delighted to be joining a lovely group of creative bloggers to bring you the We are Pinnable Blog Hop - Celebrating Fall. More of that later.
I'm not much of a one for lots of 'changing with the seasons" decor. We have Christmas decorations that go up each year and until recent that was about it. Then I was given a glass jar from Ikea which I assume is supposed to be for spaghetti and thought it might be fun to have a little seasonally changing apothecary style arrangement for the dining table. I sourced a couple more jars very cheaply (charity shop and old sweet jar) and this summer they have looked quite pretty in a floral sort of way.
I was very inspired a couple of weeks ago by Leanne from Faeries and Fauna who had shared a whole load of Autumn/Fall ideas to fill jars like these. Check all those ideas out here.
I wanted to fill my jars for free if possible and I almost managed it!
First I went on a foraging mission. We have a small wood nearby so me and my carrier bag went for a walk. I was hoping for conkers but this wood has no horse chestnut trees apparently. Never mind, what it does has is a whole load of oak trees so there were acorns everywhere. I also found some pine cones, not quite as many as I had hoped but some at least.
Things like this can be full of bugs so I spread them all out on a foil covered baking tray and gave them 30 minutes in a hot oven (200c) 
The smell is not as pleasant as you might hope! Not awful but not delightful either. 
The green acorns went a little bit brown in the heat and all the cups fell off.
I threw away the ones that had split and, feeling a bit ridiculous (and hoping no one in the family would walk in and see what I was doing) I used my hot glue gun to stick the cups back on to the acorns.
It worked though, they look cute and very Autumnal! 
As I didn't manage to collect enough pinecones I just mixed them in with some leafy looking pot pourri I already had. I might go on another pine come quest again later. Next time we have some really windy weather I pop out and see what has fallen.
2 down, 1 to go!
My original idea had been pinecones in the tall jar, conkers in the short fat jar and acorns in the little jar. With slim picking of pinecones and a total lack of conkers it was time for a new idea.
I'd been teaching our middle son to make origami cranes the other day and on the TV show Create it Yourself they had filled a Bell jar with origami shapes, so autumnal geometric origami seemed like a plan.
I used coloured paper from old envelopes, I just trimmed them to squares of various sizes.
I used a whole load of Youtube tutorials, some were easier to make than others.
OctahedronCubePaper Diamond (this one is in French and I got in a bit of a hot mess with the glueing but I think that was more me than the tutorial!)& Pyramid.
This one is called Diamond and I found the first one was tricky to put the two colours together, but once I got the hang of it, it was super easy and one of my favourites.
My other favourite is this one, the Fox Box. It uses 3 little squares and was really easy.
Once you start looking on YouTube you can find dozens of great tutorials, these are just the few I found with a quick 'geometric origami' search.
So there it is, I managed to fill these 3 jars ALMOST for free! 
I'm on the lookout for fancier apothecary jars each time I visit a charity shop as these are pretty basic looking. But we are doing this for free/almost free, using what we have instead of always buying new so for now I'm happy!
Update & what can go wrong: 
I found some conkers, just bunged them in the pinecone/pot pourri jar as they were and a day later this had happened:
Turns out drying these kind of things out in the oven first is really important! Especially if you have jars with lids. I've since dried them in the oven in the same way as the acorns and all is well.

Now it's time to see all the other 'Celebrating Fall' projects and ideas:

read more

Wednesday, 12 July 2017

Christmas Ornament Recycling

Got an old broken Christmas bauble? Here's how you could turn it into an all year round decorative ball.
Up date a broken Christmas ornament for all year round
What are these things called? Decorative balls, deco balls, ornamental spheres? I'm not sure but I know lots of people like to have a dish of them on the mantelpiece or side table.
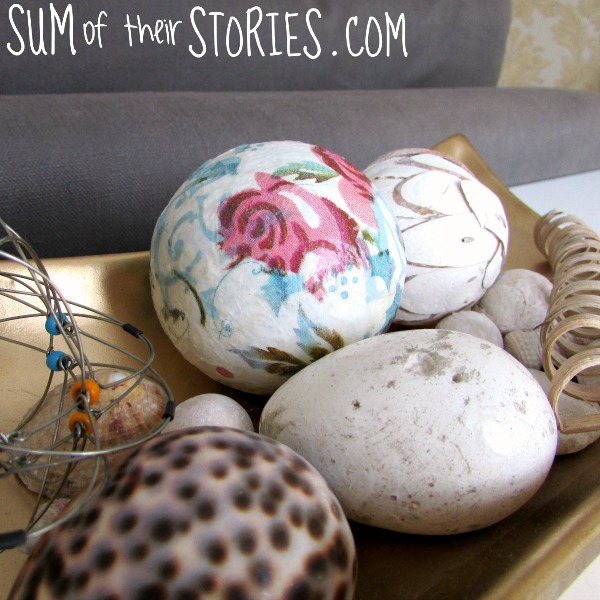
We have a decorative dish with miscellaneous bits and pieces collected over the years so when one of our larger Christmas baubles had lost it's hanging bit, rather than just throwing it away, I gave it a little makeover so it can be on show all year round.
upcycle a broken christmas ornament
It was really simple, cost next to nothing and looks pretty.

To do the same you will need:

An old Christmas bauble or similar sphere (I guess you could splash out and buy a polystyrene ball at a push)
Mod Podge or PVA glue
A paper napkin/serviette
A paint brush
White paint
A cocktail stick or skewer
christmas ornament upcycle
Rip your paper serviette into pieces.
Stab the ornament with the cocktail stick to form a handle, then paint the whole thing with white paint and let it dry.
This give a nice base for the floral serviette, if you miss this step the colours from the old ornament can show through a bit.
Next apply a layer of Mod Podge and apply the pretty floral paper serviette pieces. As the serviette is very flimsy just dab it on, don't fuss it too much. Less is more here!Christmas ornament recycling
Finally cover with another layer of mod podge to seal and leave it to dry. I stabbed mine into my pin cushion as you can see.
Once it's dry remove the cocktail stick and you are ready to pop your new decorative ball/sphere on display.
Christmas ornament recycling
Our bowl has an eclectic mix, some bits of pot pourri, shells, beads, a metal wire mandala relaxation thingy (that I bought in a street market in Saint Tropez in 1986 and thought was the coolest thing ever!) and a wooden egg that belonged to my nan. No idea what the wooden egg was for but I like it! 
Christmas ornament recycling
recycle broken Christmas ornaments to enjoy all year round
These are affiliate links, if you make a purchase when clicking through from here Sum of their Stories will receive a small commission. The cost to you is the same.
Shop this post UK:


Shop this post USA:

read more

Wednesday, 14 June 2017

Mandala Painted Sewing Box

I'm really excited to share this sewing box makeover with you today. It's been on my 'to do' list for a few years so I'm happy it's finally done and that it turn out as well as it did. 
Mandala Painted Sewing Box
This sewing box belonged to my mum, I think she had it as a wedding present back in 1967. Growing up it was always in the corner, stuffed full of sewing bits and pieces. I remember we always used it as an extra seat at the dinner table at Christmas and other family get togethers too. 
It had definitely seen better days, the legs were very scuffed and the top was quite badly scratched and watermarked. I use it as my sewing box now and it sits in the corner of our dining room which is all whites and greys so it looked a bit out of place. Time for a makeover.
sewing box before its makeover
I unscrewed the hinge, took the lid off and the "don't open too far" chain thing, gave it a good clean and a light sanding.
The green fabric lining inside was ok and so I didn't even try to remove it. I just taped it up carefully and painted the sewing box with 3 coats of Painter's Touch Satin paint.
Once it was all put back together it already looked much better.
Mandala Painted Sewing Box
sewing box makeover
I wanted to do something a bit fancy on the top and after a little thinking time I decided on a simple mandala.  
I drew some circles with a soft pencil, just drawing round a mug, a saucer and a plate, then filled in a mandala pattern. You can see a more comprehensive tutorial about drawing mandalas here.
I've not balanced the colours on these photos - it is all the same thing, honest! - but any messing about made it impossible to see the pencil lines!
Mandala Painted Sewing Box
I painted the lines with a grey acrylic paint and a fine paintbrush. The finished mandala is clearly hand painted, it's not perfectly symmetrical or even but I like that. If you wanted to try a more perfect look or were just not confident to draw your own design then a stencil would be a good way to go.
Mandala Painted Sewing Box
The sewing box has a tray that sits on the lip inside. No 'before' photo I'm afraid but it was the same wood as the main box. It had 3 coats of the same Painter's Touch satin paint.
sewing box tray
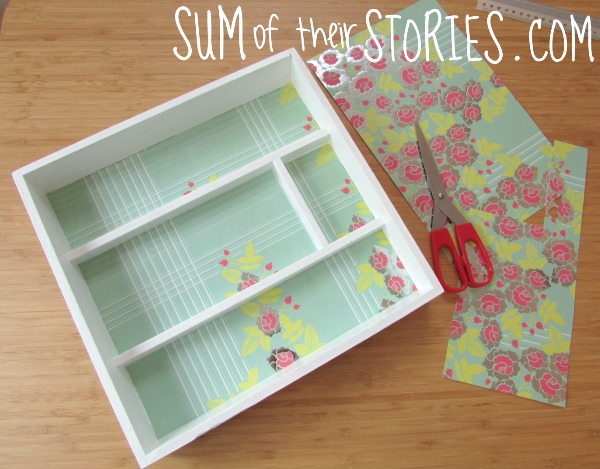
I lined the base with some scrapbook paper. I didn't stick it down, this way I can change it easily if it gets grubby. 
sewing box makeover
I needed something to keep my sewing machine bobbins under control so I took a small cardboard box (this one had had pritt glue sticks in it) cut it down and covered the 2 halves in the same scrapbook paper.
bobbin storage
Ta-dah! This is as tidy as my sewing box has ever been, or is ever likely to be!
sewing box makeover
Sewing box makeover
I'm so happy with how this turned out. I was a bit worried that I might mess it up and wish I'd never started but no, all is well.
Mandala Painted Sewing Box

read more