Showing posts with label papercutting. Show all posts

Wednesday, 5 July 2017

Upcycled Gift Box

It's really simple to give an old gift box a new look with just a magazine and some glue.
Easy upcycled gift box
If you are a 'keeper' like me you will have a small stash of little boxes that are just too good to throw away! Maybe they had jewellery, a watch, a mug or new gadget in them, some packaging is just too good to just throw out ... and here is an easy way to make it pretty.
easy floral upcycled gift box


What you need is:
An old box, this one had jewellery in it originally
An old magazine or seed catalogue
Mod Podge or similar pva glue
A craft knife (you could use scissors at a push)
A brush for the glue

Select a suitable image from the magazine, my magazine was last month's Mollie Makes which had these gorgeous paper flowers in it. Rip the page out and then using a craft knife cut out the image.
magazine cut out for upcycled gift box
Be fairly careful but you don't have to be mega precise, especially if the flowers have wiggly petals like these. Do a few if you can, options are nice.
Now experiment for a moment selecting which image fits best on your box. I wanted to cover the marks and the writing on mine of course so turning the box sideways helped with the flower placement.
easy floral upcycled gift box
Cover the top of the box with a thin layer of Mod Podge, apply the flower then cover with another layer of the glue. It will crease or air bubble a little, that's ok. Smooth it with the brush as best you can but don't overdo it. Magazine paper is pretty thin and you don't want to rip it. 
You can see that a little of the stem went over the edge of the box here, I think that's a nice detail. You just glue that down in exactly the same way.

Just leave it to dry and ta-dah! You are done. What a pretty gift box you have made. 
easy floral upcycled gift box
I loved this so much I found a few more bits & pieces to stick my magazine paper cut outs onto. 
easy floral upcycled gift box
I covered the foam inside the old jewellery box with a little matching fabric too, just to make it more pretty.
easy floral upcycled gift box
I love the big bold flowers on the dark background especially. I think I'll start saving seed catalogues for more big floral cut outs. 
These are affiliate links, if you make a purchase when clicking through from here Sum of their Stories will receive a small commission. The cost to you is the same.
Shop this post UK:
Shop this post USA:

read more

Wednesday, 21 December 2016

Yoda Snowflake attempt

Last year on a dull day in December when I should have been doing a whole number of things, I sat with a cup of tea had a go at making a Star Wars paper snowflake instead. When shared it on my personal facebook page some of my friends seemed interested to know how so I thought you might to see too.
Yoda snowflake
I downloaded and printed a template from Anthony Herrera Designs and got to work. There is a great little video too that is worth watching before you start, with some info about how to fold the paper and tips on cutting out.

I could have made a whole blizzard of regular paper snowflakes in the time it took to make this, but who wants a whole blizzard when you can have a Yoda snowflake?

You make these with regular printer paper and sharp scissors but you also need a good sharp craft knife. This is not something for young kids to do in the holidays!

The most difficult bit was the internal shapes like the eyes and mouth as there are just so many layers to get through. I found it helped if I cut the shape with my knife, lifted as many layers as I could then cut again, repeating 3 or 4 times.
I did tweak mine a little and joined Yoda's ears up, on the template the are not.

My precious Yoda snowflake got packed away with the decorations and by a miracle was still intact when we got the deckies out again this year. I've run it through the laminator, after all my hard work I hate the thought of it getting ripped.
Yoda snowflake

Now it's taped to the window for all the world to see. (Well, the people who walk down our street anyway!) The street light makes one Yoda really glow at this angle.
Yoda snowflake
There are some Frozen Paper snowflake designs over on Anthony Herrera Designs too if that's your sort of thing as well as Guardians of the Galaxy and Harry PotterI really love the Groot and baby Groot snowflake designs in the Guardians of the Galaxy collection ..... next time I have another "not really spare" moment I'll have to have a go!

read more

Saturday, 5 November 2016

Papercut Christmas Tree Picture

Make a unique piece of Christmas art for your home with paper and a craft knife. It's not especially difficult, simple drawing skills and then quite a lot of patience is all that's needed!
Papercut Christmas Tree Picture
I made this picture for our home last year but it was too late to share it with you then as it was almost Christmas day itself by the time I finally finished it! 
If you'd like to make a papercut like this for your home or as a gift, I would suggest starting it now. 
Papercutting is a lovely, almost magically craft. It's very soothing to do, quite meditative but one thing it is not is quick!

To make your own picture you will need:

  • A frame
  • Paper or thin card to fit your frame, one in your main colour and one to go behind.
  • Scrap paper to practice your design
  • A soft pencil
  • A craft knife and spare blades. I have an xacto knife and used 3 blades on this picture.
  • A cutting mat
First you need a design. I sketched a few on scrap paper.
Papercut Christmas Tree ideas

These are just sketched ideas, they need developing into proper designs, but they might spark your imagination. 
Keep it fairly simple, remember the more complicated the design is the longer it will take to cut out. All your lines must touch another line, or when you cut big sections will just fall out. 
Where you have a line, that is what will be left behind. Consider using little joining lines if necessary. 
That's why I introduced the stars and baubles into my swirly design, once I was drawing in the large scale I wanted to join swirls in an interesting way, add another design element.

Once you have decided what you are doing trim your paper or thin card to fit your frame.
I used a 110gsm card, this is a little it thicker than I would normally use for a papercut but it was all I could get in the large size I wanted. The thicker the paper the harder it is to cut and the more blades you will get through.

Now draw you design onto the back of the paper using your soft pencil. I would recommend measuring from the top bottom and sides just to make sure it is central. Use a ruler for straight lines and don't press too hard, you want to rub it out if you go wrong or change you mind.
Take your time on this step, make sure you are happy before you start cutting. pencil lines are temporary, knife cuts are permanent!

Now you just need to cut it out.
Choose a starting point and just work from there. You are cutting either side of the lines you have drawn - to remove the little shapes that are formed between the lines.
Papercut Christmas Tree Picture in progress
In real life my pencil lines were not so bold. I could see them easily but the paper has a slight sheen so they didn't show up on the photo. I've done a little post production editing just so you can see them.
As you can see from my close up my papercutting is not awesome. The curves are not completely smooth. I'm ok with that. The finished picture is exactly what I hoped for and no one is looking at it with a microscope.
Papercut Christmas Tree Picture in progress
The thing I love most about papercutting is how the design appears like magic. It's hard to stop yourself from regularly picking up your work, turning it over and holding it up to the light. It just looks so good as it gradually appears. 
When all the paper cutting is done, I think you should turn your beautiful work of art over and spend at least 10 minutes admiring it! 
All the pencil marks are on the wrong side of the paper so under NO circumstances should you try to rub them out when you are finished. It's just not worth it, no need at all and you risk ripping your papercut. I've done it, it was awful, just don't do it!

Pop it in the frame with a contrast paper behind and you are done.
Papercut Christmas Tree Picture
I chose the red paper for my papercut but I think it would look good on white paper with a colour behind it too. Maybe even a pattern behind if your paper cut in very simple and have large pieces removed.

I started this last year on 25th November and did it little and often, whilst the dinner was in the oven etc. I finished on 17th December (thank you Instagram for the dates, I shared a little of the process there last year)
Papercut Christmas Tree Picture
I'm so pleased with how this papercut turned out, so I'm really looking forward to getting it out again in a few weeks (no Christmas decorating here till December) One day I might paint this frame but I'm not sure if it should be gold or silver. Gold would be nice in our living room, but silver would be better in the dining room (which is where it is in these photos)
What do you think? 
You might also be interested in:
Sequin Christmas Tree
Framed Christmas Tree Print
Wooden Christmas Gift Tags
Christmas Pudding Chocolate Buttons
I'll be linking up at these great link parties, where you can find loads of lovely ideas.

read more

Monday, 1 August 2016

Crochet Flower Gift Wrap and a Romantic Papercut

I learnt to crochet years ago especially so I could make flowers! 
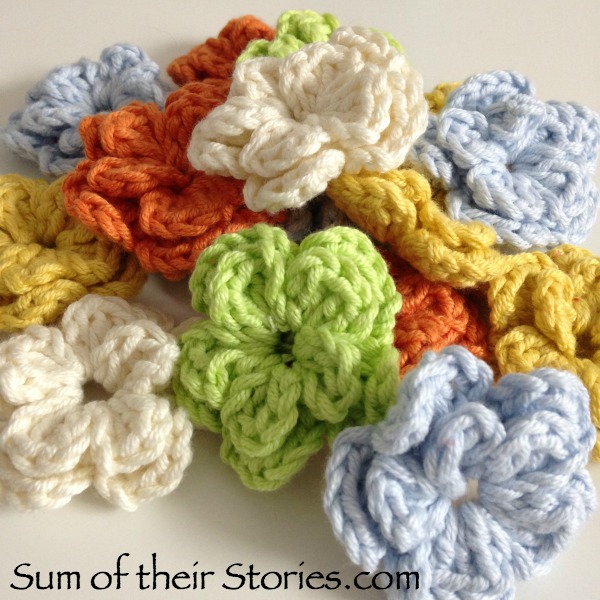
Crochet flowers for gift wrapping
Fortunately I discovered you can crochet all sorts of other things but sometimes I still like to rustle up a heap of crocheted flowers.
heap of crochet flowers
This lovely free crochet flower pattern comes from Annemarie's HaakBlog. These flowers are so quick and easy, each one takes about 10 minutes. You make them with just 3 rounds and then the middle petals are turned in through the centre hole which makes them sit forward nicely.
I've made mine with DMC Natura Medium yarn which is a lovely soft cotton that is an equivalent to an aran weight I think and I used a 4mm hook. 
My flowers have ended up approx 5cm or 2" in diameter.
This is another fabulous stash buster project, you can just use up whatever little bits you have left over from other projects.

I am planning to make a flower garland like the one on Annemarie's lovely blog but I needed a pretty pastel gift wrap idea for a wedding gift. We are having a summer of weddings this year, 4 in all! (I've been sharing bit from all these weddings over on Instagram and trying REALLY hard not to overdo it!). This was for wedding no.1 and the bride is a person who enjoys all sorts of crafts so I knew she would appreciate some crochet flowers (Is it bad that I wouldn't waste them on someone who wouldn't appreciate them???!)
I made them in the same way as the pattern but left a long tail at the beginning and again at the end, about 25" or so. You would have to vary that depending on the size of the gift.
Crochet flowers ready for gift wrap
When you finish one of these flowers the ends are both in pretty much the same place, the back looks like this:
To use these for gift wrapping I wanted the flowers to lay flat and the ends to be opposite each other, so I simply threaded one end onto a needle and through some of the loops on the back like so:
Then it was just a case of wrapping them twice round the wrapped gift and securing each one in a bow on the back. I did these one at a time, the ends are pretty long and it would be easy to get in a tangle it you tried to do them all at once!
Crochet flowers used or gift wrap
Photo credit C Nyanyo
We gave a jar of sweets too with a roll of card in the middle with money inside (which was the proper present) so to co-ordinate everything I added a flower to the jar too.
Crochet flowers used for gift wrap sweets in a jar
Photo credit C Nyanyo
The original idea of the sweets and roll of cash is one I saw on pinterest here years ago.
Crochet flowers for gift wrapping
Photo credit C Nyanyo
The card is just a little doodled thing inspired by several pretty doodles and designs l've pinned recently.
Crochet flowers used in gift wrapping
Photo credit C Nyanyo
The gift wrap paper I used was just white tissue paper so it has creased a little at the edges, if I were doing this again I would try to find a thicker, crisp wrapping paper.
The present inside was this papercut. 
Home is wherever I'm with you papercut
Anyone who follows on Instagram will have had a sneaky peek of this already. It's the bride and groom's favourite line from the song "Home" by Edward Sharp and the Magnetic Zeros, with their initials and the wedding date tucked in at the bottom.
papercut wedding gift
It's not perfect by any means but it was made with love.
This wedding had so much prettiness going on, with a pastel colour scheme which I'd tried to match with the crochet flowers and sweets. So I'll finish with just a tiny glimpse of some of the loveliness from the day:

 
I'll be sharing over at these Link Parties
You might also be interested in:
Rainbow Heart Garland
12 Ideas for Novelty Yarns
12 ideas for novelty yarns
Personalised Wedding Picture
Papercut Quotes
Papercut quotes

read more

Friday, 27 May 2016

Cath Kidston Notepaper Bangle

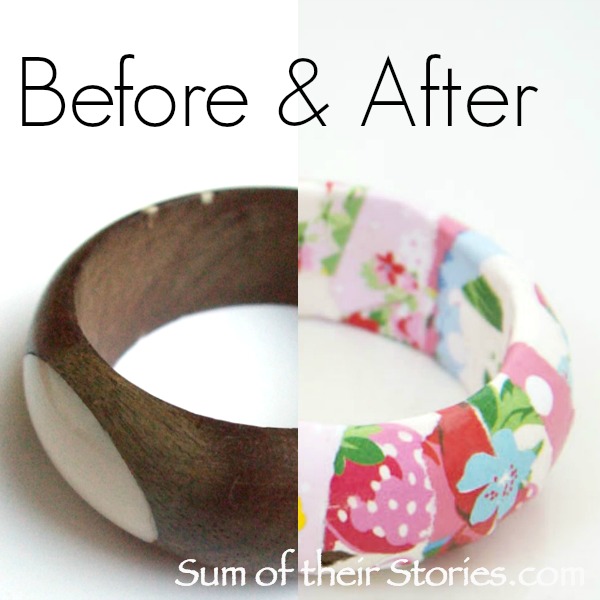
I love Cath Kidston's beautiful designs so used some scraps of pretty floral notepaper to makeover an old bracelet.
Cath Kidston Notepaper Bangle makeover
About a year ago I was a guest over on The Pinning Mama with this tutorial, but when I wore this bracelet the other day and shared it on Instagram as part of Me Made May I thought it was high time I added it here too.
It all started when I fell over a wooden bangle in a charity shop for 50p.
old wooden bangle
Some of the cream coloured bits were chipped and the wood was a bit discoloured so it was perfect for a makeover.
My first thought was to cover it with comics, a bit like my pen pot
Then I saw something similar done with pages from a book, which was lovely, except I thought it would have to be a book I love and I just can't bring myself to ruin a book on purpose! It would only be ok if the book was already falling apart. What does it say in A Series of Unfortunate Events? - "there are few sights sadder than a ruined book". I'm not sure that is strictly true but still...
I found some old sheet music which might have worked but then I remembered I had some beautiful Cath Kidston writing paper.
I had already used a lot of this for other crafts, you can see the little scrappy bits on the left in the box. Perfect.
Do you want to make one? This is what you will need:
  • An old bangle
  • Scraps of paper
  • Mod Podge or PVA glue
  • Fine sandpaper
  • Spray Sealer (optional but highly recommended)

First I gave the bangle a quick going over with sandpaper, just to rough it up a bit.
Then I tore a load of the pretty papers into long strips.
I started sticking the strips onto the bangle with Mod Podge. I spread glue all over the bangle, stuck the paper on then spread another layer of glue over the top.
If any of the bits were more than 1 cm wide I gave them a few little tears sideways to make them curve round the bangle better. 
When it was almost all covered, leaving a gap of an inch or two I left it to dry hung up on a chop stick.
Cath Kidston decoupage bangle
Once it was dry (about an hour) I covered the gap with more paper strips and left it to dry again.
Whilst I was waiting I cut some flowers from more paper scraps using my craft knife. 
paper cutting flowers for a decoupage bangle
Then I glued them on any parts of the bangle that I thought were a bit plain or where there were any little creases to cover.
Once this was all dry I gave the whole thing a few layers of clear sealer spray.
spray sealer for a decoupage bangle
This stuff kind of stinks so I did this out in the garden.
You don't have to use the sealer but I've found I can wash my hands without having to worry about getting my bangle splashed. I've had this bangle a year now and have worn it often. This photo from instagram was taken just last week and as you can see, no peeling or damage at all.
DIY floral bangle
So on reflection I would recommend at least 2 layers of sealer of some sort if you want your bangle to last.

Cath Kidston Notepaper Bangle makeover

Cath Kidston Notepaper Bangle makeover

easy diy bangle update
Do you have an old bangle that could do with a pretty paper makeover? What kind of paper would you use?
All the top quality photos in this post were taken by our daughter, you can find her website here
You might also be interested in:
3 Pink Bracelets
3 Pink Bracelets
Cluster Drop necklace
Cluster Drop Necklace
Easy Bead Necklace
Easy Bead necklace
Fabric Twine Bracelet
I'll be linking up at these great link parties,

read more