Showing posts with label Felt. Show all posts

Wednesday, 15 November 2017

Inspired by - Felt Scrap Garland

Use left over felt scraps to make a upcycled Christmas garland. 
Upcycled felt Christmas garland
This post contains affiliate links, if you click through and make a purchase then the cost to you is the same but Sum of their Stories receives a small commission
Today I'm sharing another project inspired by another fantastic blogger - part of my "Inspired by" series. This time it's a lovely felt garland made from felt scraps inspired by one I saw a couple of years ago over at Pillar Box Blue.
What I love about this project is that it uses the teeny tiniest scraps left over from all my recent felted jumper projects. 
It's super simple. Take little left over bits of felt, cut them into pieces approx 1" square and then thread them up to make a garland.
I've been on a bit of a 'felting old jumpers and cardigans' crazy recently and have been making all sorts of things with the felt. I've already shared a few here, some felt flowers & these felt lavender bag houses and I have quite a few more to come. What this has generated is a lot of tiny scraps and I was really pleased to remember this garland idea.
It was so quick to make up and saves all the little pieces from the bin. Yay! 
Upcycled felt Christmas garland
I used a Green Pearl Thread and made my garland about 145cm/57" long (plus the tassels) . It actually gets pretty heavy so this feels long enough.
I finished the ends of my garland with a few beadsand a tassel made from more of the embroidery thread.  
Upcycled felt Christmas garland
You can see the felt from my felted jumpers and cardigans came out in different thicknesses, that doesn't matter at all for this project. Not all my pieces were perfectly square either, I used every little corner so as to not waste a scrap! 
Upcycled felt Christmas garland
Pillar Box Blue has a lovely bauble idea too along the same lines if you want more options, check out it out here.
I wanted something to use up my tiny felt scraps - job done! 

read more

Wednesday, 4 October 2017

10 ways to make Felt flowers

Simple and beautiful flowers made from felt.
10 easy ways to make flowers from felt
It's really easy to make brooches and corsages from old felted jumpers and cardigans, but with so many different ways to make them it can be confusing. So I've been testing out various methods to see which I like best.
This is what I started with, the scissors give some sense of scale, this cardigan had shrunk down pretty small!
felted cardigan repurposed into felt flowers
I cut the cardigan along the seams so I could see what useable pieces I had.
Then, with the help of my pinterest board, I just started making flowers

The Rolled Rose
10 easy ways to make flowers from felt

This one is fun and fairly difficult to get wrong. 
Draw around something round, a side plate or lid of something is ideal.  
Cut out the circle and the cut a spiral, leaving a bit of a round in the middle. I forgot to photograph this stage so you have to manage with a picture instead!
 
Now roll the spiral up starting from the thinnest point, the outside of the circle. You can glue every few cms with a hot glue gun or stitch the layers together with thread the same colour.
When you get to the end, the round in the middle forms a nice tidy base. Glue or stitch round it.
Then you can add a brooch fastening or glue or stitch it to something else.

Rolled Rose take 2
10 easy ways to make flowers from felt
This rolled rose is the same as the one above except this time it was a little bit smaller and the spiral cut was wiggly.

Simple Embroidery

10 easy ways to make flowers from felt
This time I made 2 flower patterns. The larger is 9.5cm in diameter and the smaller one 6.5cm. 
Take a piece of scrap paper and fold it in half.
Fold in in thirds, then mark just over 4.5cm from the point and 2.5 cm on each side. 
Draw a curve joining all the points and cut out.
When you open it out you should have a flower shape with 6 petals. 
For the smaller flower just make your marks 3.75cm and 2cm from the point respectively.

Cut out 2 large and 1 small flower.
Embroider using 2 strands of embroidery thread as takes you fancy on the petals then use french knots through both layers to join them together. Just don't waste too much time on embroidery that won't be seen on the larger flower underneath.
To finish it off I used the 2nd of the larger flowers and stitched the 2 together using a navy blue sewing thread and an oversew stitch to cover the back neatly and added a brooch pin. 

Gathered Rolled Flower

10 easy ways to make flowers from felt
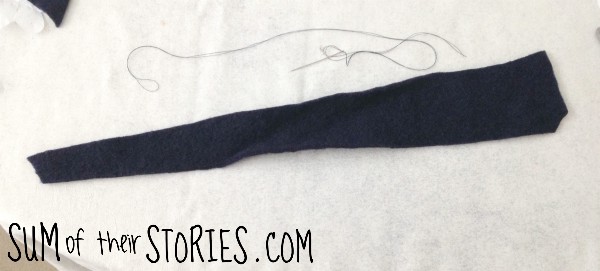
I tried this out to use a long scrap of felted cardigan (the sleeve) than wasn't big enough to make a rolled rose.
I simple cut a length about 5cm at it's widest point by 45cm and made it taper off at one end. Using sewing thread doubled up for strength I stitched a line of running stitch all along one side and pulled it up to gather the strip of felt.
I rolled it up and stitched it together to secure.
I added a leaf shape of green felted jumper to the back of this one to tidy it up, then stitched on a brooch pin. 

Button Centre Flower

This flower is made from separate petals so is great for using even the tiniest scraps. 
10 easy ways to make flowers from felt
Make yourself a petal template, this photo gives you an idea of the shape you are aiming for. 
Cut 6 petals from felt, then pinch each petal in half at the flat end and stitch or glue them together. Then you just attach all the petals to one another in a circle. I didn't seem to take any 'as I go along' photos here but it's pretty self explanatory.
I added a button to cover the small hole left in the centre.
I tidied up the back with a circle of felt and added a broach fastening. 

These are the 5 methods of making felt flowers that I've tested so far but there are loads more. I've got a Pinterest Board dedicated to all kind of flower making which you can check out. Plus I've found some more lovely ideas from other websites:

These roses from Pillar Box Blue are also made from old felted knitwear. There are great step by step instructions to show you how to make these.


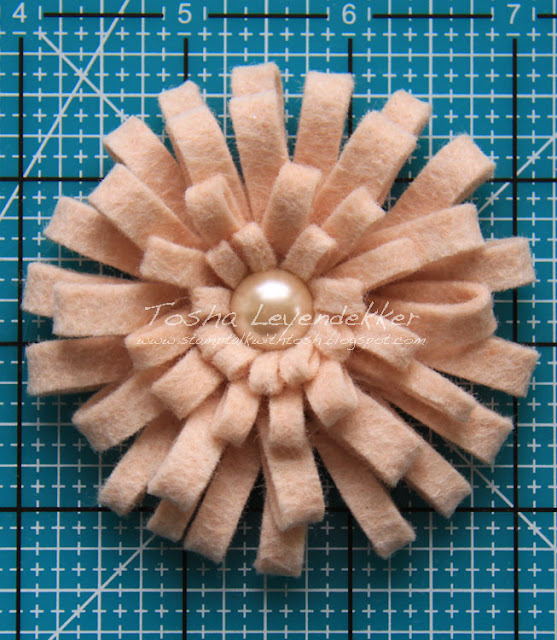
These loopy flowers from Stamp Talk with Tosh are so much fun, they look really easy to make too.

What about these lovelies from Craft your Happiness? You can make them in just 5 minutes, I love a quick craft don't you? 

Just look at these embellished beauties from Sewn Up, so pretty.

Last but by no means least what about this stunning faux succulents vertical hanging wall garden from Julie Measures. Julie has mixed felt and pinecones, what a brilliant and completely mess free idea. 

So much choice! 
10 easy ways to make flowers from felt
Do you have a favourite?


read more

Saturday, 12 November 2016

10 DIY Monogram Cushion Tutorials

Monogramed Cushions or pillows are a bit of a home decor classic. If you have basic sewing skills it's not difficult to have a go at making them yourself.
10 DIY monogramed cushion tutorials
I realised a few weeks back that I'd missed sharing the gift I made for the final wedding in our 'summer of weddings'. If you're curious I shared the gifts I'd made for the other weddings herehere and here.
Initials embroidered cushion
I wanted to make something classy and unfussy for this couple as that suits their style but still wanted it to be personal for them. After some deliberation and time on pinterest searching for inspiration I took a plain gold shop bought velvet cushion cover and embroidered the couples initials in a very simple back stitch. 

I found this plain gold cushion in TK Maxx and fell in love with the velvet. A plainer fabric would actually have been easier to stitch on but the velvet has a beautiful sheen and texture which I do love.
I also chose an embroidery thread the same colour as the fabric so the embroidery is subtle, you could easily do a contrast for a bolder effect.

To make a Simple Initials Embroidered Cushion you will need:
  • A cushion cover and insert
  • Embroidery thread
  • Computer, printer, paper
  • Needle, pins, scissors
First go onto the computer and select a font you like. Play around with different ones you computer has, I used the font "Small Roundhand" for the N and & but I didn't like the E in that font, it was one of those backward 3's so I did the E in "Apple Chancery". If your PC doesn't have lots of great fonts you can use Picmonkey in design mode as they have lots of cute ones.
Print out the initials in the size you want, this will depend on your cushion cover size of course. You may have to print it a few times until you get the size right.
Trim the paper close to the initials then pin the wherever you want them on the cushion. I did mine centrally but yours could be anywhere you like. Use loads of pins so it doesn't slide about.
Using 2 strands of embroidery thread stitch the initials in backstitch going through both the paper and the fabric.
When you are done, gently pull the paper away. I found it easiest to tear the paper as close as I could to the stitching first then the little bits just pull out easily with your finger nails or tweezers.
Initials embroidered cushion
Simple as that! You can see in my photo above that I had trimmed away the paper around the letters as I finished each one, that is not necessary, I was just checking it had worked!
All these photos are taken on an angle as that shows the embroidery better, with the nap of the velvet it was hard to get the initials to show up nicely on a photo.
Initials embroidered cushion

If my velvet initials cushion doesn't take your fancy or suit your style how about some of these beautiful DIY monogram cushions and pillows.

This beautiful cushion was made by Robyn from The Farmer's Nest, it's another done on a ready made cover using a super simple embroidery stitch.

I love this twirly font Trisha from The Sweet Survival chose for this felt monogram pillow, so classy. 

Here is another felt letter but with a completely different look. So cute and modern. It's from How Does She and has a great step by step tutorial.

This cover from Beneath my Heart has a stencilled monogram. The tutorial includes a great set of instructions of making the cover, including that pretty contrast piping.

Another stencilled idea from Merrick's Art, so simple, so effective.

If more colour is your thing, how about this beauty from Yes Spaces. It's made using a traditional machine applique method and a ready made plain cover. It would be a great way to use up fabric scraps.

This is a little bit different, a letter shaped cushion. What a fun idea from Classy Clutter.

I do love a good "crafting with buttons" project and this one from It all Started with Paint, is just lovely.

This beautiful letter made from fabric rosettes is so pretty. Kaitlyn from The Birds Nest used a liquid stitch glue so this is a "no sew" option, but of course you could make a "sew" version if you prefer!

Whether you call them cushions, pillows or something else entirely, hopefully you have found some letter and monogram inspiration here. 
Funny how so many of these tutorials are for the letter B - 5 out of the 10 - I wonder why that is? 
You might also be interested in:
Adipose Cushion
Adipose Cushion
Making Toys from Kids Drawings
Cornishware Ruffle Tote
Running Stitch Embroidered Cushion Cover
I'll be linking up at these great link parties

read more