Showing posts with label tutorials. Show all posts

Tuesday, 21 November 2017

Rainbow Pom Poms

Rainbow Pom Poms are a brilliant way to use up all the little bits of yarn left over from other projects.
How to make rainbow pom poms
This is easy and quick, let's get stuck straight in!
You will need:
Sharp Scissors
and
Yarn, wool whatever you call it you'll need some different bits and pieces in a few bright colours. 
This is what I pulled out of my stash. You don't need this much - there is enough here to make about 30 pom poms! Just use up scraps, it doesn't matter what weight the yarn is, if it's fluffy or textured, it all works just fine.
Cut an arm length of one of your yarns. Choose a strong acrylic one (one that doesn't snap when you really pull it) Double it up and lay it between your middle finger.
How to make rainbow pom poms
Now start wrapping your different coloured yarns. Do between 8 and 10 wraps of each then change (1). Just leave the ends dangling. Stop when it looks a bit like photo(2) The more you wrap the fatter the pom pom will be.
How to make rainbow pom poms
Pull the length that you left between your fingers together and knot (3). Pull it as tight as you can then slide the bundle off your fingers (4) Pull the knotted yarn really tight and knot again. Wrap it round the bundle a couple of times and knot again.
Holding the pom pom by the long lengths of yarn cut the loops on both side.
How to make rainbow pom poms
You should have something that looks like this, a bit messy but nearly there.
How to make rainbow pom poms 
Now grab your sharp scissors and start to trim. Hold the pom pom over a bin to catch all the little bits.
Trim a bit, give it a shake, fluff it in your hands and them trim a bit more until you are happy with your lovely rainbow pom pom. 
How to make rainbow pom poms
I love making pom poms like this, I don't have a fancy plastic pom pom maker and this is SO much quicker than the old cardboard ring method. I know some people think it is wasteful because you trim away a load of yarn but it honestly doesn't seem too too wastful to me. Here is what ended up in my bin after 1 pom pom:
I suppose how big your pom pom ends up depends on how big your hand is, I feel my hand is pretty average grown up lady size and my finished pom poms are about 2.5" (6cm) in diameter.
How to make rainbow pom poms
I LOVE these rainbow pom poms, I'll show you tomorrow what I used this one for.
I'll be sharing this project at these link parties

read more

Wednesday, 15 November 2017

Inspired by - Felt Scrap Garland

Use left over felt scraps to make a upcycled Christmas garland. 
Upcycled felt Christmas garland
This post contains affiliate links, if you click through and make a purchase then the cost to you is the same but Sum of their Stories receives a small commission
Today I'm sharing another project inspired by another fantastic blogger - part of my "Inspired by" series. This time it's a lovely felt garland made from felt scraps inspired by one I saw a couple of years ago over at Pillar Box Blue.
What I love about this project is that it uses the teeny tiniest scraps left over from all my recent felted jumper projects. 
It's super simple. Take little left over bits of felt, cut them into pieces approx 1" square and then thread them up to make a garland.
I've been on a bit of a 'felting old jumpers and cardigans' crazy recently and have been making all sorts of things with the felt. I've already shared a few here, some felt flowers & these felt lavender bag houses and I have quite a few more to come. What this has generated is a lot of tiny scraps and I was really pleased to remember this garland idea.
It was so quick to make up and saves all the little pieces from the bin. Yay! 
Upcycled felt Christmas garland
I used a Green Pearl Thread and made my garland about 145cm/57" long (plus the tassels) . It actually gets pretty heavy so this feels long enough.
I finished the ends of my garland with a few beadsand a tassel made from more of the embroidery thread.  
Upcycled felt Christmas garland
You can see the felt from my felted jumpers and cardigans came out in different thicknesses, that doesn't matter at all for this project. Not all my pieces were perfectly square either, I used every little corner so as to not waste a scrap! 
Upcycled felt Christmas garland
Pillar Box Blue has a lovely bauble idea too along the same lines if you want more options, check out it out here.
I wanted something to use up my tiny felt scraps - job done! 

read more

Wednesday, 1 November 2017

Knitting Needle Case from a pillowcase

Make a case for all your knitting and crochet needles, hooks and accessories from an old pillowcase.
How to make a knitting needle case from an old pillowcase
This post contains affiliate links, if you do decide to click through and make a purchase using these links the cost to you is the same but Sum of their Stories will be paid a small commission.
I have a confession, I find it really hard to walk past a Charity shop (a UK version of a Thrift store) without going in for just a 'quick look'. Last week I was sourcing fancy dress costume elements for a halloween party so I had a good excuse for going in and I fell across this set of 2 quilted pillowcases that were just too pretty to leave behind. (I did get the costumes sorted too) 
The patchwork is that printed 'fake' patchwork, but the tops were thick and quilted. The brownish border was a separate piece so I cut that away. The back was in 2 pieces, one big-one small, with ties. 
I decided to make a roll up case for knitting needles and crochet hooks with 3 rows of pockets, so there would be room for accessories as well. I used the front of the pillowcase as the main part, the back as 2 pockets and then needed to add in some white and blue fabric from my stash for the lining and the middle pocket. 

To make a Knitting needle case like this you will need:

Main case piece - 17" x 20" (44cm x 51cm)
Lining piece - 17" x 20" (44cm x 51cm)
Pocket 1 - 17" x 19" (44cm x 48.5cm)
Pocket 2 - 17" x 12" (44cm x 31cm)
Pocket 3 - 17" x 7.5" (44cm x 20cm)
Ribbon 39" (100 cm)
Thread
Water-Erasable Fabric Marking Pen

All the pocket here are doubled over, this is because the fabric I had from the back of the pillowcase was very thin. You could make your pockets half the height and just turn a small hem.
Press each of the pocket pieces in half and then arrange then on the lining like this:
Hold the layers in place with a few pins and mark the pocket sections with an erasable pen. 
Working from right to left, I marked 3 sections 1.5" wide and then 12 more at 1" wide.
You can see them a little better in this close up. 


Stitch over the lines, going back a few stitches at the top end to make sure the stitches don't come undo when your case is in use.


When you get to the last 6 rows on the left side, pin back the top layer and just stitch through the 2 larger pocket layers for 2 rows.
Then replace the smallest pocket layer for the next row. Then pin it out of the way again for the last 2 rows. 
This will create some larger pockets on the bottom left, which are useful for tape measures, scissors etc. 

Next lay the pocket layered piece and the main piece right sides together. Fold the ribbon almost in half. That sounds a bit odd, fold it in half but unevenly, so one end is about 60cm and one is 40cm. Position the ribbon on the left side of the case, 7" (18cm) from the bottom with the long ends all inside.

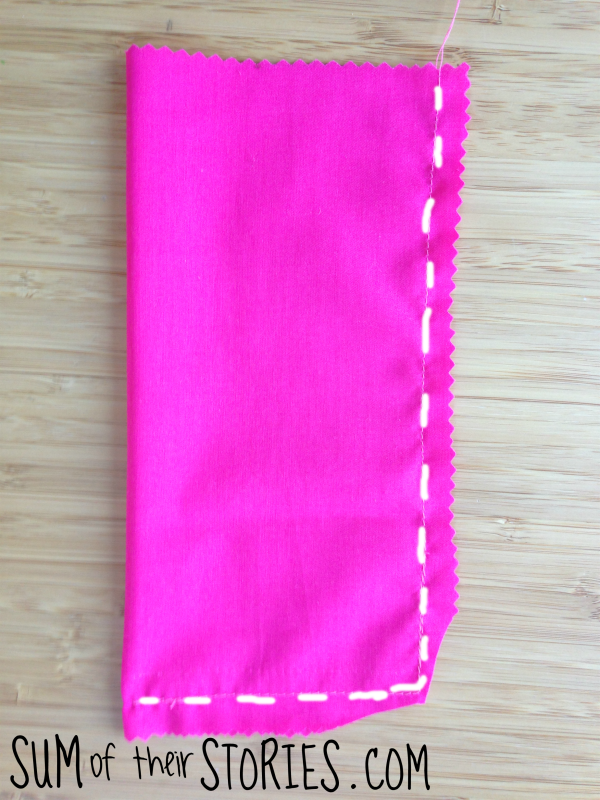
Stitch all round the case using a half inch (1.5cm) seam allowance and leaving a 3" gap on the right edge. Be careful not to catch the ribbon in the seams.
Trim the corners and excess seam allowance and then turn right side out.
Press with the iron then top stitch all around to neaten and close the gap you'd left for turning. 
You can remove any remaining erasable fabric pens marks just by rubbing then lightly with a damp cloth. 

Now just fill the case with all your knitting and crochet bits and pieces, fold the top flap over, roll it all up safely and secure with the ribbon ties.
How to make a knitting needle case from an old pillowcase

How to make a knitting needle case from an old pillowcase
On reflection I'm not sure I need all 3 pocket layers, so next time I might play around with their depth and maybe only do two. I was guided by the sizes of the pillowcase back fabric on this occasion. The nice thing about making your own is that you can make it any size you like with whatever pockets you like. 
How to make a knitting needle case from an old pillowcase
I'll be linking this project up with some of these link ups

read more

Wednesday, 18 October 2017

Inspired by - Twinkle Star Glasses Case

Today I have another project for you, inspired by another amazing blogger. This time it's a super colourful glasses case totally inspired by the amazing Red Haired Amazona and her fabulous Twinkle Star Hand Mitts pattern. 
Twinkle star crochet glasses case
This post contains affiliate links, if you do decide to click through and make a purchase using these links the cost to you is the same but Sum of their Stories will be paid a small commission.
Let me tell you the story..... Back in July some very pretty colourful crochet appeared on Instagram feed of Louise, The Red Haired Amazona (well, I say appeared, her whole feed is pretty and colourful, but this was especially so!) and 'huzzah!' in August Louise publish the free pattern for the most beautiful hand mitts she named Twinkle Star. 
I promptly made a pair (which I love and have given to our daughter as she loved them too) and as I was sewing it all up it struck me that they would be a great size for a glasses case.

To make one you will need:

Yarn - about 2oz in total of as many different colours as you like. I used 6 (pink, blue, purple, yellow, dark blue and grey)
4mm crochet hook (I think these are just THE BEST)
Fabric for lining 8.5" x 8" (22cm x 20cm)
Matching thread
A button

I'm not going to go into great detail about how to make the basic rectangle of crochet as you can find all that over on The Red Haired Amazona. Pop over here and follow the wonderful and VERY detailed how too (honestly I thought I did a lot of photos for a tutorial but I'm a photo lightweight in comparison!) 

You can see I mixed the pattern lines up a little for the glasses case. I only did stitches and pattern rows from the original hand mitts pattern, I just mixed them up and did whatever took my fancy in whatever colour came to hand. 
This is the most brilliant stash buster project! Once my piece of crochet was approx 7" or 18cm I stopped. (it was 8" or 20cm wide)
Please excuse these next few terrible photos, it was evening and I was excited to get this finished!
Ahhhh, look at all those ends to sew in!!!

I used all the ends to sew the side seam of the case up so I was sewing them in (aka tidying them up) at the same time. I found it easiest to do the larger bits first, the places where a few rows are the same colour.
Then where there was just one thin row I simple tied the ends and sewed them in, like this:
Sew the bottom up too.
Cut a piece of fabric just a little larger than you crochet has ended up.
Twinkle star crochet glasses case

Now stitch the side and along the bottom. I used a thread the same colour so I've drawn in some comedy sized stitches to show you where.
Trim the corner seam allowance as shown then slide the lining into the crocheted case.
Twinkle star crochet glasses case
Fold the top over neatly, tucking the raw edge inside and pin.
Twinkle star crochet glasses case
Then slip stitch all around the top to attach the lining to the crochet.
Twinkle star crochet glasses case
Sew a button on the front in the centre and then make a chain loop on the centre of the back. Join the yarn to the centre stitch, chain enough to go round the button fairly tightly (I did 10 chain) and then slip stitch back into the centre stitch. Sew the ends in. 
Twinkle star crochet glasses case
Ta dah! Finished. I think this is one of my favourite makes ever (and yes, I know I say that a lot!)
Twinkle star crochet glasses case
Out of interest, here are some photos of the Hand mitts that I made first, following the pattern from the Red Haired Amazona properly.
Twinkle star crochet hand mitts
Aren't they pretty?
Twinkle star crochet hand mitts
I made these mostly out of the left overs from the Rainbow Heart Bunting and Carnival Cushion I made ages ago with just a few other little left over bits thrown in.
Twinkle star crocheted glasses case
Do you think you'll try The Red Haired Amazona's gorgeous pattern and make pretty hand mitts for someone this Christmas? Or adapt the idea and make a glasses case? OR you could do a smaller version as a phone case or a bigger one for an ipad .... or wouldn't it make the most lovely little purse, handbag, coaster, cushion...

read more