Wednesday, 30 November 2016
30th November was my Nan Pearl's birthday so today I am remembering her by sharing another lovely thing she made, that I am lucky enough to still have.
This patchwork bedspread was made using the English paper piecing method and was hand stitched by my Nan for me back in the 70's. I have no idea how long it took her, must have been months and months.
I have mixed feeling about this, I wasn't allowed to put it on my bed when I was first given it. I was about 7 or 8 and my mum was worried I would damage it somehow. She was probably right, I often ended up with felt tip pens or crayon on my bedlinen and I even cut a hole in something once (by mistake of course) By the time I was old enough to be trusted not to wreck it I only used it for a short time before fashion changed and we all started to have duvets or quilts instead of sheets and blankets. You must remember at this point I am a UK child of the 1970's!
The good news is it is not wrecked, the bad news is it has not been used and therefore enjoyed much.
The patchwork is a walk down memory lane for me, so many bits of fabric that are from clothes I remember. I can see lots of bits from clothes I had, a few of my grandad's shirts, fabric that my dolls had dresses made from etc.
It's bright, there is no getting away from that, it was the 70's after all!
I also love how my nan didn't worry about having 2 hexagons of the same fabric next to each other, she was not one to spend lots of time on fancy things like design and colour balance.
It is backed with a big piece of seriously retro print, and has a ruffled valance to hide all the stuff that was under my bed at the time.
I am wondering if I should do something with this bedspread. We don't have any single beds in our house now, hence the photos of it draped on the sofa and laid out on the floor!
At the moment it is in a bag in the wardrobe. That seems a waste, but I'm not sure if I could bring myself to chop into it to make it into something we can actually use today. That said, I can almost hear my nan telling me not to be so silly. She never had any problem refashioning and recycling pretty much anything.
Any brilliant ideas would be welcome.
For now I am happy it has had a airing, is being shared here today and helping me to remember my nan, Pearl.
You can read the other stories I've shared about things made by the women who inspired Sum of their Stories here.
update:
I've actually gone and done it! A massive thank you to everyone who left suggestions, tips and ideas. You can see what I ended up doing here.
Sunday, 27 November 2016
Welcome to another Handmade Monday, the place to share your latest crafty makes.
I was so pleased that so many were able to join me last week as I hosted Handmade Monday for the first time. I was a bit nervous, it's like when you host a party in real life, what if no one turns up? Thankfully you did not let me down and we had quite a gathering! Thank you, thank you thank you.
I did promise features, for now I'm just finding it too hard to choose a favourite (It's like trying to pick a favourite child!) so I'm featuring the most viewed links.
Pam from Threading my Way shared these fabric gift tags. What a great way to make something a bit special from scraps of fabric and a paper bag!
And from Ginx Craft, these Flat Rat knitted bookmarks which I think are both super cute and a tiny bit grisly at the same time! There's a link to the free pattern too.
Congrats both of you, here is a "Yay! I was featured" button for your blog if you want to show off just a tiny bit. (I think you should!)
Talking of buttons, here's a button for you to add to your blogs link party page if you have one, so we can spread the word about Handmade Monday.
If you are new to Handmade Monday then welcome, we are really glad you are here. Here are the rules:
- Did you make it? Is it craft related? Yes - hooray, we'd love to see what you've been up to. This is not the place for shops, link parties or posts with just other people's work. Giveaways are fine as long as they are craft related.
- Add the link to your blog post, not your main site URL.
- Link up to 3 posts each week, but try to make sure it's something you've not linked up here before.
- Have fun! Mingle - visit some of the other links - that's the whole point! Leave them a comment, maybe share on pinterest, twitter or your other favourite social media. Let's support one another and grow our craft community.
- If you'd like to follow me in some way (buttons to find me are on the side at the top) then that would be just lovely. If you'd like to tell others about Handmade Monday then that would be just lovely too.
Saturday, 26 November 2016
Here's a budget recycling gift wrapping idea that comes thanks to our IKEA purchases back in November last year.
Apologies, these photos are not great as the presents are under the tree and we have had such grey weather here back in December last year that getting decent shots was problematic.Two year's ago our Christmas gift wrapping was all red paper finished off with inexpensive white gift ribbon and gift tags made from old Christmas cards.
Then last year we have a reverse thing going on, quite by accident!
In November we had some furniture delivered from IKEA, 5 low cupboards to go along one wall in the living room. I don't know if you have ever brought furniture from IKEA but sheets of thin white paper are put between some of the bits to protect them so I ended up with A LOT of really quite big sheets of this thin white paper.
Just that week I had made these paper napkin poinsettias with the intention of using them on presents, it was like it was meant to be!
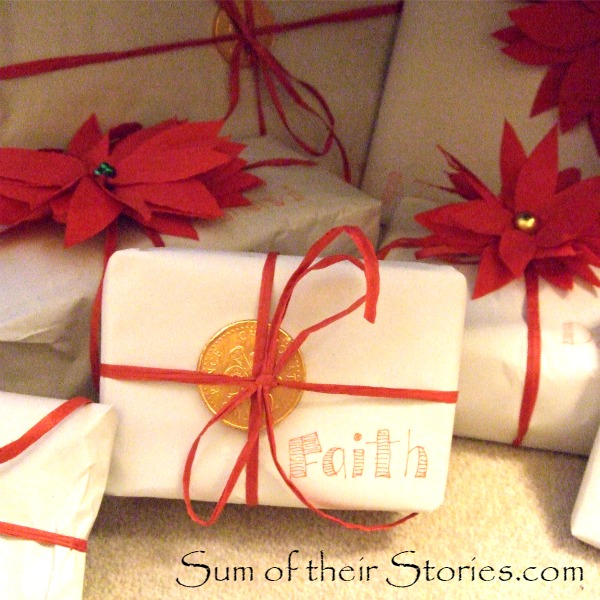
The IKEA packing paper is pretty thin so I used it doubled up, luckily I had plenty, the ribbon is very inexpensive red raffia from Tesco. I've added the poinsettias for grown up ladies with a little dab from my hot glue gun. For the kids I added a chocolate coin (again with a teeny dab of hot glue), the guys just had the raffia ribbon.
Instead of tags I'd written names on with a red pen and a cute font, I had to write on them after they were wrapped as I just couldn't work out the placement on the paper in advance. It came out ok on boxes but on some of the more squishy presents the letters wiggle a little bit!
I keep reading that normal wrapping paper is difficult to recycle, something about the inks and whatever makes it shiny. I tend to keep big pieces and reuse them anyway but this year I am happy to have saved this packing paper for a second use before it goes in the recycling.
I'm not suggesting for a second that it is cost effective to buy furniture from IKEA just to save money on wrapping paper! However if you are buying it anyway maybe save the paper and give it another use? This idea is not just for Christmas either, plain white paper could be great for birthdays all year round too. Just jazz it up with some ribbon, a flower or two or maybe some doodles, stamping and paint.
Wednesday, 23 November 2016
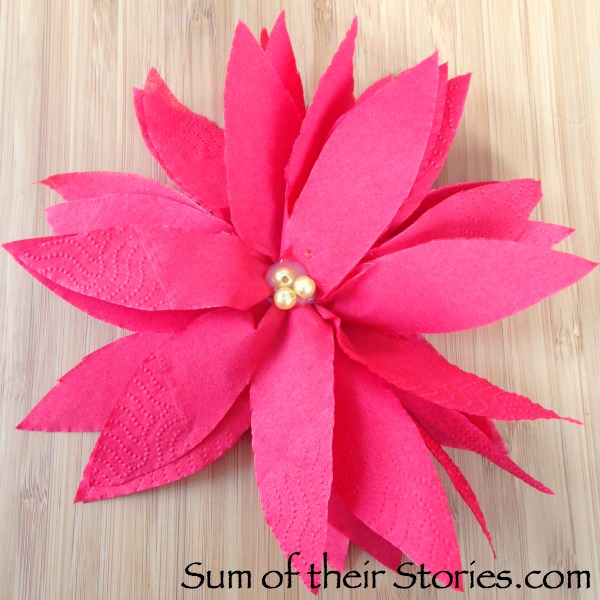
It's quick and easy to turn red paper serviettes or napkins into pretty poinsettias to use in your decorating this Christmas.
I'll be linking up at all these great link parties, pop over and have a little look round at all the lovely ideas.
This tutorial is one I originally shared over on The Pinning Mama last year as a guest contributor and now it's that time of the year again I thought it was high time I shared it here too.
I had a bit of a debate last year as to whether they are serviettes or napkins. I think it's a transatlantic thing. I've always called them serviettes, for me a napkin is a beautifully starched white damask cloth thing that you would have in a fancy restaurant.
Potato per-tar-toe, it doesn't matter what you call them! If you are anything like me you buy a packet for a party and inevitably have just a few left over. We have a collection of part used packs of various colours and patterns so this was a great way to use up a few.
To make paper poinsettias you will need:
- A red paper serviette / napkins
- Some sort of paper glue - I used a Pritt stick
- A hot glue gun
- Scissors
- A button, beads or sequins
First you need to fold and cut the serviette:
1: Open out 1 quarter, leaving the fold at the top
2: Fold the bottom open edge up to the fold
3: Fold in half
4: Fold in half again, then turn so the corner that is all flaps is nearest to you and the corner that is all folds is furthest away
5: Cut from the 'flappy' corner towards the 'folds' corner stopping about 1 inch from the corner
6: Cut petal shapes on each side
Next we are going to assemble the poinsettia.
1: Open it all out and you should have 4 flowers
2: Using a little dob of paper glue to hold them, layer the flowers up
3: As you layer them, arrange them so the petals are offset, to give a nice full flower with no gaps
Now the bit where you need to work quickly, so have everything ready and to hand.
4: Hold the flower in one hand and put a blob of hot glue in the centre
5: Quickly pinch the centre to bunch the petals
6: This is just what it looks like from the back
Turn it over and pop something on the centre ideally whilst the glue is still soft.
Don't worry if you miss your chance and the glue has set, you can always add just a little more glue if needed.
What you cannot do is unstick them. The hot glue is powerful stuff that does not let go of paper serviettes once it has it in it's grip. If you try, it will rip and you will feel bad. Why would you do that to yourself? Why?
It's a bit like pancakes, accept that the first one might not turn out great and just have another go, you'll soon get the hang of them.
I found I got quicker the more I made, I had a bit of a production line going, with all the folding and cutting first and the 'glue pinch and centre' next. Deciding what the centre was going to be and having it right there next to you to grab as soon as you've pinched helps to speed the process up too.
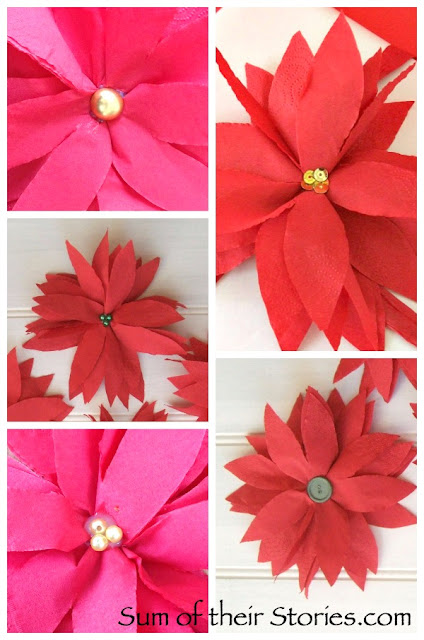
I experimented with a few different centres - buttons, beads and sequins. I think glitter might work too.
The poinsettias come out almost the same size as the original folded serviettes.
You can always trim your serviette down to make smaller poinsettias if you want, just make sure you trim from the edge not the folded side or you'll just end up with a pile of tiny scraps instead of flowers! Or you could just trim more away when you cut the petals smaller I suppose.
Last year we used these for our Christmas gift wrapping, I attached the poinsettias to the gift with another blob of hot glue.
The poinsettias were for the ladies, kids and the blokes had something else, you can find more on that here.
They could be nice on a wreath (indoor only!), part of a table centrepiece or maybe with a name tag as a place setting.
How would you use these paper serviette poinsettias?
You might also be interested in:
|
|
|
|
Sunday, 20 November 2016
Hello, welcome to the first ever Handmade Monday Link Party here at Sum of their Stories.
Handmade Monday has been around since 2012, it has moved home a few times and I'm very pleased to say it has arrived here now.
If you are a regular at Handmade Monday and you've found your way over from Lucy Blossom Crafts then "Yay!" I'm so pleased to see you.
I have promised Vicky that I will take good care of her Handmade Monday, I hope you will help me do that. I've given us a new logo/badge, what do you think? If you hate it just keep that to yourself... I'm joking, feedback please!
If you are new to Handmade Monday and are joining us for the first time then "Yay!" you are very welcome. Link up your crafty projects and then see what everyone else has been up to this week.
The rules:
That's enough for week one, let's get on with the linky:
Handmade Monday has been around since 2012, it has moved home a few times and I'm very pleased to say it has arrived here now.
If you are a regular at Handmade Monday and you've found your way over from Lucy Blossom Crafts then "Yay!" I'm so pleased to see you.
I have promised Vicky that I will take good care of her Handmade Monday, I hope you will help me do that. I've given us a new logo/badge, what do you think? If you hate it just keep that to yourself... I'm joking, feedback please!
If you are new to Handmade Monday and are joining us for the first time then "Yay!" you are very welcome. Link up your crafty projects and then see what everyone else has been up to this week.
The rules:
- Did you make it? Is it craft related? Yes - hooray, we'd love to see what you've been up to. This is not the place for shops, link parties or posts with just other people's work. Giveaways are fine as long as they are craft related.
- Add the link to your blog post, not your main site URL.
- Link up to 3 posts each week, but try to make sure it's something you've not linked up here before.
- Have fun! Mingle - visit some of the other links - that's the whole point! Leave them a comment, maybe share on pinterest, twitter or your other favourite social media. Let's support one another and grow our craft community.
- If you'd like to follow me in some way (buttons to find me are on the side at the top) then that would be just lovely. If you'd like to tell others about Handmade Monday then that would be just lovely too.
That's enough for week one, let's get on with the linky:
Friday, 18 November 2016
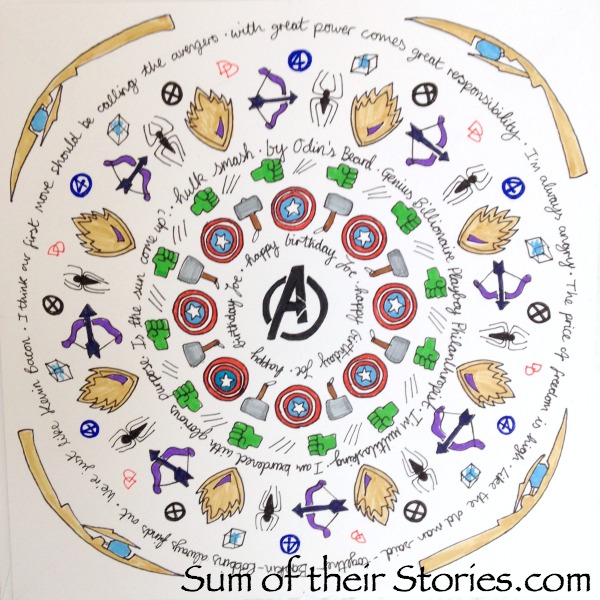
If you can draw a really simple cartoon or doodle then you could make Mandala style birthday cards in a theme to suit the birthday person.
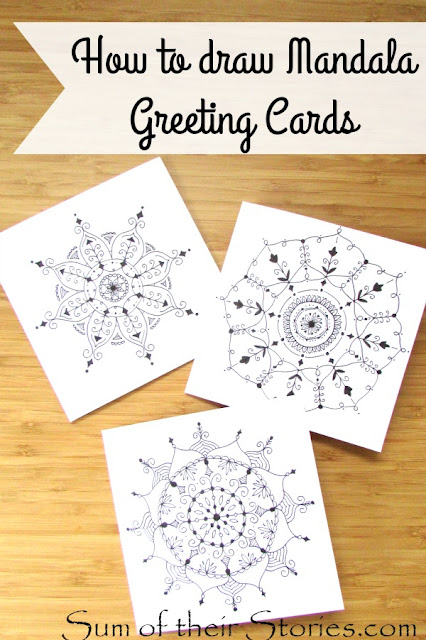
This post has been a long time in the making. Way back in January I shared how to draw mandala designs for greeting cards and then a rare thing happened, I got all organised and ahead of myself and made cards for our kids for their 2016 birthdays.
This time I picked a theme from something they like and used that for the basis of the design.
I've had to wait all year until all their birthdays passed before I can share the idea with you!
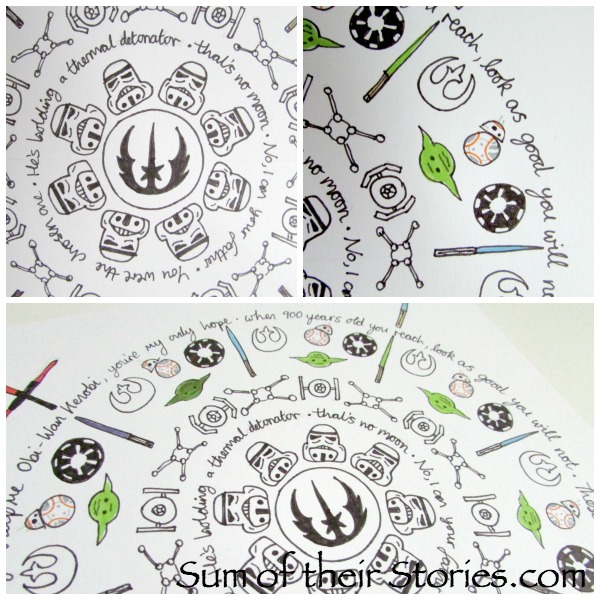
First was this Star Wars themed card for our Star Wars super fan son. He has many other fandoms too but I really wanted to do a mandala with loads of little Yoda heads so that was that!
If you look closely, the doodles are VERY simple versions of the iconic Star Wars symbols, space ships and characters. I am a doodler not a great artist.
The words are basically all my favourite Star Wars quotes (and quotes from his favourite bits too of course!)
I also wanted to include "Not if anything to say about it I have" but there just wasn't space in the end :-(
Next in the year was our oldest son's birthday and for him I did an Superhero themed card. He is also into all sorts of other things that I know nothing about so I thought it was best to pick a theme that I am at least a bit familiar with. Initially I thought it would be an Avengers theme but when I ran out of ideas that were simple enough* I extended it out to a more general superhero theme.
Again for the words I just picked out my (and his hopefully) favourite quotes:
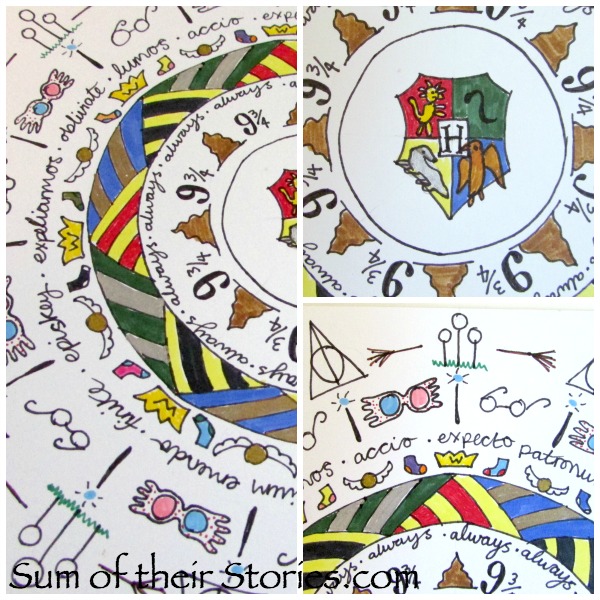
Last in the year, but actually the first I made, was this Harry Potter themed card for our daughter. She is a massive HP fan so picking this theme was a no brainer.
The words are "always" (again, the feels!!) and the rest are spells and of course no unforgivable ones.
To make one you just need to research your theme and start doodling.
Practice the elements first on scrap paper and simplify everything*
Check out the X wings and Yodas on the Star wars card to see what I mean by simplifying.
You really don't need to be super artistic (just see my lion in the Hogwarts shield above!) It's much more about creating a recognisable nod to each item rather than a work of art.
The mandala is built up in the same way as I set out in my How to draw Mandala Cards tutorial.
You'll need a square shaped card blank, a compass to draw circles, a soft pencil and a decent eraser and then whatever pens you want to draw with. I used a black fine liner and just regular kids colouring felt pens. These cards were a bigger size than the other mandala cards I'd made, they are about 20cm(8") square.
This whole thing was totally inspired by a fellow member of Dawn Nicole Designs Art & Hand-lettering Class Facebook Group. Dawn does a daily challenge which I have dabbled in now and again. She give a word prompt for hand-lettering or doodling and everyone shares their attempts. On Jan 1st 2016 the prompt was Mandala. I started drawing them and just couldn't stop - hence turning them into cards - and one talented member shared a Harry Potter themed mandala they had created. I took her brilliant idea and ran with it! After asking the group for help I've been able to find that is was a talented Photographer called Robyn, you can find her facebook page here to check out her photography and digital scrapbooks.
If you like hand-lettering and art then this is a fabulous group to join. There are members from all over the world and they are so talented, friendly and supportive. As well as the daily prompts there are discussions about equipment, hints and tips etc.
Have I sparked your imagination? What themed mandala card you could make for someone special?
This post has been a long time in the making. Way back in January I shared how to draw mandala designs for greeting cards and then a rare thing happened, I got all organised and ahead of myself and made cards for our kids for their 2016 birthdays.
This time I picked a theme from something they like and used that for the basis of the design.
I've had to wait all year until all their birthdays passed before I can share the idea with you!
First was this Star Wars themed card for our Star Wars super fan son. He has many other fandoms too but I really wanted to do a mandala with loads of little Yoda heads so that was that!
If you look closely, the doodles are VERY simple versions of the iconic Star Wars symbols, space ships and characters. I am a doodler not a great artist.
The words are basically all my favourite Star Wars quotes (and quotes from his favourite bits too of course!)
- Help me Obi-Wan Kenobi, you're my only hope
- When 900 years old you reach, look as good you will not
- These aren't the droids you are looking for
- I love you. I know
- I find your lack of faith disturbing
- You were the chosen one (oh the feels!!!)
- He's holding a thermal detonator
- That's no moon
- No, I am your father
I also wanted to include "Not if anything to say about it I have" but there just wasn't space in the end :-(
Next in the year was our oldest son's birthday and for him I did an Superhero themed card. He is also into all sorts of other things that I know nothing about so I thought it was best to pick a theme that I am at least a bit familiar with. Initially I thought it would be an Avengers theme but when I ran out of ideas that were simple enough* I extended it out to a more general superhero theme.
Again for the words I just picked out my (and his hopefully) favourite quotes:
- I think our first move should be calling the Avengers
- With great power comes great responsibility
- I'm always angry
- The price of freedom is high
- Like the old man says - together
- Baskin-Robbins always finds out
- Hulk smash?
- By Odin's beard
- Genius Billionaire Playboy Philanthropist
- I'm multitasking
- I am burdened with glorious purpose
- Is the sun come up?
- We're just like Kevin Bacon
Last in the year, but actually the first I made, was this Harry Potter themed card for our daughter. She is a massive HP fan so picking this theme was a no brainer.
The words are "always" (again, the feels!!) and the rest are spells and of course no unforgivable ones.
To make one you just need to research your theme and start doodling.
Practice the elements first on scrap paper and simplify everything*
Check out the X wings and Yodas on the Star wars card to see what I mean by simplifying.
You really don't need to be super artistic (just see my lion in the Hogwarts shield above!) It's much more about creating a recognisable nod to each item rather than a work of art.
The mandala is built up in the same way as I set out in my How to draw Mandala Cards tutorial.
You'll need a square shaped card blank, a compass to draw circles, a soft pencil and a decent eraser and then whatever pens you want to draw with. I used a black fine liner and just regular kids colouring felt pens. These cards were a bigger size than the other mandala cards I'd made, they are about 20cm(8") square.
This whole thing was totally inspired by a fellow member of Dawn Nicole Designs Art & Hand-lettering Class Facebook Group. Dawn does a daily challenge which I have dabbled in now and again. She give a word prompt for hand-lettering or doodling and everyone shares their attempts. On Jan 1st 2016 the prompt was Mandala. I started drawing them and just couldn't stop - hence turning them into cards - and one talented member shared a Harry Potter themed mandala they had created. I took her brilliant idea and ran with it! After asking the group for help I've been able to find that is was a talented Photographer called Robyn, you can find her facebook page here to check out her photography and digital scrapbooks.
If you like hand-lettering and art then this is a fabulous group to join. There are members from all over the world and they are so talented, friendly and supportive. As well as the daily prompts there are discussions about equipment, hints and tips etc.
Have I sparked your imagination? What themed mandala card you could make for someone special?
Saturday, 12 November 2016
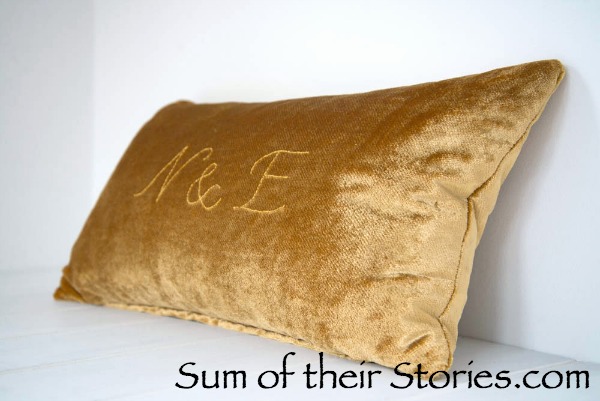
Monogramed Cushions or pillows are a bit of a home decor classic. If you have basic sewing skills it's not difficult to have a go at making them yourself.
I realised a few weeks back that I'd missed sharing the gift I made for the final wedding in our 'summer of weddings'. If you're curious I shared the gifts I'd made for the other weddings here, here and here.I wanted to make something classy and unfussy for this couple as that suits their style but still wanted it to be personal for them. After some deliberation and time on pinterest searching for inspiration I took a plain gold shop bought velvet cushion cover and embroidered the couples initials in a very simple back stitch.
I found this plain gold cushion in TK Maxx and fell in love with the velvet. A plainer fabric would actually have been easier to stitch on but the velvet has a beautiful sheen and texture which I do love.
I also chose an embroidery thread the same colour as the fabric so the embroidery is subtle, you could easily do a contrast for a bolder effect.
To make a Simple Initials Embroidered Cushion you will need:
- A cushion cover and insert
- Embroidery thread
- Computer, printer, paper
- Needle, pins, scissors
First go onto the computer and select a font you like. Play around with different ones you computer has, I used the font "Small Roundhand" for the N and & but I didn't like the E in that font, it was one of those backward 3's so I did the E in "Apple Chancery". If your PC doesn't have lots of great fonts you can use Picmonkey in design mode as they have lots of cute ones.
Print out the initials in the size you want, this will depend on your cushion cover size of course. You may have to print it a few times until you get the size right.
Trim the paper close to the initials then pin the wherever you want them on the cushion. I did mine centrally but yours could be anywhere you like. Use loads of pins so it doesn't slide about.
Using 2 strands of embroidery thread stitch the initials in backstitch going through both the paper and the fabric.
When you are done, gently pull the paper away. I found it easiest to tear the paper as close as I could to the stitching first then the little bits just pull out easily with your finger nails or tweezers.
Simple as that! You can see in my photo above that I had trimmed away the paper around the letters as I finished each one, that is not necessary, I was just checking it had worked!All these photos are taken on an angle as that shows the embroidery better, with the nap of the velvet it was hard to get the initials to show up nicely on a photo.
If my velvet initials cushion doesn't take your fancy or suit your style how about some of these beautiful DIY monogram cushions and pillows.
This beautiful cushion was made by Robyn from The Farmer's Nest, it's another done on a ready made cover using a super simple embroidery stitch.
I love this twirly font Trisha from The Sweet Survival chose for this felt monogram pillow, so classy.
Here is another felt letter but with a completely different look. So cute and modern. It's from How Does She and has a great step by step tutorial.
This cover from Beneath my Heart has a stencilled monogram. The tutorial includes a great set of instructions of making the cover, including that pretty contrast piping.
Another stencilled idea from Merrick's Art, so simple, so effective.
If more colour is your thing, how about this beauty from Yes Spaces. It's made using a traditional machine applique method and a ready made plain cover. It would be a great way to use up fabric scraps.
This is a little bit different, a letter shaped cushion. What a fun idea from Classy Clutter.
I do love a good "crafting with buttons" project and this one from It all Started with Paint, is just lovely.
This beautiful letter made from fabric rosettes is so pretty. Kaitlyn from The Birds Nest used a liquid stitch glue so this is a "no sew" option, but of course you could make a "sew" version if you prefer!
Whether you call them cushions, pillows or something else entirely, hopefully you have found some letter and monogram inspiration here.
Funny how so many of these tutorials are for the letter B - 5 out of the 10 - I wonder why that is?
You might also be interested in:
|
|
|
|
Subscribe to:
Comments (Atom)
Labels
Air Hardening Clay
Blogging
Christmas
Clever ideas
Craft show
Crochet
Doctor Who
Easter
Felt
Geekery
Gift Wrap
Gifts
Hand Lettering
Handmade Monday
Home Decorating
Kids activities
Knitting
My Favourite Finds
Needle case
Party ideas
Pattern review
Pinterest Challenge
Sewing my Stash
Silent Sunday
Valentine
Wedding
accessories
art
bags
buttons
cakes
cooking
cushions and pillows
doodle
embroidery
gardening
gift ideas
greeting cards
jewellery
organising ideas
papercraft
papercutting
pretty ideas
recipes
recycling/repurposing
refashion
sewing
their stories
thrifty tips
tutorials
what can go wrong


