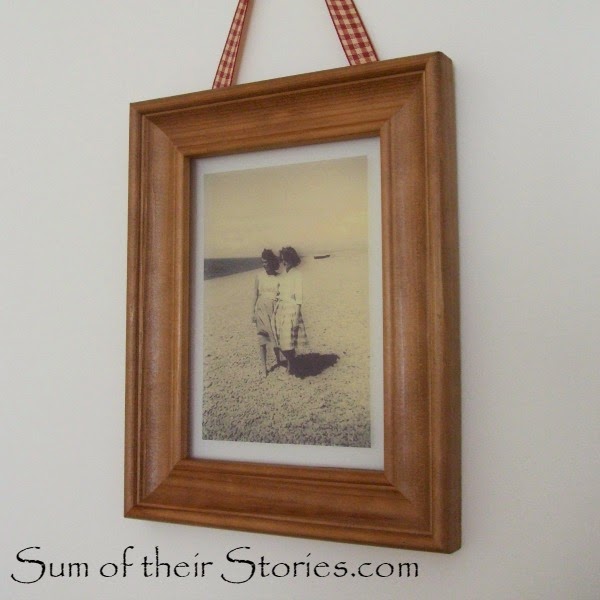
Floating Frames, is that what they are called? I've been googling to see what the proper name is. Glass frame, backless frame, I'm not sure what to call them but I do know that I like the effect!
It's that time for the Pinterest Challenge, where once a month a group of bloggers get together and share projects they've made inspired by something from pinterest.
I saw a lovely idea to transfer a photo onto glass a while back from Do Small Things with Love. You can find the pin that inspired me here. Nancy used transfer medium to put a photo onto glass - just gorgeous!
Sadly the shops round here do not seem to stock transfer medium and I wanted to try this idea for a birthday present so had no time for ordering on line. I had a look at what I already had to hand.
To make my version I used:
- An old wooden picture frame
- Printable transparency film
- An old photo
- A computer & printer
- Superglue
- Washi Tape
First I took out the back and glass out of my wooden frame then removed the little metal tabs that hold the glass, picture and back in place. These things:
I just yanked them with pliers and out they came. I gave the glass a good clean then glued it into the frame with a little superglue.
My photo was a lovely one of my mum and Auntie when they were teenagers (this is a present for my Auntie).
I scanned it and then printed it onto my printable transparency film. This is just that stuff we used to use "back in the day" for overhead projectors - remember them? In those days before Powerpoint!
Slight hiccup, it came out a little bit more blue toned that I wanted. Doesn't really go with the wooden frame and it's red check ribbon.
I uploaded the photo to my favourite photo editing site PicMonkey and played about with the colour saturation and temperature until it was more the golden tones I was after. Then I printed it again.
Much better! It's quite hard to photograph transparent film, hopefully you can see this ok (plus the window reflection!)
Then I cut this to size and superglued it onto the glass. BIG MISTAKE! The glue had no where to go between the glass and film so it seeped onto the bit that shows and looked awful. I peeled the photo off quickly and then used a razor blade to remove the glue from the glass, I was in such a panic I seem to have not photographed this stage - what a shame!
Take two:
I printed it again (I used the glossy paper setting on the printer and best quality), cut it out again and then fixed it in place with washi tape.
I just made sure the washi tape was only on the bit of the wooden frame that doesn't show. The re-positionable quality of the washi tape made it ideal for this.
Ta dah!
I'm really please with how it came out. I would still like to try the Transfer Medium method as it gives the photos a beautiful aged look. I suppose you could try an ageing effect on the photo in PicMonkey before printing for a similar look. I'm just gonna keep my eyes open for Transfer Medium next time I'm in an art shop.
If you have a moment do check out all the other projects that have been "pinspiring" this month!
Enjoy!


I've always wondered how to make these and you make it look so easy! I have some old frames I can't wait to try this with.
ReplyDeleteThis looks so neat - what a special gift! Thanks for your tips on how to adhere it to the frame - it's always nice to learn from the "take 2s" of others!!
ReplyDeleteHa ha yes - I make mistakes so you don't have to!
Deletethat's really cool. I was just remembering that transparency paper the other day thinking it would be great for a project. Definitely have to try this project.
ReplyDeleteIt's nice to be able to use it for crafts seeing as we don't really use overhead projectors any more in a modern office! It's very versatile stuff.
DeleteWhat a lovely gift - and I must say, your Mom & Auntie are so stylish! I love seeing old pictures of my family, especially when they look so retro in their clothes! Awesome project!
ReplyDeleteThey really were stylish weren't they?! I'm lucky enough to have lots of old family pictures, they are really special.
DeleteWhat a wonderful tutorial and a very special gift.
ReplyDeleteI love old photos and you have created a memorable keepsake.
I enjoyed visiting and I hope to use this very method!
Laura
White Spray Paint
I love old photos too, it's nice to be able to scan them nowadays and use them for crafts without damaging the originals.
DeleteI love it! I've wanted to transfer photos for a while, but I had the "wrong" kind of printer. This is genius!
ReplyDeleteStopping by from Creative Mondays.
That is really interesting, i have never seen those... hope you don't mind, but think i will have a go at making these... could be some family Christmas presents sorted out :) Dawn xx
ReplyDeleteThey would be perfect Christmas gifts - that is impressive forward planning! And of course I don't mind, that's the whole point of sharing my projects here - I hope you try everything!
DeleteWhat a lovely idea. I love the Sepia tones of old pictures
ReplyDeleteSuch a great idea, i love the photo too, its beautiful, i bet your Auntie is thrilled with her pressie! x
ReplyDeleteThat's a great idea and interesting to hear your trials and tribulations in achieving your goal :)
ReplyDeleteIt makes a great prezzie, I love how it turned out after your trial and error method :)
ReplyDeleteYes, not everything works out perfectly first time, but I'm not easily deterred!
DeleteWhat a beautiful gift for your Aunt!
ReplyDeleteAlso i do appreciate all the detail you've given about the little hiccups you had along the way. You've taken us on a little journey with you :)
Beautiful result!
Little hicups, I like that, a nice way to describe my momentary panics when it goes wrong before my eyes!
DeleteWhat an interesting project, and such a nice present too.
ReplyDeleteGreat idea, it looks beautiful, a lovely gift. Creative Blessings, Tracy x
ReplyDeleteBeautiful idea and fun technique! I also love the photograph so I'm happy that it wasn't damaged in the process. My dad was just talking to me the other day about a company that prints photos on glass, but I like your idea because it's DIY (and probably much less expensive).
ReplyDeleteIdea is great! Thanks for sharing!
ReplyDeleteI love how you used the transparency instead of the transfer medium. Even though it took a couples of attempts, the results were really worth it.I love the finished frame.
ReplyDeleteWhat a great gift! Thanks for sharing at the #HomeMattersParty :)
ReplyDeleteI've enjoyed looking through your blog at the many classy projects you feature! I think the bangle is my favorite, but I love the lace trimmed shirt too - and this picture frame. I am sure your auntie enjoyed this lovely trip back in time to beautiful, carefree days! I love having old pictures of me and my sisters around too!
ReplyDelete