Wednesday, 12 April 2017

Monday, 10 April 2017
This blog started back in August 2013 as a way to share all my enthusiasm for making stuff. I've learnt SO much about blogging in the last 3 and a half years and the style of my posts has changed quite a bit but one thing I've never really changed much was the look and layout of Sum of their Stories.

I've tweaked the Blogger Simple Template a little here and there over the years but about a month ago I made a new logo and starting thinking about the best way to get a new, more up to date look. I was busy researching the options when I came across a competition from Life and Linda by chance and blow me down with a feather, a week later I got a surprise email from Linda to say I'd won!
Linda has been great to work with. She really is a Fairy Blogmother! I chose the elements I liked from the Custom Blogger Templates Builder and Linda basically took care of the rest. I've had a day now to poke around my new template and make a few tiny changes - things I'd not thought to mention before.
The whole process was nowhere near as scary or difficult as I feared, but I think that may be Linda's calm efficiency.
I have things now I had no idea how to achieve, drop down menu's for tutorials - whoop whoop! My Instagram feed running along the bottom - yay! A slider with posts I want to promote along the top of the home page - huzzah!
I'll probably play around from time to time once I feel more confident I'm not going to majorly stuff anything up but all in all I am delighted. I wanted modern but not over complicated, I'm not a fan of sites where I can't find anything.
I kept my main header photo with all the crafts mostly because I love it so much and think it still explains what Sum of their Stories is about (making all the things!)
If you a thinking of a makeover from your blog yourself do consider Linda, the Fairy Blogmother, even if you are not lucky enough to win a makeover in a giveaway it's really not an expensive outlay.
So please, tell me what you think? Anything missing that I've forgotten all about? Anything you especially like? Anything you are not keen on? (be kind...) Is it easy to navigate?

Sunday, 9 April 2017
It's Handmade Monday time!
We've had an absolutely gorgeous weekend here in the UK, the sun has shone, not a cloud in the sky. Blue skies really do lift the spirits compared to the relentless grey we have so often here!
Here are the features from last weeks Handmade Monday. Two different ways to speckle eggs, both are beautiful - how lovely to have options!
Sew Historical is all about using natural dyes and has done A LOT of experimenting of what works, what doesn't, what results different foods stuffs will give and has shared all her finding. I won't say what she uses for this speckle effect here - you'll have to click through so you can see it explained properly!
Dianne from Deanie's Stash has a fool proof method for her speckled eggs which her kids were able to get involved with - the results are really pretty.
And lastly another special mention this week.
Wendy from My French Twist made this lovely Copper Easter Wreath and credits another of our regular linker-up-ers Claire from Pillar Box Blue as her inspiration for the paper bunnies.
This is exactly what Handmade Monday is all about, sharing our ideas, supporting one another, being inspired by others (and always giving proper credit of course!)
We are all about sharing and caring here at Handmade Monday so if you do link up please take some time to visit some other links and share a few on the social media of your choice. If you are not a social media fan then comments are lovely too (I know the world of tweets, likes, shares and hashtags is not for everyone!)
We have a Handmade Monday Facebook Group where we share tips and ideas. If you like to link up here regularly you are welcome to join us, just send a request. Every entry to Handmade Monday gets pinned onto our Handmade Monday pinterest board too.
The rules for Handmade Monday are simple:
- Did you make it? Yes - hooray, we'd love to see it!
- Add the link to a specific blog post, not your main site URL.
- Link up to 3 posts each week.
- Mingle - visit some of the other links - comment - share - let's support one another and grow our craft community.
If you're not sure on anything, more information can be found here.
Friday, 7 April 2017
A simple glass jar upcycled with pom poms to make a fun bright and cheerful desk accessory.
Pom Pom all the things!
Over the last few weeks I've been sharing some Easter projects made courtesy of Hobbycraft and the selection of fun Easter crafting goodies they sent to me to try. Today's pen pot upcycle is not very Easter-y or Spring like but as I totally LOVE it I am unapologetic!
One of the Supplies I received from Hobbycraft was this enormous bag of pom poms, all shapes and sizes and colours. I used some little white ones for these bunny tails and flower centres for my Spring Wreath.
I'll be linking up at these great link parties, why not check them out!
Pom Pom all the things!
Over the last few weeks I've been sharing some Easter projects made courtesy of Hobbycraft and the selection of fun Easter crafting goodies they sent to me to try. Today's pen pot upcycle is not very Easter-y or Spring like but as I totally LOVE it I am unapologetic!
One of the Supplies I received from Hobbycraft was this enormous bag of pom poms, all shapes and sizes and colours. I used some little white ones for these bunny tails and flower centres for my Spring Wreath.
But look at all these amazing bright pom poms...
Don't they just make you want to pom pom all the things?
I knew they needed to decorate something and I knew it had to be bright and fun.
You can't have too many pen pots, everyone needs pens and in a pot they are handy and ready to grab at a moments notice. If you can make one by upcycling an old container then all the better.
To make a pom pom pen pot like mine you will need:
An old container, mine was a glass jam jar.
Pom Poms, mine were from this big bag from Hobbycraft
A hot glue gun
First wash your container, remove any labels and dry thoroughly.
Sort your pom poms - this was the best bit, it's very therapeutic to plunge your hands into a big bag of soft pom pom, trust me! I separated into a bowl all the ones which were about 1 cm in diameter. Your pot will look more even if you use pom poms that are all the same size.
I only used the bright coloured pom poms for this, I didn't include black or white or the soft pink or yellow. You can use whatever colours you like but it is definitely worth getting them all ready in a bowl. Once you start gluing you want them easy to grab.
Now just hot glue the pom poms onto the jar. It's easiest to apply a 3 cm or so length of glue then press on 3 pom poms. Then just repeat. You want them pretty close together so there are no big gaps.
I started roughly in the middle and went all the way round in a circle, then added rows above and below.
It would probably make more sense to start at the bottom and work your way up - I'm not entirely sure why I didn't do that!
I went for a totally random colour scheme but you could do a fab pattern if you felt so inclined.
That's it. Easy peasy, lemon squeezy and you have a fabulous, colourful pom pom pen pot to brighten your day. Your desk will have never looked better!
Doesn't it just make you want to pom pom all the things?!
Update: This also helps if you are a little clumsy and drop pen pots on the floor occasionally - no breakages here - whoop whoop!
You might also be interested in:
|
|
|
|
Sunday, 2 April 2017
Hello, hello, hello, it's Handmade Monday time!
Welcome to another Handmade Monday, the place to share your makes, bakes and other handmade craft ideas or just find some new inspiration.
It's been a busy week in our house. Our youngest turned 18 and we had a bit of a do at home yesterday. He asked for a cake which showed all his fandoms over the years and with limited time and some of those icing gel pens this is what I managed. Can you tell what they all are? It starts at 5/6 o'clock and goes anticlockwise from toddler to the present day.
Now without further ado here are last weeks features:
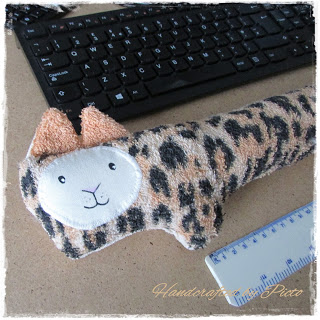
These keyboard wrist supports from Handcrafted by Picto are so much fun.
Do you ever have those "doh, why didn't I think of that' moments? I had one when I saw this super clever shirt upcycling idea from Pam at Threading My Way.
And finally a special honorary mention to this post from Mary at The Boondocks Blog. I love a good 'fail' post and Mary has some classics, her method to deal with this awkward ring left on painted furniture is worth a read if nothing else! I don't mind admitting I lol-ed!
Congratulations, here is a "Yay! I was featured" button for your blog.
We are all about sharing and caring here at Handmade Monday so if you do link up please take some time to visit some other links and share a few on the social media of your choice. If you are not a social media fan then comments are lovely too (I know the world of tweets, likes, shares and hashtags is not for everyone!)
We have a Handmade Monday Facebook Group where we share tips and ideas. If you like to link up here regularly you are welcome to join us, just send a request. Every entry to Handmade Monday gets pinned onto our Handmade Monday pinterest board too.
The rules for Handmade Monday are simple:
It's been a busy week in our house. Our youngest turned 18 and we had a bit of a do at home yesterday. He asked for a cake which showed all his fandoms over the years and with limited time and some of those icing gel pens this is what I managed. Can you tell what they all are? It starts at 5/6 o'clock and goes anticlockwise from toddler to the present day.
Now without further ado here are last weeks features:
These keyboard wrist supports from Handcrafted by Picto are so much fun.
Do you ever have those "doh, why didn't I think of that' moments? I had one when I saw this super clever shirt upcycling idea from Pam at Threading My Way.
And finally a special honorary mention to this post from Mary at The Boondocks Blog. I love a good 'fail' post and Mary has some classics, her method to deal with this awkward ring left on painted furniture is worth a read if nothing else! I don't mind admitting I lol-ed!
Congratulations, here is a "Yay! I was featured" button for your blog.
We are all about sharing and caring here at Handmade Monday so if you do link up please take some time to visit some other links and share a few on the social media of your choice. If you are not a social media fan then comments are lovely too (I know the world of tweets, likes, shares and hashtags is not for everyone!)
We have a Handmade Monday Facebook Group where we share tips and ideas. If you like to link up here regularly you are welcome to join us, just send a request. Every entry to Handmade Monday gets pinned onto our Handmade Monday pinterest board too.
The rules for Handmade Monday are simple:
- Did you make it? Yes - hooray, we'd love to see it!
- Add the link to a specific blog post, not your main site URL.
- Link up to 3 posts each week.
- Mingle - visit some of the other links - comment - share - let's support one another and grow our craft community.
If you're not sure on anything, more information can be found here.
Subscribe to:
Posts (Atom)
Labels
Air Hardening Clay
Blogging
Christmas
Clever ideas
Craft show
Crochet
Doctor Who
Easter
Felt
Geekery
Gift Wrap
Gifts
Hand Lettering
Handmade Monday
Home Decorating
Kids activities
Knitting
My Favourite Finds
Needle case
Party ideas
Pattern review
Pinterest Challenge
Sewing my Stash
Silent Sunday
Valentine
Wedding
accessories
art
bags
buttons
cakes
cooking
cushions and pillows
doodle
embroidery
gardening
gift ideas
greeting cards
jewellery
organising ideas
papercraft
papercutting
pretty ideas
recipes
recycling/repurposing
refashion
sewing
their stories
thrifty tips
tutorials
what can go wrong