

I've taken a load of photos as I go, especially of the cable bit, so if you can knit a bit but haven't tried cable before I think this would be a great starter project. Don't let the length of the pattern put you off, it's just long because I've written every row out. I thought it would be clearer when to decrease etc.

You can make your trees bigger or smaller simply by changing the wool you use and the size of needle. The chunkier the wool - the bigger the needle - the bigger the tree - easy!
Here the larger green tree is 18cm/7" tall and 8cm/3" across at the base, the cream one is 15.5cm/6" tall and 6cm/2.5" wide.
There is a mixture of photos of the green tree and the cream one, the pattern is the same but the cable shows up better on the cream.
First just the pattern for those who already know what they are doing:
Knitted Cable Mini Christmas tree
Approx 25g of wool (I know this is a terrible way to write a pattern but I was just using up oddments, a 25g ball would be plenty)
My green wool was a thick DK(worsted) and I used 4mm needles
My cream wool was also DK but was a bit thinner (go figure) and I used 3.25mm needles
You also need a cable needle approx same size as your regular needle, some stuffing or wadding of some kind & a big sewing needle
cast on 45 stitches
R1: p3 *k4 p3 rep from *
R2: k3 *p4 k3 rep from *
R3: rep R1
R4: rep R2
R5: p3 *c4f p3 rep from *
R6: rep R2
R7: rep R1
R8: rep R2
R9: rep R5
R10: rep R2
R11: p2tog p1 *k4 p2tog p1 rep from * (38sts)
R12: k2 *p4 k2 rep from *
R13: p2 *c4f p2 rep from *
R14: rep R12
R15: p2 *k4 p2 rep from *
R16: rep R12
R17: rep R13
R18: rep R12
R19: rep R15
R20: rep R12
R21: p2tog *c4f p2tog rep from * (31 sts)
R22: k1 *p4 k1 rep from *
R23: p1 *k4 p1 rep from *
R24: rep R22
R25: p1 *c4f p1 rep from *
R26: rep R22
R27: rep R23
R28: rep R22
R29: rep R25
R30: rep R22
R31: p1 *k1 k2tog k1 p1 rep from * (25 sts)
R32: k1 * p3 k1 rep from *
R33: p1 *c2f k1 p1 rep from *
R34: k1 *p3 k1 rep from *
R35: p1 * k3 p1 rep from *
R36: rep R 34
R37: p1 *slip 1 st to cable needle k2tog then knit st from cable needle p1 rep from * (19 sts)
R38: k1 * p2 k1 rep from *
R39: p1 * k2 p1 rep from *
R40: rep R38
R41: p1 *c2f p1 rep from *
R42: rep R38
R43: p1 *k2tog p1 rep from * (13 sts)
R44: work k1 p1 rib starting with k1
R45: work k1 p1 rib starting with p1
R46: rep R44
R47: p1 * sl1 k1 psso rep from * (7 sts)
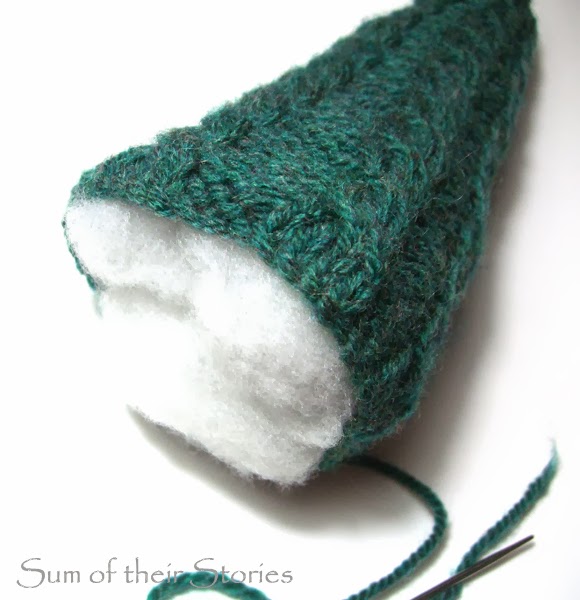
Break off wool leaving about a 30cm tail. Thread a big old sewing needle and thread the tail though the remaining stitches and pull up tight.

Fold in half right sides together and slip stitch up the long side to form a cone
Turn right side out
Stuff with wadding making sure to adjust as you go to get a nice even cone shape

To Knit the base:
Cast on 8 st
R1: k to end
R2: p to end
R3: k row inc at both ends (10 sts)
R4: p row inc at both ends (12 sts)
R5: rep R3 (14 sts)
R6: rep R4 (16sts)
work 6 rows stocking stitch starting with a p row
R12: k2tog k to last 2 sts k2tog (14sts)
R13: p2tog p to last 2 sts p2tog (12 sts)
R14: rep R12 (10 sts)
R15: rep R13 (8 sts)
cast off.

Pin then stitch the base in place at the bottom of the cone

Now exactly the same pattern again with a bit more help:
The black writing is the pattern same as above, the red is me leaning over your shoulder talking to you!
cast on 45 stitches
R1: p3 *k4 p3 rep from *
R2: k3 *p4 k3 rep from *
R3: rep R1
R4: rep R2
It should look like this, a sort of rib:

I'm showing you here in the middle of a row, just because it's easier to photograph. So you've done your 3 purl stitches, take the wool to the back ready for your knit stitch

c4f means cable 4 stitches to the front. Your little cable twist will be 4 stitches wide in total. Get your cable needle and slide it into the next 2 stitches.

Then slide these two stitches off the regular needle they were on. Now they are just on the cable needle. Bring them to the front

Next you are going to knit the next two stitches on your regular needle. This is a bit of a fiddle because the cable needle is kinda in your way

Now it should look like this:

Tuck your left regular needle out of the way for a minute and pull the cable needle across to the left. You are now going to knit those two stitches from the cable needle

That's it, c4f - you've done it! see the little twist it's made

R7: rep R1
R8: rep R2
R9: rep R5
R10: rep R2
R11: p2tog p1 *k4 p2tog p1 rep from * (38sts)
R12: k2 *p4 k2 rep from *
R13: p2 *c4f p2 rep from *
R14: rep R12
R15: p2 *k4 p2 rep from *
R16: rep R12
R17: rep R13
R18: rep R12
R19: rep R15
R20: rep R12
R21: p2tog *c4f p2tog rep from * (31 sts)
R22: k1 *p4 k1 rep from *
R23: p1 *k4 p1 rep from *
R24: rep R22
R25: p1 *c4f p1 rep from *
R26: rep R22
R27: rep R23
R28: rep R22
R29: rep R25
R30: rep R22
R31: p1 *k1 k2tog k1 p1 rep from * (25 sts)
R32: k1 * p3 k1 rep from *
R33: p1 *c2f k1 p1 rep from *
c2f just means you little twist is now only 2 stitches wide instead of 4,
so you only slide 1 stitch onto the cable needle

R34: k1 *p3 k1 rep from *
R35: p1 * k3 p1 rep from *
R36: rep R 34
R37: p1 *slip 1 st to cable needle k2tog then knit st from cable needle p1 rep from * (19 sts)
So you've just got 1 st on the cable needle and you knit the next 2 stitches together, then knit your one from the cable needle

R38: k1 * p2 k1 rep from *
R39: p1 * k2 p1 rep from *
R40: rep R38
R41: p1 *c2f p1 rep from *
R42: rep R38
R43: p1 *k2tog p1 rep from * (13 sts)
R44: work k1 p1 rib starting with k1
R45: work k1 p1 rib starting with p1
R46: rep R44
R47: p1 * sl1 k1 psso rep from * (7 sts)
s1 means slip one - you just slip the next stitch onto the right needle without doing anything to it. psso means pass slip stitch over.
So here you slip a stitch, knit the next stitch:

then use your left needle to pick up the slipped stitch

and pass it over the one you've just knitted

Break off wool leaving about a 30cm tail. Thread a big old sewing needle and thread the tail though the remaining stitches and pull up tight.


Turn right side out
Stuff with wadding making sure to squidge it and adjust as you go to get a nice even cone shape
To Knit the base:
Cast on 8 st
R1: k to end
R2: p to end
R3: k row inc at both ends (10 sts)
R4: p row inc at both ends (12 sts)
R5: rep R3 (14 sts)
R6: rep R4 (16sts)
work 6 rows stocking stitch starting with a p row
R12: k2tog k to last 2 sts k2tog (14sts)
R13: p2tog p to last 2 sts p2tog (12 sts)
R14: rep R12 (10 sts)
R15: rep R13 (8 sts)
cast off.
It should look a bit like this:
Pin then stitch the base in place at the bottom of the cone
Use a load of pins, ease it round carefully before you start to
stitch, make sure it's even


*The Christmassy picture behind was one I printed from the lovely How to nest for less last year, it's in an old frame just covered with Washi tape, first red then green. It is still available for free download along with loads more lovely printables.
Our charming sons are not enamoured with the cream coloured tree, I was aiming for a country chic look and they advise it looks like a ice cream cone! Ah well, you can't please everyone!
Update: I've sewn a few buttons on, I found a button with a star for the top of this cream one which I'm not sure about.

The little one I quite like with it's tiny buttons, the top is a mini peg that already had a silver star on it, I just painted the star red with nail varnish.

What do you think, better with or without?
You might also be interested in:
|
|
|
|


Love your trees! I'm not a knitter, but maybe I should learn. Now following on FaceBook. Have a great day!
ReplyDeleteThanks Kathy, if you don't knit maybe you'll be more successful than me at finding an old cable jumper to cut up and make a tree from. I'm still keeping my eyes open so I can make something similar but a bit bigger.
DeleteVery cute. They would look nice with buttons sewn on, but nothing too glizty as I like their simplicity.
ReplyDeleteI'll have a go and if it comes out nice I'll let people see it!
DeleteGreat christmas trees!
ReplyDeleteThanks Natalie, so not too ice cream cone-y then?!
Delete*THANK YOU*!! -- Those are such GREAT Instructional Pics!
ReplyDeleteAlthough I've been a Crocheter since FOREVER, I only started Knitting a couple of years ago and still can't "Pattern"-read in either! [I just go cross-eyed when reading them! My brain prefers "pictures" or graphs] - Meanwhile, I was "planning" on *teaching* myself how to do cables this year, but just never had a chance to get at it... THIS will be *quite* HELPFUL!!
:-D
Thanks, good luck and I hope these pictures help. I can now picture you sitting in front of your pc, peering at the screen with your knitting on your lap!
DeleteIf you are going to learn to cable start with something with narrow cable like this, nothing too wide. If you are pulling more than a few stitches over it can be quite fiddly to get used to (keep this a secret but cable is actually really easy - much easier than anything with holes or lacey effect!)
What a brilliant blog! These trees look lovely. Will definitely be putting them on my to do list. Thank you
ReplyDeleteThank you Andrea, what a nice thing to say. I'm glad you have liked what you see.
DeleteI love this! I still remember knitting mini Christmas wreaths one year. I'm not sure if I still have the pattern.
ReplyDeleteI pinned your post on my Christmas board. I'd love for you to share it with my readers at my Motivation Monday linky party: http://www.alifeinbalance.net/motivation-monday-healthy-holiday-recipes-almost-no-desserts/
Cabling is my nemesis! >_< But you make it look so easy and the trees are super cute! I'm going to give it another go! Thank you! x
ReplyDeleteAwh, don't be scared, it's not difficult just a bit of a fiddle! Like I think I've already commented, just start with something where the twist is quite narrow (just a couple of stitches to pull across like this pattern) Once you have mastered it then all cable patterns are just variations on a theme. My Mum was an expert cable knitter, I have a few lovely things she knitted for me & the family to share.
DeleteThese are so adorable! i wish i knitted :) http://www.handmadeintheheartland.com/
ReplyDeleteJulia, OMG, I love these. I am so jealous too you can knit like this. I can only loom knit. I also crochet. Too bad you can't make cables with crochet. Love how the trees turned out!
ReplyDeleteThese are so cute! I don't know how to knit but I wish I did. Thank you for linking up at The Wednesday Round Up! Hope to see you back next week!
ReplyDeleteThanks so much for linking up at The Wednesday Roundup! Looking forward to following along!! Angela @ http://lemoinefamilykitchen.blogspot.com
ReplyDeleteIt is always disappointing to try to find something that we are looking for, but then again it inspires us to create something unique and that is our own. Thanks you for linking your wonderful tutorial up to Inspiration in Progress.
ReplyDeleteOne day I WILL find a lovely cable knit jumper in a charity shop, I shall be so excited I won't know what to make with it!
DeleteSuper cute! -Marci @ Stone Cottage Adventures
ReplyDeleteThis takes a lot of talent! Great job and thanks for linking this to Less Laundry, More Linking party!
ReplyDelete