28th March was my Nan's birthday, so today I'm sharing another thing she made as a little tribute to her.
As I was growing up I knew my nan dabbled in oil and acrylic painting, but it was either when she retired or when my grandad passed away (I can't remember which) she went to classes and tried out lots of new techniques.
These pretty painting were some she did for us when she was experimenting with watercolours.
As far as I know she always painted from her imagination so sadly this little cottage and garden probably doesn't really exist!
I remember that we had them framed and on the wall in our bedroom in our first house but at the moment the are in a box along with a load of photos and other family memorabilia.
Interesting that she signed her name in different ways on each picture.
I think I said it last year, but if my paternal grandma Ellen were still alive today I'm an absolutely sure she would have a blog. She would have loved the idea of sharing her ideas and makes with people all over the world, connecting with like minded people, being inspired by what they've been creating.
The stories I've sharing in previous years showing items made by Ellen, my mum and my other nan can be found here.
Tuesday, 28 March 2017
Sunday, 26 March 2017
Hello, it's Handmade Monday time! Welcome to our weekly craft linky.
Come and join us, share your makes, bakes and other handmade craft ideas or just find some new inspiration.
I'm SO sorry that Handmade Monday is a little late going up today. It's Mothers Day here in the Uk and I was sitting with a cuppa enjoying a film with the family when I suddenly remembered I'd not got our linky ready in advance this week! Ops!
Here are last weeks features:
Macrame has made such a come back recently, I really love this wall hanging from My French Twist.
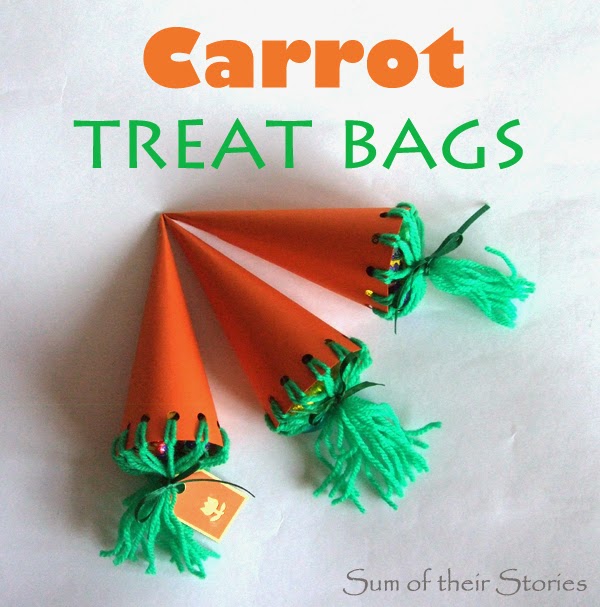
Easter is not far away now, these paper treat bags are such a sweet idea from Pillar Box Blue.
Congratulations, here is a "Yay! I was featured" button for your blog.
We have a Handmade Monday Facebook Group where we share tips and ideas. If you like to link up here regularly you are welcome to join us, just send a request. Every entry to Handmade Monday gets pinned onto our Handmade Monday pinterest board too, send a request to join this group board if you love to pin.
The rules for Handmade Monday are simple:
I'm SO sorry that Handmade Monday is a little late going up today. It's Mothers Day here in the Uk and I was sitting with a cuppa enjoying a film with the family when I suddenly remembered I'd not got our linky ready in advance this week! Ops!
Here are last weeks features:
Macrame has made such a come back recently, I really love this wall hanging from My French Twist.
Easter is not far away now, these paper treat bags are such a sweet idea from Pillar Box Blue.
We have a Handmade Monday Facebook Group where we share tips and ideas. If you like to link up here regularly you are welcome to join us, just send a request. Every entry to Handmade Monday gets pinned onto our Handmade Monday pinterest board too, send a request to join this group board if you love to pin.
The rules for Handmade Monday are simple:
- Did you make it? Yes - hooray, we'd love to see it!
- Add the link to a specific blog post, not your main site URL.
- Link up to 3 posts each week.
- Mingle - visit some of the other links - comment - share - let's support one another and grow our craft community.
If you're not sure on anything, more information can be found here.
Wednesday, 22 March 2017
I've had so much fun creating this Easter decoupaged bunny, repurposing an old book.
I received a large polystyrene bunny from Hobbycraft, part of their Easter decorating range.
She (I think it's a she, I'm not sure why) has been so much fun to decorate. I wasn't sure initially what I was going to do with her, but thinking about rabbits reminded me of a battered copy of Alice in Wonderland that I picked up in a charity shops ages ago. I had a plan to do some art work (still on my 'to do' list) but I knew that wouldn't take the whole book. I dug it out and on flicking through discovered that at the end is "An Easter greeting to every child that loves Alice".
I assume every copy has this but I don't know for sure. Still, it was like it was mean't to be!
I realise that batter copies of Alice in Wonderland might be hard to come by, if you can't find one don't worry. You can use any book, not enough really shows to matter and then just photocopy a page with an illustration from a copy of the actual book if you want to make a tag like I have.
To make your own Alice in Wonderland inspired Decoupaged Book Bunny you will need:
A polystyrene bunny - mine is this one from Hobbycraft
An old book - As I said, I had a copy of Alice in Wonderland but you could manage with any old book.
Mod Podge - mine was the sparkly kind, I love it but you can use regular if you prefer.
Ribbon
A scrap of card, scissors, brush
Start by ripping a few pages of the book into small pieces. I put the ones with the illustrations I wanted to save to one side and ripped up about 10 pages in all for this.
Brush Mod Podge over a section of the rabbit and start glueing the book scraps on.
Cover the paper completely over the top with glue too. You'll find it softens and has a little 'give' once it's all saturated with the glue but for curved sections it's also helpful to do little rips in the sides of the paper scraps too.
I did my rabbit all over save for the bottom inch and allowed it to dry throughly overnight.
In the morning I decoupaged over the last bit going round onto the base.
I thought the ears were a little bit fiddly, that was until I did the tail! For these extra curvy bits I just used much smaller pieces of paper, this made it easier.
Whilst she dried I made her a tag.
I ripped round one of the rabbit illustrations that I'd saved earlier and cut a simple tag shape from scrap card. I simple glued the illustration on and then added the happy easter greeting I ripped from the letter at the back of the book.
To finish her off I just tied a blue check ribbon from my stash round her neck and added the tag with a tiny length of embroidery thread.
I'll be linking up this project at some of these lovely link parties
I received a large polystyrene bunny from Hobbycraft, part of their Easter decorating range.
She (I think it's a she, I'm not sure why) has been so much fun to decorate. I wasn't sure initially what I was going to do with her, but thinking about rabbits reminded me of a battered copy of Alice in Wonderland that I picked up in a charity shops ages ago. I had a plan to do some art work (still on my 'to do' list) but I knew that wouldn't take the whole book. I dug it out and on flicking through discovered that at the end is "An Easter greeting to every child that loves Alice".
I assume every copy has this but I don't know for sure. Still, it was like it was mean't to be!
I realise that batter copies of Alice in Wonderland might be hard to come by, if you can't find one don't worry. You can use any book, not enough really shows to matter and then just photocopy a page with an illustration from a copy of the actual book if you want to make a tag like I have.
To make your own Alice in Wonderland inspired Decoupaged Book Bunny you will need:
A polystyrene bunny - mine is this one from Hobbycraft
An old book - As I said, I had a copy of Alice in Wonderland but you could manage with any old book.
Mod Podge - mine was the sparkly kind, I love it but you can use regular if you prefer.
Ribbon
A scrap of card, scissors, brush
Start by ripping a few pages of the book into small pieces. I put the ones with the illustrations I wanted to save to one side and ripped up about 10 pages in all for this.
Brush Mod Podge over a section of the rabbit and start glueing the book scraps on.
Cover the paper completely over the top with glue too. You'll find it softens and has a little 'give' once it's all saturated with the glue but for curved sections it's also helpful to do little rips in the sides of the paper scraps too.
I did my rabbit all over save for the bottom inch and allowed it to dry throughly overnight.
In the morning I decoupaged over the last bit going round onto the base.
I thought the ears were a little bit fiddly, that was until I did the tail! For these extra curvy bits I just used much smaller pieces of paper, this made it easier.
Whilst she dried I made her a tag.
I ripped round one of the rabbit illustrations that I'd saved earlier and cut a simple tag shape from scrap card. I simple glued the illustration on and then added the happy easter greeting I ripped from the letter at the back of the book.
To finish her off I just tied a blue check ribbon from my stash round her neck and added the tag with a tiny length of embroidery thread.
The sparkle Mod Podge I used is awesome, no where near as messy as using glitter and the sparkly is amazing once it's dry.
Just to check that this could work using a photocopy too I make another tag. I wouldn't recommend using photocopies for all the decoupage, the ink tends to smudge a little if you rub it too much with the glue brush, but for a single illustration it was fine. I just made sure I didn't fuss it too much with the brush and it didn't really smudge at all.
Made like this without the Easter reference this could work for any time of the year. It would be fabulous for an Alice in Wonderland themed party, are they a thing? If not they should be! Although having studied it as I ripped it up I have to conclude it is a slightly weird book!
Hobbycraft have more ideas of how you can decorate these large polystyrene rabbits if you don't fancy book decoupage. I'm loving it, and now I'm looking for more things I can cover in scraps of old books!
When I was really little apparently I would spend a lot of time doing what I called 'cutting and sticking'. Some things never change!
You might also be interested in:
|
|
|
|
Sunday, 19 March 2017
Hello, it's Handmade Monday time! Welcome to our weekly craft linky.
Come and join us, share your makes, bakes and other handmade craft ideas or just find some new inspiration.
How's your week been? It's been a busy one for me but I did manage to find some time to start a decoupage project, that I hope to have finished and ready to share soon.
I've also been multitasking in the evenings combining catching up with some tv and the knitting that I started last week.
Now onto the features from last week's Handmade Monday. And can I just say thank's a lot - you are not making it easy to pick features, so many lovely ideas linked up last week! I've gone for yarn based features this week and there are 3 because I just couldn't choose!
Jo from Three Stories High shared a child's jumper she made from her left over stash. She even added some little crochet flowers which I love.
Lina from Sew Historically was so clever and creative with this jumper refashion. She took apart the polo neck (turtle neck) of an old jumper (sweater) and then used the wool (yarn) she had just undone to crochet a new pretty lacy collar.
Sometimes I find it funny that we think we speak the same language in the UK as the US!
Over the Apple Tree was also on the recycle vibe with this great idea to take apart a jumper (sweater) carefully to source some lovely new materials for making new stuff.
Congratulations, here is a "Yay! I was featured" button for your blog.
We have a Handmade Monday Facebook Group where we share tips and ideas. If you like to link up here regularly you are welcome to join us, just send a request. Every entry to Handmade Monday gets pinned onto our Handmade Monday pinterest board too, send a request to join this group board if you love to pin.
The rules for Handmade Monday are simple:
How's your week been? It's been a busy one for me but I did manage to find some time to start a decoupage project, that I hope to have finished and ready to share soon.
I've also been multitasking in the evenings combining catching up with some tv and the knitting that I started last week.
Now onto the features from last week's Handmade Monday. And can I just say thank's a lot - you are not making it easy to pick features, so many lovely ideas linked up last week! I've gone for yarn based features this week and there are 3 because I just couldn't choose!
Jo from Three Stories High shared a child's jumper she made from her left over stash. She even added some little crochet flowers which I love.
Sometimes I find it funny that we think we speak the same language in the UK as the US!
Over the Apple Tree was also on the recycle vibe with this great idea to take apart a jumper (sweater) carefully to source some lovely new materials for making new stuff.
Congratulations, here is a "Yay! I was featured" button for your blog.
We have a Handmade Monday Facebook Group where we share tips and ideas. If you like to link up here regularly you are welcome to join us, just send a request. Every entry to Handmade Monday gets pinned onto our Handmade Monday pinterest board too, send a request to join this group board if you love to pin.
The rules for Handmade Monday are simple:
- Did you make it? Yes - hooray, we'd love to see it!
- Add the link to a specific blog post, not your main site URL.
- Link up to 3 posts each week.
- Mingle - visit some of the other links - comment - share - let's support one another and grow our craft community.
If you're not sure on anything, more information can be found here.
Saturday, 18 March 2017
Spring has definitely sprung in our part of the world so here's a simple upcycling idea for bringing a little spring prettiness into your home.
If you are in the southern hemisphere and heading into Autumn, maybe just pin for now and come back to this in 6 months!
I'll be linking up this project at some of these lovely link parties
If you are in the southern hemisphere and heading into Autumn, maybe just pin for now and come back to this in 6 months!
In order to bring you this craft project I was provided with some products by Hobbycraft.
Perfect for an Easter Table centerpiece or just as a fun way to brighten your indoor space, this vase started it's life as a jam jar. I don't know why we call them all jam jar's here in the UK when this jar didn't contain jam at all! It actually contained mincemeat that we used for mincepies last Christmas, it's a good size jar, 13cm/5" tall - perfect for a vase.
To make this vase or the pen pot you will need:
- Faux grass - mine was this one from Hobbycraft
- Artificial daisy heads - I used these also from Hobbycraft
- A clean old jam jar for the vase
- A clean old food tub of some sort for the pen pot
- Scissors
- A hot glue gun - mine is one of these
This is a super quick project, it took longer to clean up afterwards that it did to make the vase and pen pot!
Simple cut the faux grass to fit in a band around your jam jar. I made my band about 7cm/3" wide as I wanted a little glass and therefore stems showing top and bottom, yours can be as wide or narrow as you wish.
It's really easy to cut with regular scissors, but it is a little messy as you can see. Just rub your hands over the grass after you've cut it to remove all the loose bits and to fluff it up a bit.
Now hot glue it to the jam jar. No photos of this bit I'm afraid as I can't hot glue and take photos simultaneously but I'm sure you can work it out!
Just be careful of your fingers with that hot glue. Once it's attached, just press firmly to the glass for a few seconds until the glue cools down and hardens.
Next take the artificial daisy heads and glue them to the grass. I did a fairly regular pattern but you could dot them randomly all over or place them in a line, whatever takes your fancy.
That's it! Simple as that. Fill your jar with water and pop in some spring flowers. I went for daffodils as they scream Spring and Easter to me.
This would make a great Mother's Day gift too, maybe not for small children to do with the hot glue but anyone else could rustle this up easily.
You could even just add a grass wrap around an existing vase and just tie it on firmly with twine if you wanted a large bunch of flowers for an Easter celebration, that way once you were finished with it you could easily remove it and stash it away for next year. Some sort of rustic twine could look great with the grass and daisies, tied in a bow, maybe with an Easter tag.
Making the pen pot uses exactly the same method.
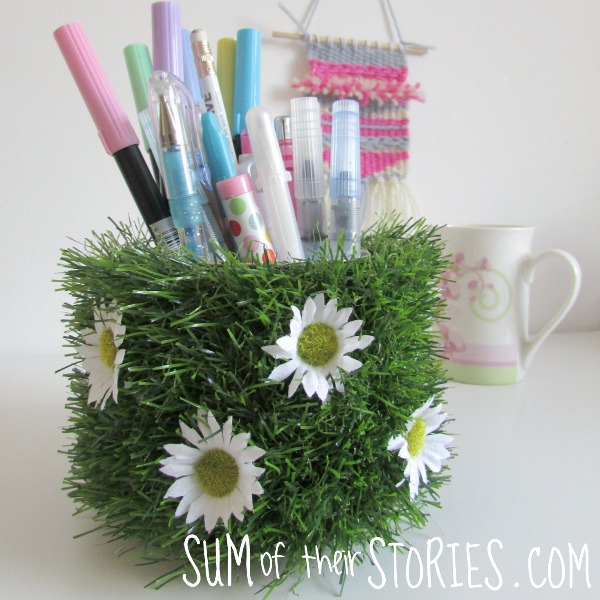
This time I covered a coffee tin but covered it completely in the faux grass. It was just a case of cutting the faux grass to size, hot gluing it on and then adding the daisies. This time I just used white daisies - just mixing things up a bit!
The tin gets surprisingly warm inside as the glue is cooling, I guess the metal holds the heat but it was never dangerously hot.
Once it had cooled I popped my prettiest pens in and added it to the desk.
This tin could be a planter too of course, as long as your recycled container is water tight you could add a potted plant in there instead - now that really would be ideal for Mother's day.
Just bear in mind that metal tins used as planters will rust at the bottom eventually. You can read my cautionary tale about that here.
I've got a few more Easter and Spring crafting ideas in the pipeline made from the products Hobbycraft provided, plus they have loads more ideas here if you are in an Easter decorating mood now!
You might also be interested in:
|
|
|
|
Subscribe to:
Posts (Atom)
Labels
Air Hardening Clay
Blogging
Christmas
Clever ideas
Craft show
Crochet
Doctor Who
Easter
Felt
Geekery
Gift Wrap
Gifts
Hand Lettering
Handmade Monday
Home Decorating
Kids activities
Knitting
My Favourite Finds
Needle case
Party ideas
Pattern review
Pinterest Challenge
Sewing my Stash
Silent Sunday
Valentine
Wedding
accessories
art
bags
buttons
cakes
cooking
cushions and pillows
doodle
embroidery
gardening
gift ideas
greeting cards
jewellery
organising ideas
papercraft
papercutting
pretty ideas
recipes
recycling/repurposing
refashion
sewing
their stories
thrifty tips
tutorials
what can go wrong