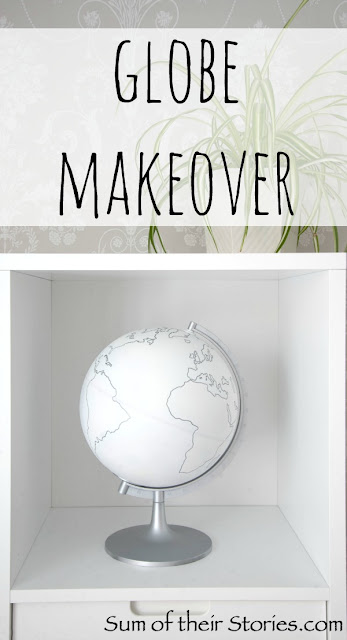
I'm so pleased with this simple makeover. It started life as a charity shop purchase by our daughter for a uni project and it was just about to make it's way back to the charity shop when I thought it might be worth attempting a makeover.
I did a little looking around on pinterest for some inspiration (even made a globe board & pinned some Star Wars Death Stars just because!) and settled on trying something involving painting it white with some silver accents. This was an "evolve as it went along" project with no pressure because the globe had been on it's way out the door anyway.
To make one you need:
A old kid's globe
White matt spray paint
Silver spray paint
A silver sharpie
A fine black sharpie
Take the globe out of the stand.
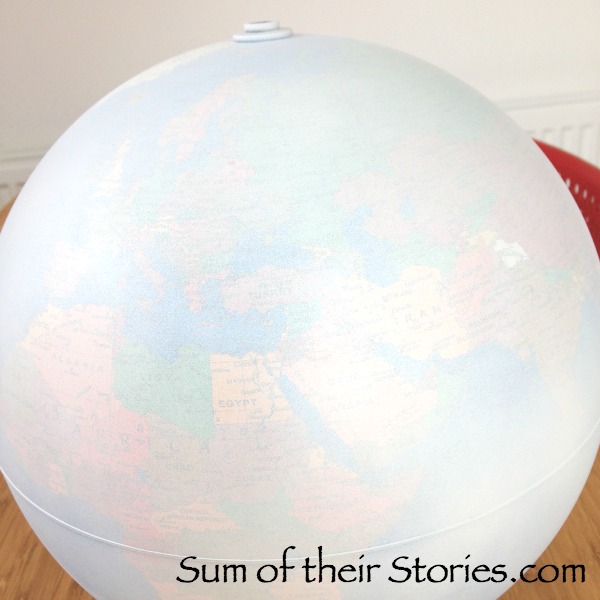
Give it a coat of white matt spray paint. I just did this in stages, one side at a time.
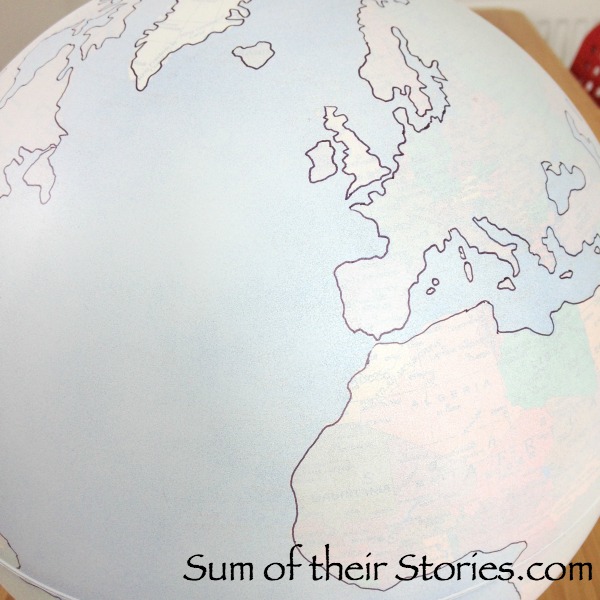
Whilst you can still make out the landmasses go over their outline using the black sharpie.
Give it another couple of coats of white spray paint until it's evenly coated.
At this point the bright colours should be all gone but you still should be able to make out the black sharpie lines faintly.
Now go over those landmass outline with your silver sharpie.
Spray the stand silver and reassemble. Do this carefully so you don't scratch your nice new paint job.
I'm loving this classy looking new globe, complete transformation!
The landmasses have become an approximation as some detail gets lost in the thickness of the pen. Some islands may have disappeared on mine, after the first coat of paint some areas were a little hard to make out. I apologise to Greece, Canada, Thailand and the Philippines as I know quite a lot of their little islands are missing on my globe now!
This would work with any colour scheme I think, gold or bronze would look amazing. You could try spraying the whole globe with a metallic paint but I imagine only if you are not bothered about drawing in the land masses, I can't imagine that showing through the paint at all.
I did think about colouring in all the landmasses with the silver, I may still do that one day. Or maybe cover them in paper flowers, or glitter, or sequins....
All the top quality photos in this post were taken by our daughter, you can find her website here
You might also be interested in:
|
|
|
|








Wow this looks great! I have seen other globe makeovers done with black chalkpaint but I really like the look of the white together with the silver - pinned! :)
ReplyDeleteThanks Sam, the chalkboard paint ideas are tempting aren't they, it would be fun to be able to write messages. Maybe next time!
DeleteWow what an improvement, now it's a much more stylish decoration. Great upcycle !
ReplyDeleteThanks Claire, I had this is the dinning room for a few days just to check the size before the makeover, the family thought I'd gone a bit mad - now it all makes sense to them!
DeleteWhat a great idea. It looks fantastic. I think I'll suggest it to my daughter as her globe is really awful to look at. #MakingHome
ReplyDeleteGlad you like it Katherine. I'm wondering if your daughters globe is a bright as this one was?!
DeleteWhat a cool makeover! Such a unique look :)
ReplyDeleteBlessings,
Edye | Http://gracefulcoffee.wordpress.com
Thanks Edye, so pleased that you like it.
DeleteThis looks wonderful. I've got a small glove just waiting for a makeover. Thanks for the inspiration and for sharing at Snickerdoodle Sunday. Pinned.
ReplyDeleteSo easy Beverly if you want to give it a try, and there are loads of different ideas and styles knocking around, I'm sure you'd find something to suit you.
DeleteLove this!! Sending to a friend who was looking to do something cool with an old globe!
ReplyDeleteGreat Tamar, if they Pinterest get them to check out the ideas there too - loads of options, some easy and some more fancy so I'm sure they'll find something they like.
DeleteThis looks great. I just did a bookend globe makeover but I really like how you did yours.
ReplyDeleteI love the sound of bookend globes.
DeleteBrilliant makeover so much better and fits your decor so well
ReplyDeleteHa ha, yes Carolee, our dinning room is all grey and white so this fits really well now. Now the kids are grown up we can have a few rooms with classy decor!
DeleteTotally and utterly gorgeous and soooooo worth the makeover.
ReplyDeleteThank you Michelle, it's always nice when you do a makeover and people don't prefer the "before"!
DeleteA very chic looking glob you have finished up with #TheRealCraftyLinkParty
ReplyDeleteI love this!! Thanks so much for sharing the how to! I'll be on the look out for a globe to make one for myself :) Pinned to share! Thanks for sharing at Snickerdoodle Sunday!
ReplyDelete~Laurie
I gather from a trip to TK Max that globes are very "in" right now so I don't know how hard it will be to pick the kids type up at a Charity or Thrift shop, hopefully you might come across one at the right price!
DeleteHi Julie, Great job! The "after" globe looks so much more interesting! Very creative! Blessings, Janet
ReplyDeleteThanks Jan, I'm pleased with how it looks, even if it is slightly less educational now!
DeleteI absolutely love this! I think outlining the countries in silver is such a cool touch. Thanks for linking up with our Creative Spark party - I chose your map makeover as one of my Features for this week. I hope you'll come back tomorrow and link up with us again!
ReplyDeleteLovely, thank you so much Emily, so glad you like it.
DeleteIt turned out great, you did a great job and now the globe looks like a design decor piece. Thank you for sharing at The Really Crafty Link Party. Pinned!
ReplyDeleteWow, this is a beauty!
ReplyDeleteThis is such a great idea!! I love it. My sister fancies one of those scratch maps as she has been going all over but this would be a great alternative and she could colour in where she has been. Great job! #MakingHome
ReplyDeleteThat's a brilliant idea, colouring in where you have been. Your sister could add a tiny photo too maybe, that would be fun.
DeleteI do love this more than anything! I have 3 globes which I've acquired through tag and estate sales and have been searching relentlessly for some DIY to do with them, or at least ONE of them. I've come up with nothing yet UNTIL I saw your globe makeover. LOVE. Simplicity! Best wishes to you. I'm pinning and sharing. Linda @Crafts a la mode
ReplyDeleteHi Linda, I'm so happy you are feeling inspired! This was pretty easy, the fact you trace over the land masses twice takes a little time but otherwise it's all very straightforward. Good luck with whatever you decide to do with yours!
Delete