Wednesday, 11 October 2017

Easy DIY Abstract Art

You really don't need lots of mad artistic skills to make a passable piece of abstract art for your home.
Easy DIY Abstract Art
This post contains affiliate links. This means if you click through and make a purchase the cost to you will be the same but Sum of their Stories will receive a small commission.
Our dining room has needed a something to go on the wall in a big ol' space for the 2 1/2 years since we moved here. 
I finally found a suitable old canvas in a local charity shop to paint over and last week I got to work. It's really easy and quite a lot of fun to make your own art and if you don't like it or get tired of it after a while you can just paint over it!

To make you own DIY Abstract Art you will need:

A canvas - buy new or pick up one in a charity shop or garage sale maybe
Household emulsion paint (latex)
Spray and/or acrylic paint in your choice of secondary colours 
A couple of brushes, nothing special - just use what you have
Ideas - pinterest is your friend here, I've a board of ideas to get you started.

I found this red canvas for £4, it's about 24" x 31" (61cm x 79cm) - perfect.
The first thing you want to do is get rid of any colour you don't want. 
I wanted our new art to be shades of white & grey with a touch of blue and pink. So I painted the whole canvas with 2 coats of regular household emulsion paint (I believe you call it Latex in the US)  
Now you are going to create your masterpiece. 
It's all about splodging on layers of paint until you are happy. How you do this will depend on the look you want and the paint you have.
I had a very small bit of spray paint left over from something else in the perfect shade of blue so that's where I started.
It may be hard for you to believe but this is not the final look I was going for!!! My husband pulled a doubtful face at this point, I don't blame him!
You can see I also had a teeny tiny bit of silver spray paint hanging around so I squirted that on too. If I had had more silver I think I would have done much more of that and much less of the blue. But this is ok, because we are working in layers these early stages don't really matter too much. Just keep going!

Next I mixed my grey acrylic paint with the emulsion (latex) and just painting in on randomly. I gave the middle a bit of interest with a band just the grey on it's own and a bit of a line up the right side. I just left a few bits of blue showing properly, but there are a few areas where the white/grey mix is pretty thin and the blue shows through lightly. 
Once you have the bare bones like this I'd recommend letting it marinate. You want to leave it to dry anyway, but give yourself a day or so to look at it again with fresh eyes. 
I decided this needed to be lighter all over and it needed some proper points of interest. 
I added a few areas of pink, a few grey and white lines with the finer brush. It was all very add hock, just a few bits here and there. Stand back every now and again, make a cuppa then return to your art and see what you think it needs more of. 
Just keep going with random blocks, lines or even dots and whirls if you like. Stop when you think it's enough.

To finish I used the larger of my brushes, with just the smallest amount of white paint to go over most areas. This softened the whole thing and lightening up some of the areas that felt too dark.
You can see here how the almost dry brush softens the pink area.
This is probably the busiest part of the artwork. Those lines through the white blob were done with the thinner brush and grey paint whilst the white shape underneath was still wet, to give a variable effect.
You can see the almost dry brush effect in this close up too.

And here it is in all it's glory in situ.
Make your own abstract art
I'm sure the light balance is all off in this photo, the sun was streaming in the window - hooray! But it gives you an idea. One day I'm going to paint those wooden chairs white. 
You can also see my globe makeover and where it lives ....
... and those are my Autumn Apothecary jars on the table 

I really enjoyed making my unique piece of abstract art and as a complete bonus, I hardly spent a thing. 
Make your own abstract art
The main rule seems to be there are no rules, it's art so you can do what you like. 
Easy DIY canvas art
If you paint a bit and the next day decide you don't like it you can just paint over it. Have fun, I can honestly say it was much easier than I thought it would be to create something that's not embarrassing to hang on the wall. Do you fancy having a go?
 

read more

Sunday, 8 October 2017

Handmade Monday #46

Welcome to our weekly craft link up Handmade Monday. 
Handmade Monday is a great place to share your makes, bakes and other handmade craft ideas and find some new inspiration.
I've finally got my Etsy shop up and running after a ridiculous amount of procrastinating. I had this idea that I had to be 'ready' until I realised that I never would be! I have quite a lot more to list but at least it's started now. Feel free to pop by and make it one of your favourites if you'd like to!!!


Now it's time to take a look at the features from last weeks Handmade Monday:
Laurie from My Husband has too many Hobbies showed us how to make these felt acorns - there are plastic Easter eggs under there! Can you believe it?!

Staying with a felt theme, Claire from Pillar Box Blue used her left over scraps from the felted blanket she shared with us a few weeks ago to make pretty flowers for this autumnal denim wreath. 

Congratulations to you both, here is a "Yay! I was featured" button for your blog.


Instructions: Select all code above, copy it and paste it inside your blog post as HTML

Handmade Monday is all about building a craft community, please so take a few minutes to visit some of the other links, leave a comment, and maybe share your favourites on the social media of your choice if you can.
A massive thank you to everyone who does participate and takes the time to visit the other Handmade Mondayers and share their projects and ideas.

The rules for Handmade Monday are simple:
  • Did you make it? Yes - hooray, we'd love to see it!
  • Add the link to a specific blog post, not your main site URL.
  • Link up to 3 posts each week.
  • Mingle - visit some of the other links - comment - sharelet's support one another and grow our craft community.
If you're not sure on anything, more information can be found here.


read more

Wednesday, 4 October 2017

10 ways to make Felt flowers

Simple and beautiful flowers made from felt.
10 easy ways to make flowers from felt
It's really easy to make brooches and corsages from old felted jumpers and cardigans, but with so many different ways to make them it can be confusing. So I've been testing out various methods to see which I like best.
This is what I started with, the scissors give some sense of scale, this cardigan had shrunk down pretty small!
felted cardigan repurposed into felt flowers
I cut the cardigan along the seams so I could see what useable pieces I had.
Then, with the help of my pinterest board, I just started making flowers

The Rolled Rose
10 easy ways to make flowers from felt

This one is fun and fairly difficult to get wrong. 
Draw around something round, a side plate or lid of something is ideal.  
Cut out the circle and the cut a spiral, leaving a bit of a round in the middle. I forgot to photograph this stage so you have to manage with a picture instead!
 
Now roll the spiral up starting from the thinnest point, the outside of the circle. You can glue every few cms with a hot glue gun or stitch the layers together with thread the same colour.
When you get to the end, the round in the middle forms a nice tidy base. Glue or stitch round it.
Then you can add a brooch fastening or glue or stitch it to something else.

Rolled Rose take 2
10 easy ways to make flowers from felt
This rolled rose is the same as the one above except this time it was a little bit smaller and the spiral cut was wiggly.

Simple Embroidery

10 easy ways to make flowers from felt
This time I made 2 flower patterns. The larger is 9.5cm in diameter and the smaller one 6.5cm. 
Take a piece of scrap paper and fold it in half.
Fold in in thirds, then mark just over 4.5cm from the point and 2.5 cm on each side. 
Draw a curve joining all the points and cut out.
When you open it out you should have a flower shape with 6 petals. 
For the smaller flower just make your marks 3.75cm and 2cm from the point respectively.

Cut out 2 large and 1 small flower.
Embroider using 2 strands of embroidery thread as takes you fancy on the petals then use french knots through both layers to join them together. Just don't waste too much time on embroidery that won't be seen on the larger flower underneath.
To finish it off I used the 2nd of the larger flowers and stitched the 2 together using a navy blue sewing thread and an oversew stitch to cover the back neatly and added a brooch pin. 

Gathered Rolled Flower

10 easy ways to make flowers from felt
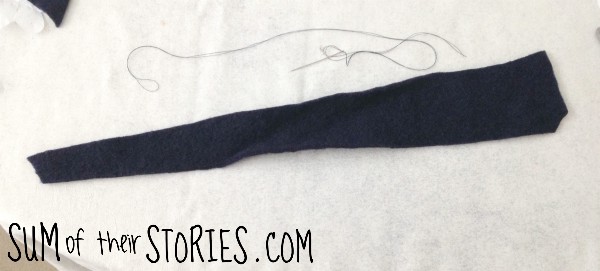
I tried this out to use a long scrap of felted cardigan (the sleeve) than wasn't big enough to make a rolled rose.
I simple cut a length about 5cm at it's widest point by 45cm and made it taper off at one end. Using sewing thread doubled up for strength I stitched a line of running stitch all along one side and pulled it up to gather the strip of felt.
I rolled it up and stitched it together to secure.
I added a leaf shape of green felted jumper to the back of this one to tidy it up, then stitched on a brooch pin. 

Button Centre Flower

This flower is made from separate petals so is great for using even the tiniest scraps. 
10 easy ways to make flowers from felt
Make yourself a petal template, this photo gives you an idea of the shape you are aiming for. 
Cut 6 petals from felt, then pinch each petal in half at the flat end and stitch or glue them together. Then you just attach all the petals to one another in a circle. I didn't seem to take any 'as I go along' photos here but it's pretty self explanatory.
I added a button to cover the small hole left in the centre.
I tidied up the back with a circle of felt and added a broach fastening. 

These are the 5 methods of making felt flowers that I've tested so far but there are loads more. I've got a Pinterest Board dedicated to all kind of flower making which you can check out. Plus I've found some more lovely ideas from other websites:

These roses from Pillar Box Blue are also made from old felted knitwear. There are great step by step instructions to show you how to make these.


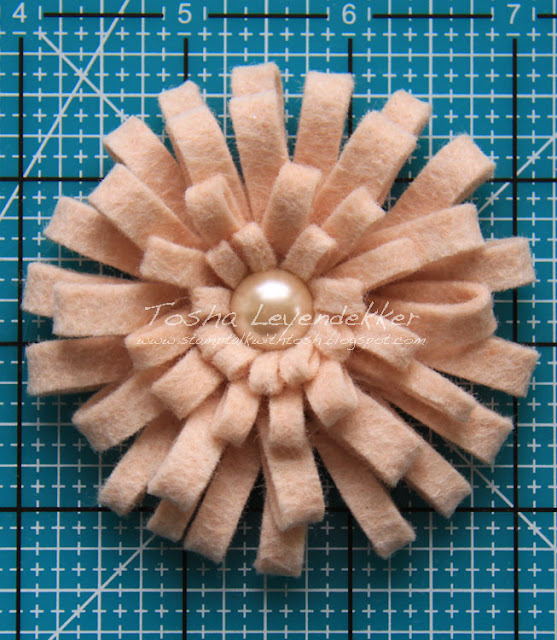
These loopy flowers from Stamp Talk with Tosh are so much fun, they look really easy to make too.

What about these lovelies from Craft your Happiness? You can make them in just 5 minutes, I love a quick craft don't you? 

Just look at these embellished beauties from Sewn Up, so pretty.

Last but by no means least what about this stunning faux succulents vertical hanging wall garden from Julie Measures. Julie has mixed felt and pinecones, what a brilliant and completely mess free idea. 

So much choice! 
10 easy ways to make flowers from felt
Do you have a favourite?


read more