Thursday, 13 February 2014

Evening Cardigan Makeover

plain cardigan to evening cardigan refashion
This is the second of my cardigan makeovers, You can find the first one here.

I had this plain little black cardie with a round neckline and 3/4 sleeves.
I'm not a big fan of 3/4 sleeves, I figure either it's cold enough to need sleeves or not, however I do have a few things with them and sometimes I do push up long sleeves. I digress.

It felt suitable for a dressy "going out" makeover. Sometimes on a night out you need a cardie to go over a silly little party dress, what if the place you are going is a bit chilly?

I found this trim in Hobbycraft at 90p per metre. How much you need will depend on the style of your cardigan. I bought 2 metres and have a bit left over.

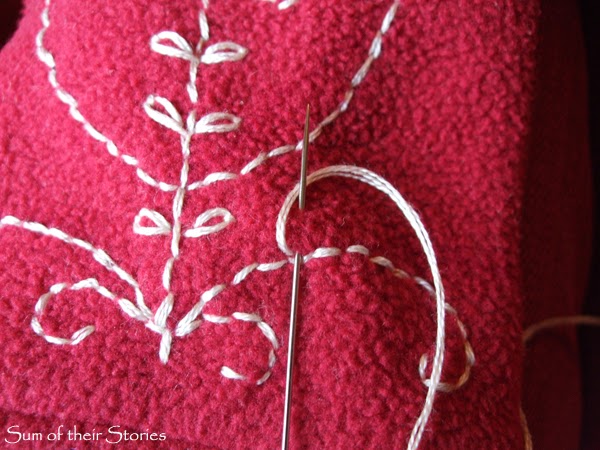
This was very easy, I just took some regular sewing thread and stitched the trim around the bottom of the neck edging.
  • I learnt as I went along that you want your needle to go in the direction shown in the photo, downwards, not upwards. It was just sooo much easier that way and I didn't keep getting the thread stuck on the beads.
  • I stopped every 5 of so beads and did a little casting off stitch, that way if I ever catch this trim on something it won't all come undone.
  • I worked quite slowly making sure the knit fabric was laid out on my knee without being bunched up or stretched out so it will lie flat when finished.
  • Don't use a long length of thread, be prepared to cast off and start again with a new length several times. A long thread will only wrap round and catch on the beads and end up taking longer.
That's it, easy as that. 
plain cardigan to evening cardigan refashion

plain cardigan to evening cardigan refashion
The buttons were already nice little shiny round buttons which went really well with the trim so I didn't even need to change them.

And finally, just to give you all a laugh, a selfie!
How on earth are you supposed to do these? Where do you look? How do you not end up with the camera in the way?
This was actually the best of about 6 selfies I took - enough said I think, back to photos taken by our youngest out in the garden!

You might also be interested in:
Stripy T Shirt Refashion
Star Stitch Sweatshirt Refashion
Pom Pom Scarf Refashion
Heart Elbow Patch Cardigan Makeover
I'll be linking up at these great link parties.

read more

Tuesday, 11 February 2014

Guest Blogging at Chic on a Shoestring Decorating

I am a teeny bit excited today as I'm guest posting over at Chic on a Shoestring Decorating.


Pop over to see my felt needle case tutorial.
felt needle case tutorial
 Another exciting new experience in my blogging journey.
Unfortunately the link to the pattern seems not to be working at Chic on a Shoestring decorating, apparently I am better at creative stuff than computer stuff, here it is in case you want to make your own needle case.


You might also be interested in:
Lace Top Refashion
Lace Top Refashion
Infinity Loop Scarf
Infinity Loop Scarf
Owl Granny Square Cushion Cover
Tea Towel Totes
Tea Towel Totes

read more

Saturday, 8 February 2014

Embroidered Gloves


I'd had these plain fleece gloves for ages, I thought they needed a bit of a makeover.
I started off thinking I would do something kind of fair isle inspired, something with white on the red, then I started doodling ideas...
https://drive.google.com/file/d/0B9Wvu5Rr2tp7STViUWFKSTdnY0k/edit?usp=sharing
 I ended up deciding on something a bit more folk art looking:

https://drive.google.com/file/d/0B9Wvu5Rr2tp7Q0Z1NDg3b3piNlE/edit?usp=sharing
Fancy giving a pair of old gloves a makeover? Here's what you need:
  • Old fabric gloves
  • A water soluble fabric pen or chalk (mine is a Pym Trickmarker)
  • Embroidery thread (I ended up using this ECRU DMC thread)
  • A sharp embroidery needle
  • A design idea, you can download mine here if you'd like to use it. (The download does work but you don't get a preview on screen, I haven't sussed out why yet - sorry, if anyone know, please message me!)
Draw the basics of your design on with the fabric marker pen or chalk. You can add the extras in by eye as and where you like. Unfortunately my pen is purple so it didn't show up especially well on the red gloves, but I wanted to get on with it so just went with what I'd got. You can just about make it out!
Cut a length of embroidery thread and separate the 6 strands into 2 lots of 3. Tie a knot at one end and start embroidering your design.

I used Backstitch:

Lazy Daisy Stitch:

and French Knots:
Give your beautiful new gloves a quick swish in luke warm water to get rid of the pen lines, dry them and you're done.
As you can see my stitching is not completely perfect or even, that's ok, a real human being embroidered these gloves so a bit of variation is nice.
Not sure why the colour changes so much on these pictures, I did try to correct it when I was editing them. The bottom pictures are a much truer colour.

 Now look round to see what else you can add a little embroidery too! 
All the top quality photos in this post were taken by our daughter, you can find her website here
You might also be interest in:
Easy to Sew Cushion Covers
Infinity Loop Scarf
Infinity Loop Scarf
Heart Elbow Patch Cardigan Makeover
Crochet Owl Brooch
Crochet Owl Brooch
I'll be linking up to all these great link parties, why not pop by!

read more

Friday, 7 February 2014

A little Tribute to Jenny

My Mum, Jenny loved to bake, knit and sew. She could actually do lots more than that, of course, but they were the things she loved. February 7th was her birthday so today I'm sharing something lovely that she made quite a few years ago.
This is my oldest son modelling the beautiful cricket jumper his Nan made for him. He's about 18 months in this photo and is almost 18 years now (over 6 foot and definitely can't fit in his Dad's shoes any more!)
The jumper was passed down to his little brother and then to younger cousins so I don't have it any more but I do still have the pattern:
Only a £1, bargain - and I'm guessing she made one of the smallest sizes.

Cable knitting was my Mum's favourite kind of pattern, she always said the first couple of pattern repeats were a bit tricky but once it was set up it was easy and looked more impressive than it was. I think she was being modest.

So today I'm remembering my Mum, Jenny who patiently taught me to knit, picked up my dropped stitches and was endlessly encouraging. x
You might also be interested in:

Harry Potter Scarf Pattern
My Nan's Shortbread Biscuits
Grey & Bright Crochet Flowers
A little tribute to Pearl
I'll be linking up at these great link parties.

read more