This post contains affiliate links, if you click through and make a purchase then the cost to you will be the same but Sum of their Stories will receive a small commission
One of the trends that is all over the place at the moment is floral embroidery on clothes. I keep seeing it in every shop window I walk past, it was even mentioned at the CHSI stitches show a few weeks ago as a big fashion thing. Some trends come along and stay for ages, others are in and out again before you know it. I'm no great fashion expert and I don't want to spend lots of money on something that is "here today, gone tomorrow" so I thought a DIY nod to this embroidered fashion trend might be in order.
I've had this old denim shirt for a few years now, it's soft and comfy and goes with loads of things.
A couple of evenings and some pretty simple stitching later and it has a new lease of life.
I love the red embroidery thread on the denim but you could try this idea on any colour or fabric shirt.
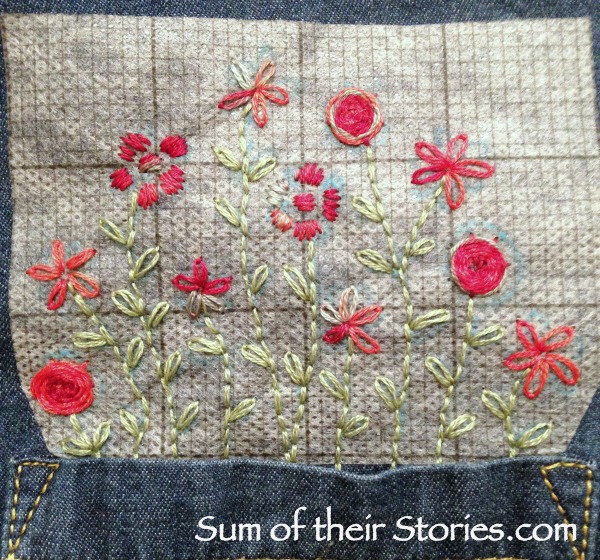
I used the DMC magic sheet that was in my goodie bag from the CHSI stitches show to transfer my design to the fabric. I like how it makes the fabric stiffer so an embroidery hoop is not really needed (at least I didn't use one and it turned out fine)
To create a similar refashion you need:
- A shirt - with a pocket if you want this "flowers in the pocket" effect
- Embroidery threads, mine was DMC coloris 4517 for the flowers and DMC 522 for the green stems and leaves
- Embroidery Transfer Magic Sheet by DMC or similar, or a wash out fabric marker pen
- Sharp embroidery needle and scissors
Now transfer your design onto the magic transfer paper if using. I used a pale blue pen which was probably a mistake as a darker colour would be easier to see. I'm afraid I was being lazy and just grabbed what was to hand.
To put the design onto the fabric you just cut it out, peel off the backing then press it down firmly.
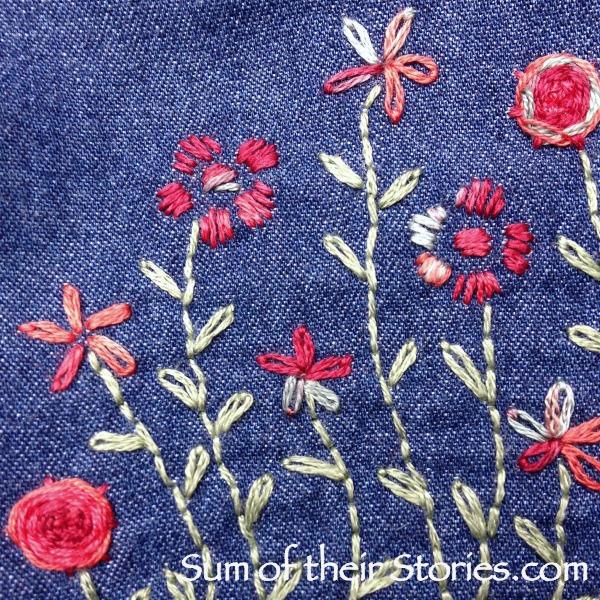
Now you just stitch your design using 2 strands of the embroidery thread. I did all the green stems and leaves first using back stitch for the stems and lazy daisy stitches for the leaves.
I used the DMC coloris thread, again with 2 strands, for the flowers and did a mix of lazy daisy stitches, simple long stitches (I'm not sure exactly what to call them, kind of satin stitch but not so close together) and some woven wheel stitch. My nan taught me these years ago and I was reminded of them just the other week by this great tutorial from Tea and a Sewing Machine.
Because the DMC coloris thread changes colour as you go it gives different shades to the flowers without you having to change anything.
The magic sheet transfer paper is pretty cool, I have no idea what it's made off but when your embroidery is all done you can just run it under the tap and in seconds the paper just turns to a kind of jelly and then vanishes.
I confess I started my embroidery threads with knots, normally a bit of a no no for embroidery but on the weighty denim I think I got away with it.
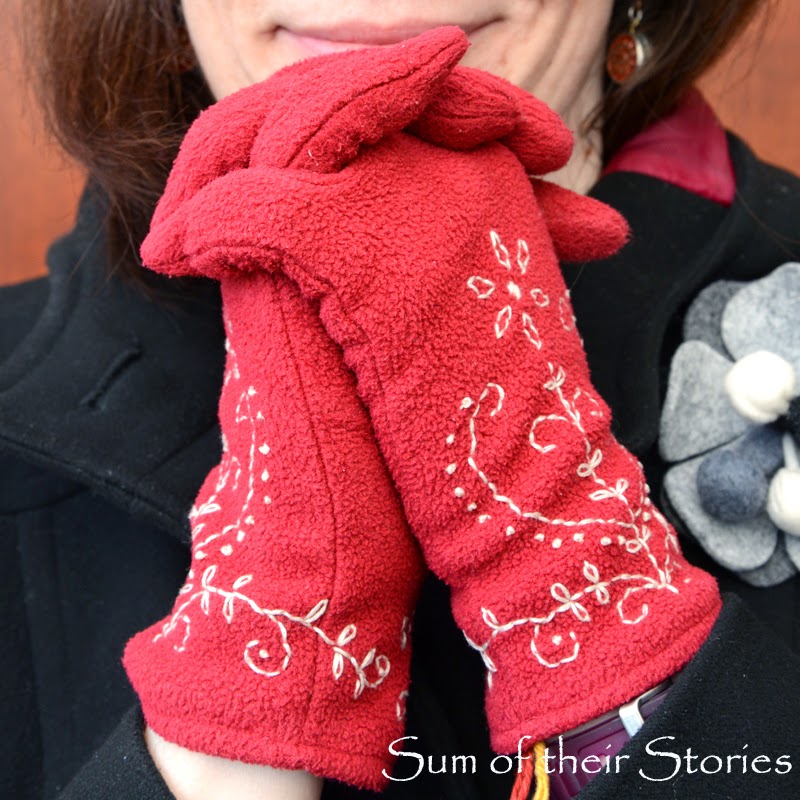
I added a little embroidery to the cuffs too, in exactly the same way as the pocket detail.
Dry your garment, if it needs ironing do it on the wrong side with a fluffy towel underneath so you are not squashing all your lovely stitches and the wear your embroidered embellished top with the joy of knowing no one else has one exactly the same.
You can go wild and add more or tone it down and add less. that's the beauty of doing it yourself! I can imagine a little on the collar, or maybe actually on the pocket instead of peeking out.
|
|
|
|


Love the flowers, coming out of the pocket was a great idea with these. I did machine embroidery on jeans quite a few years ago when it became popular again. I might have to do up some more now.
ReplyDeleteI've only tried machine embroidery once and I snarled up my machines tension, so I'm a little scared of it! I tend to stick to a needle and thread but I think the effects some people get are lovely. Good luck if you do try some more, it's very 'on trend'!
DeleteThis came out just lovely, and I like the two ideas you've shown here - 1) That magic sheet sounds awesome for keeping your artwork where you meant it and 2) Coloris thread. I like to crochet using those ombre colored skeins so that what I make ends up looking more complicated than it is, and that watercolor effect you get here is super neat.
ReplyDeleteThanks Susan, I've recently got into these coloris thread, the changing colour is not great if you like to be in control but if you can be free about how it turns out they are fab!
DeleteThe magic sheet might just be a game changer for me - I loved using it.
Your embroidery is so pretty. What a great idea for a re-fashion project.
ReplyDeleteThanks Caroline, I like a quick makeover project.
DeleteI love how the flowers are peeking out from the pocket, Julie.
ReplyDeleteThanks Pam, it turned out just like it had been in my head, which is always nice.
DeleteHi Julie, I've featured your fab embroidery today.
DeleteThanks so much Pam, that's lovely. I'll be sure to share on social media :-)
DeleteI love how it looks like the flowers are popping out of the pocket. Clever!
ReplyDeleteThanks Gail, glad you like it.
DeleteVery pretty
ReplyDeleteThis is sew cute Julia, a fabulous refashion!
ReplyDeleteThank you Josie, glad you like it.
DeleteWhat a beautiful idea, the little flowers look so sweet and delicate, Very clever xx
ReplyDeleteThanks Cheryl, it's given it a new look and meant I get it out of the wardrobe more often so that's a good thing!
DeleteSuch a difference and a good idea to brighten a garment
ReplyDeleteThanks, I know it's not up to the standard of your embroidery Caroline but i am not embarrassed by the result so that's a win as far as I'm concerned!
DeleteGosh that is so cute. I love the little round flowers. I have not seen that stitch before.
ReplyDeleteThanks, I remembered it from years ago when I saw it the other week on Tea and Sewing Machine, I'd completely forgotten all about it so it was nice to have another try.
DeleteThat turned out so cute!
ReplyDeleteLove this! The flowers poking out of the pocket look cute. You have combined 2 0f my favourite things denim and embroidery.
ReplyDeleteI'm a sucker for denim too, I like the red embroidery thread with this blue denim especially.
DeleteI love the idea of the flowers growing out of the pocket! And what fantastic detail, with all different types of flowers! Very pretty! :) Lisa
ReplyDeleteThanks, a lot less messy than putting real flowers in a shirt pocket, that's for sure!
DeleteI love to embroider so this is just perfect for me and I love the design you chose
ReplyDeleteThanks Amber, I hope you give it a try.
DeleteI love your shirt transformation and I had no idea that paper existed. Thanks for sharing with #CCBG
ReplyDeleteNore me, until I went to the CHSI stitches trade show a few weeks ago - it's really clever stuff, I'd definitely recommend it.
DeleteLovely, you did a wonderful job! (and yes, I do love that embroidery paper, it's so practical). Thank you for sharing at The Really crafty Link Party. Pinned!
ReplyDeleteThanks Teresa. I hadn't come across it before but I'm glad I have now. I've really enjoyed getting back into embroidery.
DeleteHi there
ReplyDeleteJust stopped by to let you know that I featured this on my Round Tuit post this week!
A Round Tuit 354
Thanks again for linking up to A Round Tuit Hope you have a great week!
Jill @ Creating my way to Success
Thanks Jill, that's so lovely. I really appriciate you letting me know.
DeleteI love this project! Crewel work was really popular when I was a teenager. Glad to see it making a comeback. Thanks for sharing with us at Creatively Crafty #ccbg :)
ReplyDeleteIts a very soothing craft, I'm loving it . I'm so pleased you like my project, thanks for stopping by.
DeleteWhat a great transformation for your denim shirt! Love the flowers coming up out of the pocket as well as on the cuffs! Well done! Blessings, Janet
ReplyDeleteThanks Janet, glad you like it :-)
DeleteI love this idea! I'm going see if I can find a shirt to try this out on. It's just so pretty.
ReplyDeleteI host a weekly Stitchery Link Party for all things hand embroidered and I'd love to have you come link up so that my readers can come see.
Thanks for the invite, I'll try to stop by and share plus get some more inspiration.
DeleteHello Julia, I'm back to thank you for taking the time to come link up to last week's Stitchery Link Party. I do hope that you join in again soon.
DeleteI went searching and found a pretty light blue men's shirt at the thrift store and once I've got the Eau de Thrift Store smell out of it, I'm going to stitch flowers coming out of the pocket and on the cuffs like you have on yours.
Such inspiring project, Julia! I made my own version of it at Polka Crafts blog http://wp.me/p8lBW1-79
ReplyDeleteKeep up with nice work and I wish you all the best!
Hi Sarune, that's so exciting, I love it when someone shares their versions of my projects. You shirt is lovely, thanks so much for sharing and for the link back.
DeleteI really love your design I am gonna try them for sure, nice, color-full and creative one.
ReplyDelete