Tuesday 30 June 2015

My Favourite Finds June 2015

Well, June has gone in a flash - how can we possibly be at the end already?
I did manage to find a few lovely things to share this month though, here we go:

Inside the Fox Den have some lovely kitchen printables with quotes from books about food and drink. This one is my favourite, but then anything that mentions tea is fine by me!

There are 3 to choose from and they are free to download.

This gorgeous planter started it's life as an inexpensive plastic salad bowl! 

Christine from Where the Smiles have been totally transformed it using a paint technique that looks like magic to me!

I've not picked up any crochet for ages but this pretty blanket from 5 Little Monsters is going onto my list.

It's a "join as you go" method which means no sewing up at the end which would suit me down to the ground. The pattern is free and there are loads of instructions to help too.

And finally for this month, a Doctor Who craft. I've not talked about anything Doctor Who for 4 months now so it's definitely long overdue - have I mentioned I'm a big fan???
Nikki from Tikkido has a full step by step tutorial for this two hearts tardis fabric t-shirt. She made it for her daughter but I'm thinking it would be just fine in adult size too! Nikki has LOADS of fabby Doctor themed projects, especially party ideas. Worth a look if you have a Whovian in the family. 

read more

Friday 26 June 2015

Scrapbusting Fabric Twine Bracelet

For the Pinterest Challenge this month I've made a bracelet from fabric scraps.
bracelet made from fabric scraps

Some of the products I used to make this bracelet were provided by Pandahall.

Quite some time ago I pinned this idea to make twine by twisting fabric scraps from My Poppet Makes.

Cintia from My Poppet Makes also has some fun ideas of what to do with your twine once you've made it, she's made a mat for the floor but also suggests wrapping presents, making coasters, tablemats and more.
I made a bag full - just because - and then put it to one side, moved house and forgot all about it (like you do...) Then a few weeks ago when I made this ribbon and bead bracelet ...
Ribbon bracelet tutorial
... using ribbon end jewellery findings, I thought of my bag of fabric scrap twine and dug it out.
So if you would like to have a go at making your own fabric twine bracelet you will need:
  • scraps of fabric - longish strips are best
  • a Selection of Jewellery Finding:
  • 2 Ribbon Ends (mine are these silver colour 6mm ones from Pandahall)
  • 2 small round jump rings (mine are these 4mm from Pandahall)
  • 1 larger jump ring (mine is a 7mm oval, from my stash)
  • 1 lobster clasp (mine is this one from Pandahall)
  • strong glue (I used Superglue)
  • jewellery making or small pliers
and
  • to go to My Poppet to find out how to make your twine
Once you have a length of twine, make the bracelet in exactly the same way as the Ribbon and Bead bracelet - the tutorial is here. I used 2 strands of my twine but you could include more if your twine comes out thinner or if your ribbon ends are bigger. You just don't need to add any beads, and I found I didn't need to use the tape to hold everything together either.

I find bracelets very hard to photograph, here is an awkward selfie just so you can see how it looks on (I took loads of these and this is the best - not my greatest photographic achievement!)

When I wear this bracelet I've found I like it best if I twist it before doing up the fastening, the two strands slightly twist together naturally and it lies nice and flat on my wrist. 

My favourite thing about this project is how each and every bracelet made this way will be unique, it all depends of the combination fabric used.
I also love that it uses up scraps, so good for those last precious fragments of a favourite print AND if it gets a bit grubby you can just gently handwash it and it will be good as new.
It would be lovely to make a bracelet to match a dress, skirt or shorts that you've made with the little leftover fabric scraps.

Here are the other great Pinterest Inspired projects in this month's Pinterest Challenge.
Scrapbusting Fabric Twine Bracelets || Sum of Their Stories 
DIY Strawberry Planter ||Refresh Living
DIY No Sew Faux Roman Shades || Dwelling in Happiness 
Wood Pineapple Bowl Revived || Sisters, What!
Mike Wazowski Pinata || Tastefully Frugal


You might also be interested in:
3 Pink Bracelets
3 Pink Bracelets
Earrings Organised Update
Earrings organised Update
Old Bracelet to New Statement Necklace
Old bracelet to new statement necklace
Crocheted owl Brooch
Crocheted Owl Brooch
I'll be linking up at these great link parties,

read more

Tuesday 23 June 2015

Personalised Gift Tags

You don't need lots of special equipment to make cute personalised gift tags.
I'm over that The Pinning Mama sharing how to make these personalised gift tags.
You can make any name, so this is perfect for those family members with unusual names. All you need is a bit of patterned scrapbook paper, a computer with printer and a pair of scissors or craft knife.
Even easier is making an initial tag like this one, perfect for reusing a gift bag.
I never buy gift bags, I am a reuse, recycle type of gal, but people will insist on writing on the gift tag so I am forced to remove it and make a new one!

There are probably lots of different ways to get type onto patterned paper in reverse, so you can make tags like this. A lot seem to depend on what set up of computer and printer you have though and my old way doesn't work any more.

I've messed about and found a way I think will work no matter what your set up is. The full tutorial is over at The Pinning Mama here, pop over and have a peek.

read more

Wednesday 10 June 2015

Button Envelope

Here is a cute way to give a gift card - make a button fastened envelope for it from lovely craft paper.
button close envelope tutorial
Some of the products I used to make this envelope were provided by Pandahall.com
You will need:
A gift card
Your choice of craft paper (mine is a lovely handmade paper I've had for years with real petals somehow mushed into the actual paper)
2 Buttons - these pretty wooden tree design ones are from Pandahall
Embroidery thread
Scissors, needle & glue


DIY button close envelope tutorial
  • Lay the gift card centrally on the paper and fold around it in all directions
  • Cut away the corners as shown in the 2nd photo
  • Fold the envelope up and mark in pencil where the two buttons will go (the red blobs are just so you can see them!)
  • Cut or punch 2 circles of the paper (from the corner scraps) to reinforce the buttons on the inside
  • Using 2 strands of embroidery thread sew on the buttons, Only make two holes in the paper, make sure you use the same hole each time - you don't want to perforate the paper too much
  • For the lower button just tie off the thread ends and trim
  • For the button on the flap, leave one long end of thread, tie off as before to secure then carefully poke the thread back through one of the holes to the front of the envelope - this will be to wrap round the buttons and seal the envelope
  • Glue the side flaps of the envelope and fold it up
Pop your gift card inside then seal up the envelope by wrapping the long thread round and round the two buttons.

button close envelope tutorial

I love the wooden tree buttons with the textured paper, you could try any combination of papers and buttons and get a totally different look. 
This worked well for a birthday present last week when I just didn't have time to make a separate birthday card, it made the shop's gift card feel just a little bit more special. 
You might also be interested in:
Dictionary Page Card
Circle Card Crazy
Circle card Crazy
Simple Speech Bubble Cards
Photo Earring Gift Card
I'll be linking up this project at these lovely link parties.

read more

Monday 8 June 2015

Gold Heart Pot

Continuing my efforts to make old things fit with out new bedroom décor I've made a useful pot for putting things in (Winnie the Pooh anyone? Eeyore's Birthday Present?)
Gold heart makeup brush pot
 I am so pleased with how this project turned out. It was really simple and fun to do too.
There was a sneak peek of this in my post the other week "Buying New verses Using Old", now I'm ready with some photos to share how you can make this if you fancy having a go.
DIY gold heart pot

My original inspiration for this came from something I pinned AGES ago, in fact one of my first pins ever! 
But I had done that lazy/newbie thing and pinned a good idea without checking the source. Turns out my pin lead to one of those sites that takes images and makes a long tutorial pin from someone else's work. I have managed to track down the original post at heart. love. always. and re pinned from there - phew! (Thank goodness for Google image search) You can find my new properly linked pin here

This is what you need:
A glass (mine was one of those Nutella ones, great for recycling but didn't stack nicely with our other glasses as it's a different height and we only had 1 - perfect for this!)
Spray Paint
Stickers
Scrap Paper
Washi tape or decorators tape
First wash and dry the glass, then stick whatever sticker you have where ever you like on the glass. I'd had these peel off stickers for a long time but hadn't really used them, I think they were probably free with a magazine. 
The design on the sticker doesn't matter - just the size and shape. I chose a heart and put it centrally.
You could put lots on if you want, just don't put anything too close to the top edge.
Next take a piece of scrap paper and roll it up to fit inside the glass and secure it with some tape. Take your time with the tape, make it nice and straight.
I found it easiest to take short lengths rather than trying to do it all in one go. Also by using a tape with a pattern I was able to line everything up with the top of the glass, keep it all straight.
Give the whole thing a coat of gold spray paint. The paper will stop the paint going on the inside.
Now the most fun bit. As soon as the paint is dry carefully peel off the sticker and tape.
Give the whole thing a couple of days for the paint to really dry thoroughly and then fill with lovely things.
Gold heart pot tutorial

Now here is a second bonus project for today: The mirror frame you can also see in the "Buying New verses Using Old" post was another item that's had a makeover. It was natural wood colour and it has also had a spray of gold. 
I don't think this really deserves a whole post dedicated to it: I took the mirror out, sprayed it gold, put the mirror back, hung it on the wall - job done. 
I really do have the Midas touch at the moment - everything I spray turns to gold!
You might also be interested in:
Paper Cutting First Attempt
Paper Cutting first attempt
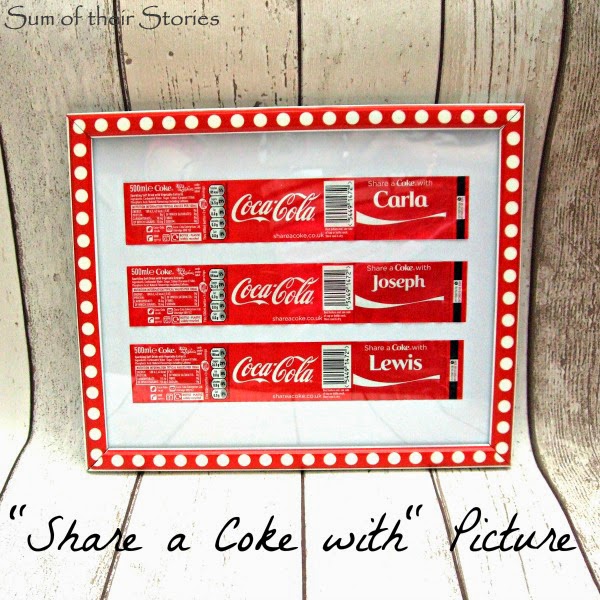
Share a Coke with Picture
Washi Tape Berry Baskets
Recycled Pen Tub Tutorial
I'll be linking up at these lovely link parties

read more

Monday 1 June 2015

My favourite Finds May 2015

I found some more beautiful projects last month to share with you today. Enjoy!
 Beautiful projects I've found in May

I love love love this cute idea from Sadie Season Goods. I've seen lots of super cute pin cushions in tea cups but Sadie has used a teapot and you can keep other sewing essentials inside!
Isn't that adorable?

When my kids were small we would wrap ice pops, or "Tip Tops" as we call them here (this might be a very regional UK Midlands thing though) in just a bit of kitchen roll - or just let them manage without anything and risk moaning, dropping, slipping and other undesirable repercussions! These little fabric wraps are very cute and practical.
There is a full step by step tutorial over at Fynes Designs showing exactly how to make them - really doesn't look too difficult either.

I love these printable gift tags from Dawn Nicole. They would make great card toppers too, and they are free! 
Dawn's blog is packed with beautiful hand lettered typography, she really is super talented, definitely worth a look if you have a minute.

Josie from Sew for Soul has made this beautiful fabric notebook cover and then been kind enough to share a tutorial with us too!
I love the fabric combination, what a great gift idea. (or something beautiful just to make for yourself of course!)

And here is just one last minute bonus project I found late on last month. These are cakes. I repeat these are cakes!
How cool are they? Natalie from Doodlecraft actually makes them look pretty easy to make too. 


read more