Showing posts with label Christmas. Show all posts
Wednesday, 15 November 2017

Wednesday, 8 November 2017
Chocolate Chip & Orange Porridge Oat Cookies

Wednesday, 25 October 2017
Receive 2 for 1 on tickets to Stitching, Sewing & Hobbycrafts with Simply Christmas taking place at the NEC from 2 – 5 November.
To take advantage of this special ticket offer visit www.ichfevents.co.uk and use code OV80 when purchasing or call 01425 277 988 to book.
Terms and conditions for buy one get one free tickets
- Phone lines open 9am-5pm Monday –Thursday, 9am-4.30pm Friday.
- Standard tariffs apply.
- This offer is for advance, 1 day tickets only and is valid until Monday 30 October 2017, it cannot be used in conjunction with any other offer.
- Children under 16 go free when accompanied by an Adult (otherwise £6).

Wednesday, 21 December 2016
Last year on a dull day in December when I should have been doing a whole number of things, I sat with a cup of tea had a go at making a Star Wars paper snowflake instead. When shared it on my personal facebook page some of my friends seemed interested to know how so I thought you might to see too.
I downloaded and printed a template from Anthony Herrera Designs and got to work. There is a great little video too that is worth watching before you start, with some info about how to fold the paper and tips on cutting out.
I could have made a whole blizzard of regular paper snowflakes in the time it took to make this, but who wants a whole blizzard when you can have a Yoda snowflake?
You make these with regular printer paper and sharp scissors but you also need a good sharp craft knife. This is not something for young kids to do in the holidays!
The most difficult bit was the internal shapes like the eyes and mouth as there are just so many layers to get through. I found it helped if I cut the shape with my knife, lifted as many layers as I could then cut again, repeating 3 or 4 times.
I did tweak mine a little and joined Yoda's ears up, on the template the are not.
My precious Yoda snowflake got packed away with the decorations and by a miracle was still intact when we got the deckies out again this year. I've run it through the laminator, after all my hard work I hate the thought of it getting ripped.
I downloaded and printed a template from Anthony Herrera Designs and got to work. There is a great little video too that is worth watching before you start, with some info about how to fold the paper and tips on cutting out.
I could have made a whole blizzard of regular paper snowflakes in the time it took to make this, but who wants a whole blizzard when you can have a Yoda snowflake?
You make these with regular printer paper and sharp scissors but you also need a good sharp craft knife. This is not something for young kids to do in the holidays!
The most difficult bit was the internal shapes like the eyes and mouth as there are just so many layers to get through. I found it helped if I cut the shape with my knife, lifted as many layers as I could then cut again, repeating 3 or 4 times.
I did tweak mine a little and joined Yoda's ears up, on the template the are not.
My precious Yoda snowflake got packed away with the decorations and by a miracle was still intact when we got the deckies out again this year. I've run it through the laminator, after all my hard work I hate the thought of it getting ripped.
Now it's taped to the window for all the world to see. (Well, the people who walk down our street anyway!) The street light makes one Yoda really glow at this angle.
There are some Frozen Paper snowflake designs over on Anthony Herrera Designs too if that's your sort of thing as well as Guardians of the Galaxy and Harry Potter. I really love the Groot and baby Groot snowflake designs in the Guardians of the Galaxy collection ..... next time I have another "not really spare" moment I'll have to have a go!Friday, 16 December 2016
Turn your mirror into a fun festive photo opportunity this Christmas with Chalkola Chalk Markers.
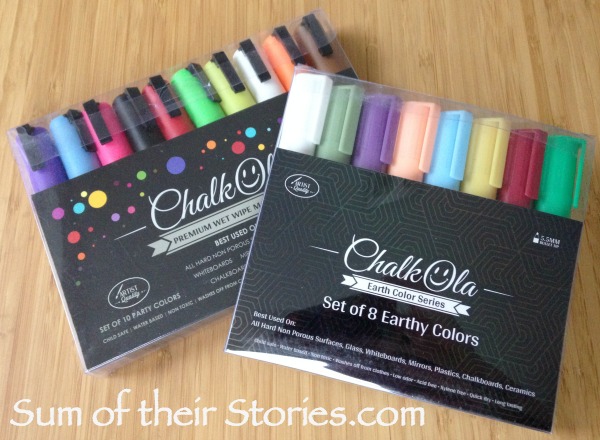
A few weeks ago ChalkOla sent me a couple of packs of their Chalk Markers to test and review.
I shared a classy and sophisticated idea last week, my festive wreath to decorate a window but I've been having loads of fun trying out these pens in other ways too.
In a mad moment, on a whim I added a Santa hat and beard to the mirror in our hallway. Then I couldn't resist adding a Rudolph red nose and Antlers too.
We've had fun messing about posing for photos ever since.
These are the UK links to the products I tested :
https://www.amazon.co.uk/Chalk-Pens-Whiteboard-Chalkboard-Blackboard/dp/B01E17WAQO
https://www.amazon.co.uk/Chalk-Pens-markers-Whiteboard-Chalkboard/dp/B00VVOWCSC
I'll be linking up at all these great link parties, pop over and have a little look round at all the lovely ideas.
A few weeks ago ChalkOla sent me a couple of packs of their Chalk Markers to test and review.
I shared a classy and sophisticated idea last week, my festive wreath to decorate a window but I've been having loads of fun trying out these pens in other ways too.
In a mad moment, on a whim I added a Santa hat and beard to the mirror in our hallway. Then I couldn't resist adding a Rudolph red nose and Antlers too.
We've had fun messing about posing for photos ever since.
The drawing on the mirror was so simple. Just stand close to your mirror, shut one eye then draw the outline of a Santa hat and beard over your face using ChalkOla chalk marker pens. Then you can step back, open both eyes and take a few minutes to colour it in.
https://www.amazon.co.uk/Chalk-Pens-Whiteboard-Chalkboard-Blackboard/dp/B01E17WAQO
https://www.amazon.co.uk/Chalk-Pens-markers-Whiteboard-Chalkboard/dp/B00VVOWCSC
It's slightly tricky to get great photo of this. If you stand there in front of the mirror it looks fab, but if you try to take a selfie it's really challenging to get lined up properly.
The flash adds additional difficulties!
You need to stand to one side with the camera and then direct the person who is posing to line them up as best you can.
Anyway, great photos or not, it's been loads of fun. I think we will make all our guests over the holidays have a picture taken in front of the mirror!
It doesn't have to be Santa and Rudolph of course, an Elf would be fun, maybe a snowman hat and carrot nose. An angel halo could work, or maybe 3 crowns for 3 kings.
There is still plenty of regular mirror left so you can check your hair/teeth/makeup/clothes before you leave the house too.
You might also be interested in:
|
|
|
|
Saturday, 10 December 2016
Simple designs drawn on the window in fantastic Chalkola chalk markers that just wipe away in the new year.
I was lucky enough to receive some Chalk Marker pens from ChalkOla in exchange for a review.
Scroll down to the bottom for a 20% off discount code.
I have loved trying these Chalkola Chalk Markers out. They are so simple to use, smooth to write or doodle with and the colours are way more vibrant that I was expecting. They contain a high density chalk ink and it takes a couple of minutes to get them going when they are brand new. You pump the nib down a few times (like you would for any paint marker) and the nib gradually fills with colour - then you are ready to go. After that the ink flows pretty constantly even vertically like I was using them. If the ink flow slowed a little I just gave them a shake, depressed the nib again then it flowed freely again.
I've tried a few idea out with them so far, the first is a Christmassy wreath and greeting on the doors to our back garden.
That IS glass, it's just evening. Here it gets dark pretty early (about 4pm) this time of year so most crafting has to happen in the dark!
Start by drawing round a side plate with a white chalk pen.
Then add a very simple sets of leaves and then twiggy lines to make a wreath design.
Add a few dots with a red Chalk Marker pen for just a little touch of colour. You could do your wreath in green if you prefer, the sets from ChalkOla have loads of colours to choose from.
Next print your chosen greeting onto regular printer paper. I used a font called Bromello which I downloaded from DaFont. You might need a little trial and error before it is the right size for your wreath, I got lucky with mine. Or you could be super organised a measure everything properly first.
Blue Tack the greeting to the glass outside lining it up centrally.
Now you just need to trace over the words with your Chalk Marker pen. I found I needed one eye shut to do this, I'm not sure why, it just made it easier!
It looks like I was a bit off with the tracing, but remember the camera is off the the side so it's a bit of a weird angle.
Next just thicken up the down strokes next to give them a little more of a modern calligraphy look.
These are the UK links to the products I tested :
https://www.amazon.co.uk/Chalk-Pens-Whiteboard-Chalkboard-Blackboard/dp/B01E17WAQO
https://www.amazon.co.uk/Chalk-Pens-markers-Whiteboard-Chalkboard/dp/B00VVOWCSC
I've had SO much fun playing with these pens already and have more ideas to share with you using them. Photographing anything on glass is a challenge though! Hopefully you get a good idea of the fun and vibrant effect you can get with these pens. And as long as you use them on a non porous surface they just wipe away easily when you've had enough of them.
Update 7th Jan 2017
Just to reassure everyone that they really do just wipe away here is a quick photo from last night when I finally cleaned off our window wreaths using a damp cloth.
I'll be linking up at all these great link parties, pop over and have a little look round at all the lovely ideas.
I was lucky enough to receive some Chalk Marker pens from ChalkOla in exchange for a review.
Scroll down to the bottom for a 20% off discount code.
I have loved trying these Chalkola Chalk Markers out. They are so simple to use, smooth to write or doodle with and the colours are way more vibrant that I was expecting. They contain a high density chalk ink and it takes a couple of minutes to get them going when they are brand new. You pump the nib down a few times (like you would for any paint marker) and the nib gradually fills with colour - then you are ready to go. After that the ink flows pretty constantly even vertically like I was using them. If the ink flow slowed a little I just gave them a shake, depressed the nib again then it flowed freely again.
I've tried a few idea out with them so far, the first is a Christmassy wreath and greeting on the doors to our back garden.
That IS glass, it's just evening. Here it gets dark pretty early (about 4pm) this time of year so most crafting has to happen in the dark!
Start by drawing round a side plate with a white chalk pen.
Then add a very simple sets of leaves and then twiggy lines to make a wreath design.
Add a few dots with a red Chalk Marker pen for just a little touch of colour. You could do your wreath in green if you prefer, the sets from ChalkOla have loads of colours to choose from.
This next bit I did a bit earlier the next day so daylight - yay! This is what I had so far.
Blue Tack the greeting to the glass outside lining it up centrally.
Now you just need to trace over the words with your Chalk Marker pen. I found I needed one eye shut to do this, I'm not sure why, it just made it easier!
It looks like I was a bit off with the tracing, but remember the camera is off the the side so it's a bit of a weird angle.
Next just thicken up the down strokes next to give them a little more of a modern calligraphy look.
The white pen shows best where there are no curtains or binds as once it's dark the design really shows beautifully. I'm going to try the other brighter colours on our front windows, where we have shutters, if I get time before Christmas.
In the daytime, with gorgeous dull grey UK skies the effect is more subtle but still pretty festive.
These are the UK links to the products I tested :
https://www.amazon.co.uk/Chalk-Pens-Whiteboard-Chalkboard-Blackboard/dp/B01E17WAQO
https://www.amazon.co.uk/Chalk-Pens-markers-Whiteboard-Chalkboard/dp/B00VVOWCSC
I've had SO much fun playing with these pens already and have more ideas to share with you using them. Photographing anything on glass is a challenge though! Hopefully you get a good idea of the fun and vibrant effect you can get with these pens. And as long as you use them on a non porous surface they just wipe away easily when you've had enough of them.
Update 7th Jan 2017
Just to reassure everyone that they really do just wipe away here is a quick photo from last night when I finally cleaned off our window wreaths using a damp cloth.
You might also be interested in:
|
|
|
|
Subscribe to:
Posts (Atom)
Labels
Air Hardening Clay
Blogging
Christmas
Clever ideas
Craft show
Crochet
Doctor Who
Easter
Felt
Geekery
Gift Wrap
Gifts
Hand Lettering
Handmade Monday
Home Decorating
Kids activities
Knitting
My Favourite Finds
Needle case
Party ideas
Pattern review
Pinterest Challenge
Sewing my Stash
Silent Sunday
Valentine
Wedding
accessories
art
bags
buttons
cakes
cooking
cushions and pillows
doodle
embroidery
gardening
gift ideas
greeting cards
jewellery
organising ideas
papercraft
papercutting
pretty ideas
recipes
recycling/repurposing
refashion
sewing
their stories
thrifty tips
tutorials
what can go wrong