Friday, 10 June 2016
Easy Summer Top Pattern Review and shirt upcycle
June 10, 2016
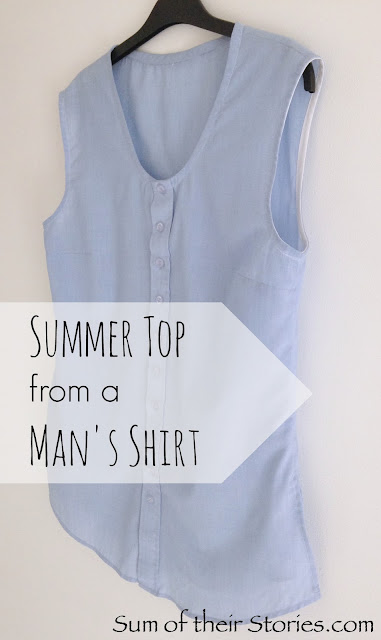
Here's how I got on adapting the New Look K6483 pattern that came with Sew Style & Home Magazine to make a summer top from an old shirt.
This post contains affiliate links, if you do decide to click through and make a purchase using these links the cost to you is the same but Sum of their Stories will be paid a small commission.
A heady combination of all the amazing Me Made May challenge inspiration and one of my most favourite programmes "The Great British Sewing Bee" being back on the telly was too much for me recently. So whilst in the supermarket I found the June Issue of Sew Style and Home magazine just fell into my trolley before I could stop it! It's a great magazine with loads of projects inside with downloadable patterns but one what really caught my eye was the actual real paper pattern that comes with it. New Look K6483, a quick and easy summery top with 5 variations, different combinations of neckline and arm hole/sleeve.
I had an old man's shirt (the shirt is old not the man that used to wear it!) that I wanted to upcycle to make myself a summery top and thought this pattern would be just right. It was!
Making new clothes from old clothes is both easier and more difficult than making from new fabric. Things like hems can be reused to save you time and effort but you have less raw material to work with so compromises sometimes have to be made. You also need to adjust for features on the original garment you want to keep.
The first thing I did was cut the shirt open by cutting the side seams and removing the collar and sleeves. I also took off the pocket from the front.
I choose style B from the pattern as my basis and thought I would have the buttons from the front of the shirt go down the back of the new top. Sadly I lost concentration for a second and promptly cut out the front of the top from the front of the shirt so that was the end of that!
It's a little awkward to fold the shirt in half with the buttons attached but not impossible. I adjusted the neckline a little so that the top button was nice and close to the neck edge.
I then cut the back of the top from the back of the shirt, on the fold. The pattern has a seam centre back so I reduced the width by overhanging the paper pattern over the fabric the width of the seam allowance.
The New Look K6483 pattern has facing to finish the neck and arm hole edge in one streamline piece. I really like this way of finishing a garment edges as it looks so sleek. I had planned to use the sleeve fabric to cut the facing but there wasn't quite enough fabric. I thought there would be plenty but apparently not.
I put the darts in and joined the front and back pieces as per the pattern instructions then I found this great tutorial from Sewaholic to add bias binding to necklines.
I'd saved it on Pinterest a while ago (love pinterest!)
I had enough sleeve fabric to make bias binding for the neck edge
and then found some white shop bought binding in my stash for the arm holes.
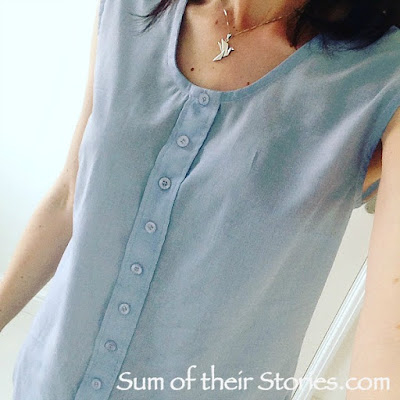
The last thing was to sort out the buttons. I had wanted the buttons on the back because men's shirts have much larger gaps between buttons than ladies, I was worried about gaping. The solution was to take all the unused buttons from the shirt (very top, sleeve plackets, the spare inside ones) and add them in between the existing buttons.
I didn't need to do button holes, the top fits over my head without undoing it, this is just decorative. I just stitched the buttons right through the layers, no gaping now!
I see a little puckering with my top stitching round the neck hole in the photos. Would you believe me if I said they really don't notice in real life?
This is a great pattern, easy to adapt and I will definitely be using it again. (maybe next time with enough fabric to do the proper facings) It is a lovely comfy loose fit, but you could easily add some long darts in the back if you like a more fitted look. The bust darts are just right for me. My top is longer than the pattern as I used the shaped bottom edge of the original shirt.
All it all, after a few set backs and complications of my own making this was a really easy make.

Sum of their Stories
Hello, I'm Julie. I love making things and this is where I share my enthusiasm.
you may also like
Subscribe to:
Post Comments (Atom)
Labels
Air Hardening Clay
Blogging
Christmas
Clever ideas
Craft show
Crochet
Doctor Who
Easter
Felt
Geekery
Gift Wrap
Gifts
Hand Lettering
Handmade Monday
Home Decorating
Kids activities
Knitting
My Favourite Finds
Needle case
Party ideas
Pattern review
Pinterest Challenge
Sewing my Stash
Silent Sunday
Valentine
Wedding
accessories
art
bags
buttons
cakes
cooking
cushions and pillows
doodle
embroidery
gardening
gift ideas
greeting cards
jewellery
organising ideas
papercraft
papercutting
pretty ideas
recipes
recycling/repurposing
refashion
sewing
their stories
thrifty tips
tutorials
what can go wrong


This is really super cool. I have never made something new from something old. My bloke wears his shirts until the fabric is so sheer it rips when looking at it but I am tempted to attempt creating new little boy t-shirts from my unloved ones. Bias binding is great, I made a little girls crossover tunic once that was finished with metres and metres of it. Have a lovely weekend.
ReplyDeleteWhat a pity you don't have a supply of decent quality unwanted men's shirts! You wouldn't want to go to all the trouble of making a top from thin worn fabric would you?!
DeleteKids t-shirts from your old ones sounds like a great idea, good luck!
I go to thrift shop and find lots of quality men's shirts with some rather feminine fabric patterns and turn then into bags and pillows as well as refashioned tops. It is much cheaper than buying new fabric and it often much better quality...but don't stop at shirts look around there's so much worth refashioning💁🏼✂️😉
DeleteI totally agree Ms Candy Bags, I love a good large size dress when I can find them - so much fabric to play with! I've also bought items in the Charity shop for the buttons as that is often much cheaper too.
DeleteThat top is just my style! I love how you re-worked a pattern and made this from a man's shirt. P.S. I did not do anything to my garden door....the weather did it all!
ReplyDeleteThanks AnnMarie, glad you like it.
DeleteYour door looks amazing, what a happy accident!
Your 'mistake' when cutting out the front with the buttons turned into a very sweet top. And I like the bias around the neck & armholes instead of facings. Super sewing job!
ReplyDeleteThanks Linda, all's well that end's well and all that! The bias binding was surprisingly easy with the method from Sewaholic's I'm very happy with the results.
DeleteWhat a great idea!! I wish I had more time to sew...Thanks so muchf or stopping by!!
ReplyDeleteHugs,
Deb
Thanks Debbie, it is fun to make your own clothes - very satisfying, especially when you don't have to buy anything!
DeleteIt's fabulous, great upcycling
ReplyDeleteThanks, it's fun to save something and turn it into something else.
DeleteIt's a brilliant revamp - you would be good on The Great British Sewing Bee challenge!
ReplyDeleteHa ha, it's very kind of you to say so, and I do love Sewing Bee but I fear I am way to "that'll do" in my attitude to sewing, not nearly careful enough with details to be a contestant. I do watch the alteration challenges with interest though and try to think what I would make!
DeleteSuch a lovely effect and the longer length really suits you. I'm quite short wasted but might try making it by drawing it in at the middle with a belt as I like the idea of keeping the shirt bottom. The neckline is very effective and the buttons would work well on the front or back. #CreativeMondays
ReplyDeleteOoo, I love the idea of it with a belt, sort of tunic like, great. I really liked the shaped hem so was glad to be able to keep that.
DeleteLove it, can remember my Mum doing this with Dad's old shirts a real make do and mend project
ReplyDeleteThanks Carolee, that reminds me, I used to take the collars off my dad's old shirts and wear them belted over leggings but that was back in the 80's!
DeleteThis is a brilliant upcycle - I love it. The neckline looks great. I may just have to purchase the magazine, plus I'm off to a clothes swap today - wondering if there will be any shirts!!
ReplyDeleteThanks Vicky, the magazine is full of patterns to download, and almost all things I will be wanting to make so it's worked out really good value. I can see it falling into my trolley again in the future!
DeleteWhat a great idea!! You did a fab job here Julia :)
ReplyDeleteThanks for sharing at Creative Mondays
Thanks Claire, glad you like it.
DeleteFantastic upcycle Julie!! Your new shirt looks fab!
ReplyDeleteThanks, I've had this in mind to try for a while so I was pleased it turned out so wearable.
DeleteI love how you transformed the shirt, it looks so cool and comfortable. Perfect for sharing on the #OMHGFF this week Thank you!
ReplyDeleteThanks Karen, yes it's very cool and comfy I think it will be great for the summer.
DeleteJulie, I love this idea. It certainly does not look like a mens shirt now that you have improved upon it.
ReplyDeleteHa ha, thanks Mary, this was saved from the charity shop donation bag especially because I loved the colour and I hoped it wouldn't look too much like a old mans shirt when I'd finished so I relieved to hear that you agree!
DeleteWhat a wonderful upcycle! I'll be raiding my husband's closet this summer for sure, after seeing this...Thank you for sharing at The Really Crafty Link Party! pinned!
ReplyDeleteThere must be a shirt or two with a frayed collar that he doesn't need in there somewhere!
Delete*heads of to raid Hubby B's wardrobe* Great job! #MakingHome
ReplyDeleteThanks, when the collar or cuffs are a little frayed it really rude not to acquire it for your refashion pile!
DeleteYour upcycle is just fabulous. I love that you rescued all those buttons and added them down the front to give that extra detail. I think it's made a huge difference to the way the top has turned out.
ReplyDeleteThis is brilliant! I am going to go through my husbands shirts that don't fit anymore. Thanks for sharing at the Wednesday Showcase party.
ReplyDeleteHa, ha.. I notice all sorts of things in photos that I don't see in real life. A fabulous refashion, Julie. The now decorative button placket at the front looks great and I love how you've added bias to the neckline and armholes. Clever idea to add the extra buttons to stop gaping.
ReplyDeleteFeatured today...
DeleteThank you so much Pam, that means a lot.
DeleteGreat idea and super cute top! Thanks for sharing. I’ll be pinning to my Pinterest board :)
ReplyDeleteThanks Missy, and thank YOU for sharing too (heart pinterest!)
Deletedid u sew it?
ReplyDeleteI did!
Delete