Sunday, 29 January 2017

Handmade Monday #10

Hi and welcome to Handmade Monday. 
This is the place to share your makes, bakes and other handmade craft ideas and to find some new inspiration. It's been so lovely to see a few new faces joining Handmade Monday, it's fun to have some interesting craft blogs to dip into.
Can I take this chance to remind everyone this linky is all about handmade, please don't link up posts you have which are not in keeping with that theme.

So, what 'making' have you been up to this week?
I've been working on a fun stitching project, playing with all those stitches on my sewing machine that I never normally use.

I'm also trying to get organised with all those half written blog posts and half finished projects I have lying around. More focus and less flighty, that's what I'm aiming for!

Now here are the features from last week's Handmade Monday.

The super talented Clare Willcocks shared these amazing little painted people - she has big plans for them. Top tip: follow her on facebook and you get to see sneaky peeks of all her art as she goes along! 

I am in love with these gorgeous little crochet stars from AnneMarie's HaakBlog, could those colours be any more pretty together? 

Congratulations, here is a "Yay! I was featured" button for your blog.


Instructions: Select all code above, copy it and paste it inside your blog post as HTML

And now for this weeks linky.
Every entry gets pinned onto our Handmade Monday pinterest board.
We also have a Facebook group for people who link up regularly. We are still working on the best way to use this group, but if you like to link up here regularly you are welcome to join us.

The rules for Handmade Monday are simple:
  • Did you make it? Is it craft related? Yes - hooray, we'd love to see what you've been up to. This is not the place for shops, link parties or posts with just other people's work. Giveaways are fine as long as they are craft related.
  • Add the link to your blog post, not your main site URL.
  • Link up to 3 posts each week, but please try to make sure it's something you've not linked up here before.
  • Have fun! Mingle - visit some of the other links - that's the whole point! Leave them a comment, maybe share on pinterest, twitter or your other favourite social media. Let's support one another and grow our craft community.
  • If you'd like to follow me in some way (buttons to find me are on the side at the top) then that would be just lovely. If you'd like to tell others about Handmade Monday then that would be just lovely too.


read more

Wednesday, 25 January 2017

Retro Patchwork Bedspread made into a Snuggly Throw and Bag

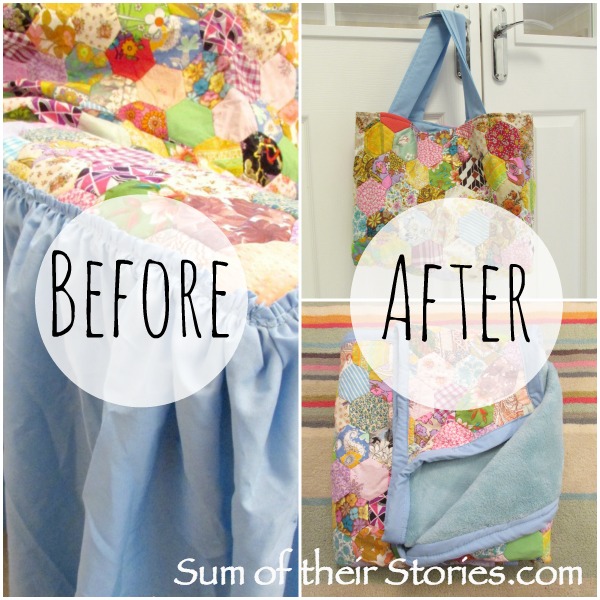
I finally turned the old patchwork bedspread my Nan made for me in the 1970's into a cosy new throw and a fun tote bag.
Retro bedspread upcycled into a bag and throw
Back in November, as part of my Sum of their Stories features, I shared a brighter than bright patchwork bedspread that my nan made for me way back when I was little. You can see my original post here.

Lots of you were kind enough to offer ideas of how I could turn this bedspread into something we could actually use and enjoy, instead of it just sitting in a bag at the bottom of the wardrobe. In the Christmas holidays I finally found the time to make a start and take the bedspread, with it's expansive valance frill, apart.
Wowza, my nan did not skimp on sewing thread, she put this thing together to last. It took a whole afternoon to get the valance off and the backing off the patchwork. My seam ripper has never worked so hard!
It turned out that my nan had finished of the edges of the patchwork like this.
No worries about any of those hand stitches coming undone any time soon!
Everything got washed and ironed just to freshen it all up then I was ready to begin a makeover.

At this point I will apologise for the lack of "as I went along" photos. I was in the zone...just experimenting and trying to make this work and so I completely forgot to take photos of the steps - sorry.

Following all the super helpful advice I'd been given, thank you all, I'd decided to give the patchwork a soft fleecy or fluffy backing to make it more snuggly.
In our local fabric shop they had a lovely sherpa style fleece but it was £12 per metre and not very wide, so I took a trip to Tesco and bought a soft throw for a fiver. 
Once taken apart the patchwork piece was long and narrow, measuring 94cm/37" by 190cm/75" and the soft throw was 150cm/59' by 120cm/47" .
I had originally wanted to avoid chopping into the patchwork but in the end I just went for it. I cut the extra length off the patchwork and the extra width off the throw. Both bits ended up being 94cm/37" by 150cm/59" - a perfect size for a throw or snuggly quilt type thing.

To try to ensure the cut edge doesn't start to unravel, I folded it over with a small hem and stitched.
I laid the fluffy throw over the patchwork, wrong sides together then stitched round the edge. Then I cut a long length of fabric from the valance of the original bedspread to bind the edges.

If you look closely this is where my inexperience shows. I think I used the "hot mess" method for my binding and the "dog's dinner" technique for the corners. The whole thing was so thick and bulky under my sewing machine foot that when I lifted the foot to turn the corner I kept forgetting to put it back down - rookie mistake!
However all is not lost. The whole thing is secure and enclosed, no raw edges or risk of anything coming undone so I'm calling it a win. Just don't look too closely and it's fine. Actually I think the patchwork is so vibrant it is hard to take your eyes off it, no one is going to be looking at the wonky binding with all that amazing colour, pattern and texture!
Old bedspread upcycled into a bag and throw
See how I've tucked the corners in for this photo so you can't see just how awful they are! 


To finish the throw I used this tutorial from Chrissie D to hand tie the layers together. It was easy and it works. Yay!
I'm so happy with the finished throw. It's soft, warm, pretty, practical and full of memories.
Old bedspread made into a cosy throw

As I had chopped a piece off the top of the quilt I decided to use that bit and make it into a bag.
patchwork bag

The piece was 94cm/37" by 40cm/16" so I secured the raw cut edge with a narrow hem as I had on the throw and then cut a piece of the old blue valance to the same size for the lining.
Basically I made the tote bag using pretty much the same method as I used for my Tetris tote bag here.
The main difference was that I folded the pieces, the patchwork and the lining, in half and just stitched the bottom and side of each rather than all 3 sides. I didn't want to be cutting the patchwork any more than necessary.
I made handles from the same blue fabric as the lining and just squared off the corners to make the bag more boxy.
I shared how to do this in more detail in my T Towel Tote Bag Tutorial if you don't know how (it's REALLY easy) 
That was it - Ta da! I was much more confident making the bag than the throw, bag making is much more my comfort zone!
Patchwork bag made form an old quilt
I'm going to use this as a shopping bag. I realise I risk it getting damaged if it's a high use item like that but my heart will be happy every time I use it. This patchwork has spent the best part of 40 years in a cupboard, I think it will enjoy the fresh air and exercise! 
Old bedspread upcycled into a bag and throw
So there you have it, an old and unused bedspread turned into 2 useful things. My nan was a really practical woman and waste upset her so I think she would have been really pleased.
You might also be interested in:
Knitting Needle case
Making Toys from Kids Drawings
Cornishware Ruffle Tote
The Easiest Pocket Pack Tissue Holder
I'll be linking up at these great link parties

read more

Sunday, 22 January 2017

Handmade Monday #9

Hello and welcome to Handmade Monday. 
This is the place to share your makes, bakes and other handmade craft ideas and to find some new inspiration.

Back in November I shared photos of a patchwork bedspread my nan made for me when I was little, you can see that here if you missed it, and some of you were kind enough to offer some ideas of what I could do with it. During the Christmas holidays I found time to finally take it apart and this weekend I've been remaking it into something new. I'm writing a proper post all about it but for now here is a sneak peek.
I won't say too much now, except I'm really happy with what I've been able to do and some of it involved Chrissie D's tutorial on a hand tying technique. 
Now here are the features from last week's Handmade Monday.

Anna from Tea and a Sewing Machine has lined an old wooden box with fabric and given it a whole new lease of life.

Mary from The Boondocks Blog also gave a box a makeover, but this one caused her some real headaches. Luckily it all ended well and she filled this pretty Valentine's Day wooden gift box with chocolates.

Congratulations, here is a "Yay! I was featured" button for your blog.


Instructions: Select all code above, copy it and paste it inside your blog post as HTML

And now for this weeks linky.
Every entry gets pinned onto our Handmade Monday pinterest board . It's a group board so you are welcome to join, just send me a message with your pinterest email and I'll send you an invite.

The rules are pretty straightforward:
  • Did you make it? Is it craft related? Yes - hooray, we'd love to see what you've been up to. This is not the place for shops, link parties or posts with just other people's work. Giveaways are fine as long as they are craft related.
  • Add the link to your blog post, not your main site URL.
  • Link up to 3 posts each week, but please try to make sure it's something you've not linked up here before.
  • Have fun! Mingle - visit some of the other links - that's the whole point! Leave them a comment, maybe share on pinterest, twitter or your other favourite social media. Let's support one another and grow our craft community.
  • If you'd like to follow me in some way (buttons to find me are on the side at the top) then that would be just lovely. If you'd like to tell others about Handmade Monday then that would be just lovely too.


read more

Wednesday, 18 January 2017

Recycled Plastic Valentine Hearts

Make cheap and simple valentine decorations from old plastic food containers and nail varnish.
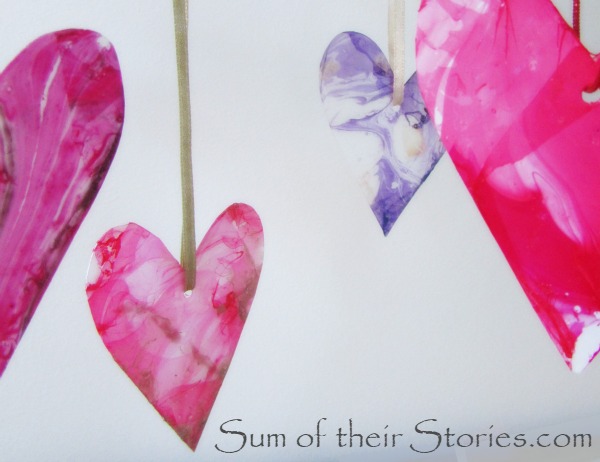
Recycled plastic Valentine hearts
This is an idea I originally shared as a contributor over on The Pinning Mama last year and as Valentines Day is looming I thought it was time to share the full tutorial here in case you want to have a go at making some easy Valentine decorations from old plastic food tubs.
Valentine hearts made from old plastic tubs

All you need is:
Old plastic tubs
Nail Varnish
Water
Plenty of scrap paper, kitchen roll and nail varnish remover for cleaning up afterwards!

You can use pretty much any food tubs that you have, the effects you get may vary a little but that is all part of the fun!
Valentine hearts made from old plastic containers
I had a white plastic margarine tub and a clear plastic ice cream tub that I used for my marbled nail polish hearts.

Unless you are lucky enough to have a tub with no pictures or writing on it the first thing you need to do is remove any print.
I found the easiest way to do that was to give it a good scrub with a kitchen scourer and a cream cleaner. Here in the UK we have something called Cif (it used to be called Jif back in the day) which worked a treat.
Now just cut out your heart shapes, I drew round a cookie cutter first but you can freehand if you prefer.
Punch a hole now if you want to be able to hang your hearts.
Now the fun bit....
Fill another old plastic container with water and drip some nail varnish on the top.
Add as many colours as you want, play around, experiment with what you have.
DO NOT try to stir the nail varnish to make patterns - it will stick to whatever you are stirring with. You just have to be brave and go for it!
Valentine hearts recycled from old plastic tubs
Dip your plastic heart in, then pull it out. That's it!
Now leave it propped up on some scrap paper to dry for a few minutes.
You need to add more nail varnish drops to the water for each heart, a little may be left on the water but not really enough for another dipping.
It's quite messy, you may find you marble the end of your finger like I did.
I found metallic nail varnishes showed up best on clear plastic, the results on white plastic were a little disappointing. It's so quick though, that if you don't like how one turns out you can just wipe it off with nail polish remover and start again. 
Recycled plastic marbled valentine hearts
Recycled plastic valentine hearts with nail polish marbling
These could make good card toppers, or maybe gift tags too. Don't be restricted to just hearts for Valentines day either, you can cut out any shape that takes your fancy.
This marbling with nail polish is SO much fun and it really does feel like magic when you lift out your item and the pattern is just there. You don't know quite what you are going to get which is not ideal for those who like control, but I loved the surprise and to be honest most came out WAY better than I could ever have planned.

You might also be interested in:
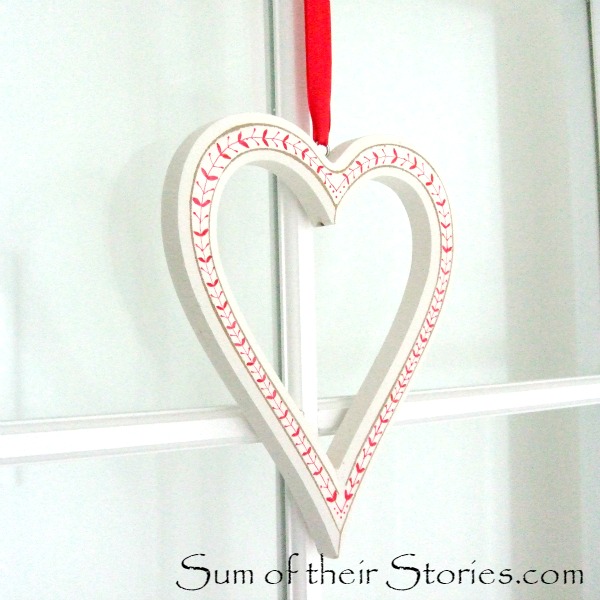
Red and White Heart Decoration
IKEA Cactus Gift Wrap
Recycled Pen Pot Tutorial
Gold Heart Pot
Gold Heart Pot
I'll be sharing this project at these link parties

read more

Sunday, 15 January 2017

Handmade Monday #8

Hi and welcome to Handmade Monday. The place to share your craft, make or bake ideas.
I'm so pleased you have joined us at Handmade Monday. We've had a wintery feel to the weather here this last week with a sprinkle of snow so I was very pleased to have finished my 'for me' crochet project. I fell in love with this hat from Whistle and Ivy when I saw the free pattern.
It was made entirely from yarn I already had (yay, a stashbuster!) The black I used was a bit thinner than the red and wine but it didn't seem to make too much difference. I learnt a new skill too as I've never done colour change crochet like this before. It was pretty straightforward but the colour changing does slow things down a bit so it took me a couple of evenings to finish. I also added an extra row my mistake so my hat is just a teeny bit more slouchy than it's supposed to be! 

Here are the features from the last weeks Handmade Monday.


Carolee Crafts shared a whole load of great ideas for getting your craft area and supplies organised and under control, plus a sneak peak at some of the things she's been making including these pretty flowers made from linen ribbon.

CJ Made shared a project from her archives (we like old stuff here too, it doesn't always have to be brand new!) a Jackson Pollock inspired DIY T-shirt. 
It looks like a really fun, but messy idea. I think I'll wait for warmer weather before I consider giving this a try, then I can make all the mess outside!

Congratulations, here is a "Yay! I was featured" button for your blog.


Instructions: Select all code above, copy it and paste it inside your blog post as HTML

And now for this weeks linky.
Remember every entry gets pinned onto our Handmade Monday pinterest board too, if you'd like to join the board and pin directly just send me a message with your pinterest email.

The rules are pretty straightforward:
  • Did you make it? Is it craft related? Yes - hooray, we'd love to see what you've been up to. This is not the place for shops, link parties or posts with just other people's work. Giveaways are fine as long as they are craft related.
  • Add the link to your blog post, not your main site URL.
  • Link up to 3 posts each week, but try to make sure it's something you've not linked up here before.
  • Have fun! Mingle - visit some of the other links - that's the whole point! Leave them a comment, maybe share on pinterest, twitter or your other favourite social media. Let's support one another and grow our craft community.
  • If you'd like to follow me in some way (buttons to find me are on the side at the top) then that would be just lovely. If you'd like to tell others about Handmade Monday then that would be just lovely too.


read more