


Lots of you were kind enough to offer ideas of how I could turn this bedspread into something we could actually use and enjoy, instead of it just sitting in a bag at the bottom of the wardrobe. In the Christmas holidays I finally found the time to make a start and take the bedspread, with it's expansive valance frill, apart.
Wowza, my nan did not skimp on sewing thread, she put this thing together to last. It took a whole afternoon to get the valance off and the backing off the patchwork. My seam ripper has never worked so hard!
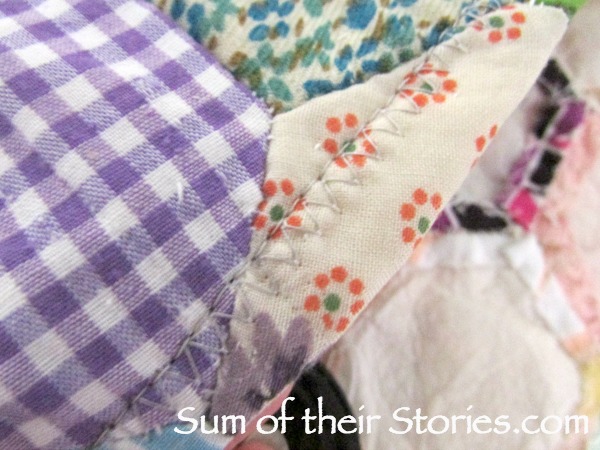
It turned out that my nan had finished of the edges of the patchwork like this.

No worries about any of those hand stitches coming undone any time soon!
Everything got washed and ironed just to freshen it all up then I was ready to begin a makeover.
At this point I will apologise for the lack of "as I went along" photos. I was in the zone...just experimenting and trying to make this work and so I completely forgot to take photos of the steps - sorry.
Following all the super helpful advice I'd been given, thank you all, I'd decided to give the patchwork a soft fleecy or fluffy backing to make it more snuggly.
In our local fabric shop they had a lovely sherpa style fleece but it was £12 per metre and not very wide, so I took a trip to Tesco and bought a soft throw for a fiver.
Once taken apart the patchwork piece was long and narrow, measuring 94cm/37" by 190cm/75" and the soft throw was 150cm/59' by 120cm/47" .
I had originally wanted to avoid chopping into the patchwork but in the end I just went for it. I cut the extra length off the patchwork and the extra width off the throw. Both bits ended up being 94cm/37" by 150cm/59" - a perfect size for a throw or snuggly quilt type thing.
To try to ensure the cut edge doesn't start to unravel, I folded it over with a small hem and stitched.
I laid the fluffy throw over the patchwork, wrong sides together then stitched round the edge. Then I cut a long length of fabric from the valance of the original bedspread to bind the edges.
If you look closely this is where my inexperience shows. I think I used the "hot mess" method for my binding and the "dog's dinner" technique for the corners. The whole thing was so thick and bulky under my sewing machine foot that when I lifted the foot to turn the corner I kept forgetting to put it back down - rookie mistake!

However all is not lost. The whole thing is secure and enclosed, no raw edges or risk of anything coming undone so I'm calling it a win. Just don't look too closely and it's fine. Actually I think the patchwork is so vibrant it is hard to take your eyes off it, no one is going to be looking at the wonky binding with all that amazing colour, pattern and texture!

To finish the throw I used this tutorial from Chrissie D to hand tie the layers together. It was easy and it works. Yay!

I'm so happy with the finished throw. It's soft, warm, pretty, practical and full of memories.

As I had chopped a piece off the top of the quilt I decided to use that bit and make it into a bag.

The piece was 94cm/37" by 40cm/16" so I secured the raw cut edge with a narrow hem as I had on the throw and then cut a piece of the old blue valance to the same size for the lining.
Basically I made the tote bag using pretty much the same method as I used for my Tetris tote bag here.

The main difference was that I folded the pieces, the patchwork and the lining, in half and just stitched the bottom and side of each rather than all 3 sides. I didn't want to be cutting the patchwork any more than necessary.
I made handles from the same blue fabric as the lining and just squared off the corners to make the bag more boxy.

I shared how to do this in more detail in my T Towel Tote Bag Tutorial if you don't know how (it's REALLY easy)
That was it - Ta da! I was much more confident making the bag than the throw, bag making is much more my comfort zone!

I'm going to use this as a shopping bag. I realise I risk it getting damaged if it's a high use item like that but my heart will be happy every time I use it. This patchwork has spent the best part of 40 years in a cupboard, I think it will enjoy the fresh air and exercise!


You might also be interested in:
|
|
|
|


A fantastic way to preserve your gran's gift - the blanket looks fantastic and the bag is so unique!
ReplyDeleteThanks Maya, both projects turned out better than I could have hoped and I do think my nan is looking down right now nodding her approval!
DeleteAbsolutely darling as can be!!
ReplyDeleteAwh, that's a lovely thing to say Andrea, thank you.
DeleteThese two ideas are brilliant. Its so nice that you will be using the throw and bag regularly so you can enjoy the love and care both your nan and you have put into these items. Great idea to buy a snuggly blanket to use for the backing on the quilt!
ReplyDeleteI think is absolutely fabulous - just my kind of project. Crafting and saving things that matter into everyday objects. Jo x
ReplyDeleteThanks Jo, I am now wondering myself what took me so long!
DeleteYou must be so pleased you decided to go ahead and upcycle the bedspread your Nan made you all those years ago. Now you'll see her work on a daily basis. Love them both!
ReplyDeleteThank you Pam, and as one of my "advisors" I have to say thanks. You all gave me the courage to go for it.
DeleteBrilliant. There was no point having this unused and unloved. Glad you took the time to make and share 2 really useful items. Nan would be happy K xXx
ReplyDeleteThanks, she would, wouldn't she. I was pleased I got 2 for 1 in the end and love both.
DeleteWell done. You have upcycled the hidden treasure into things which are both useful and beautiful and neither looks like the dog's dinner. It's a lovely homage to the woman who spent so many hours creating the original piece. Catriona
ReplyDeleteThank you so much Catriona, as I was sewing I kept thinking just how many hours of hand stitching was right there in my hands. Amazing.
DeleteNice save/re-do and yes, your Nan would be pleased. To be sure she must have said, "If a thing is worth doing, it's worth doing well."
ReplyDeleteI can almost hear her saying exactly that! She loved a good saying, she could talk in saying till the cows came home!!
DeleteWow what a transformation, wonderful and that fleece will make the throw so cosy
ReplyDeleteYes, the fleece idea was brilliant, it is lovely to snuggly under.
DeleteYou must be delighted with the outcome, that quilt was crying out to be liberated from the bottom of the wardrobe! Good job done xx
ReplyDeleteYes, I think it's much happier out in the light, being used and enjoyed.
DeleteNice way to re-purpose an old quilt. Thanks for sharing at the Inspiration Spotlight party. Pinned & Shared.
ReplyDeleteYour retro patchwork bedspread make an adorable throw and tote bag. I remember when you first posted about the quilt. Thank you for sharing at the Snickerdoodle Create~Bake~Make link party! I am featuring you tomorrow at the Snickerdoodle Party.
ReplyDeleteThank you so much Sharon, that means a lot.
DeleteWhat a lovely, practical way to remember your nan. these links with our past are so important xx
ReplyDeleteThanks Anna, I think so too and it's much nice to see and use things rather than having then tucked away.
DeleteOh wow! You've been so busy! You've really managed to modernise the bedspread, I'm sure your Nan would be chuffed that you'll still be using her handiwork - especially seeing as she made it to last! x
ReplyDeleteI think chuffed is exactly what she would be! It's funny what you learn about someone when you take apart something they have made, my nan most certainly did make things to last!
DeleteThat's such a lovely way to preserve all the beautiful work your Gran put into the patchwork quilt Julia. Now it will last for a few more generations. It's gorgeous.
ReplyDeleteWow, great idea and great re-purpose. Great that you could use such a special item in these two new ways. Visiting from We Are Pinnable party.
ReplyDeleteThis reminds me so much of my old Holly Hobby which I loved
ReplyDelete