Friday, 31 July 2015
I found three super gorgeous lovely things I'd like to share with you this month, I hope you like them as much as I do.
First a sewing project from Even Artichokes have Hearts. It's not new but I only came across it the other day. It's a little Tote bag attachment that keeps all your little bits and pieces sorted and stops them clunking round at the bottom of your shopping bag - Boom!
The pattern is available to buy here for £3.25, Usually I'm all about the free patterns and I'm not on any sort of commission here! I just thought this is such a good idea.
Next is such a lovely lovely thing that will make your heart melt just a little.
All these "squares" were made by children in a school knitting class then turned into a patchwork cuddle Ted as a gift for their teacher's new baby. Isn't that just lovely! You can read the full story over at Ginx Craft.
Last but not least this month is this cute caravan sewing machine cover.
Super talented T'onna from USS Crafty shows step by step how she made this. There is so much lovely detail. The whole thing is reversible too but I can't imagine not wanted this side on show! My sewing machine packs away into a very boring plastic case, I love the idea of making something as pretty as this.
So there you go, a few of my favourite finds this last month. If you want to pin or share, do click through to the source page - that's just polite!
Friday, 24 July 2015
When my lovely friend and colleague got married a little while ago I gave her an emergency jar full of little things she might need on the day.
Back in February I'd seen a couple of really beautiful wedding gifts using jars by Desiree at 36th Ave, check her's out here and here, they are just gorgeous. Now I look again, mine are nothing like Desiree's masterpieces. I improvised and used what I had, let's just say I was "inspired by" rather than actually attempting to recreate!
Really what I did here was a tweak of the Gold Heart Pot I made for my makeup brushes, I did this at the same time using mostly the same materials.
To make one you need:
I'll be linking up to all these great link parties, why not go and have a look!
Back in February I'd seen a couple of really beautiful wedding gifts using jars by Desiree at 36th Ave, check her's out here and here, they are just gorgeous. Now I look again, mine are nothing like Desiree's masterpieces. I improvised and used what I had, let's just say I was "inspired by" rather than actually attempting to recreate!
Really what I did here was a tweak of the Gold Heart Pot I made for my makeup brushes, I did this at the same time using mostly the same materials.
To make one you need:
- A jar with a lid. Mine was just an old chocolate spread jar. Another time I would use a bigger jar, it was hard to fit everything in here that I wanted to
- Gold spray paint
- A sticker, mine was a heart
- Washi tape or low tack masking tape
- Paper
- Ribbon or thread
- A button with a shank
- Strong glue - mine was superglue
- Small bits and pieces you might need on your wedding day
I washed and dried the jar then prepared it in the same way as the Gold heart Pot. A sticker in the middle and washi tape to secure paper to the top.
As my jar had a ridge top and bottom I used that as a guide and used the washi tape and paper to mask off the top and bottom areas.
The whole thing got a coat of gold spray paint.
Then I peeled off the washi tape and sticker. The lid also got a spray of gold but apparently I didn't take any photos.
As the wedding had a blue colour scheme I made a simple tag in Picmonkey, you can right click on the image below and save it to your computer if you'd like to use it, but it is very easy to make your own.
You might also be interested in:
Once I printed and cut that out I assembled the contents.
You can include whatever you like, depending on the size of your jar. I added:
Mini deodorant
Breath freshener
Tissues
Sample size perfume
Lipstick
Lip balm
Sewing kit
Headache tablets
I attached the gift tag with blue twine and then as a finishing touch glued a sparkly button to the lid. I chose one with a shank (I think that's what you call that sticking out bit) so it would stick up and form a knob of sorts.
If I do this again I would use a bigger jar, just so I have more options with what to include. I would also think ahead and find a small drawer knob or similar to use instead of the button. I think the button is ok on this small jar but would be too small on a larger jar.
|
|
|
|
Thursday, 16 July 2015
It's easy to buy beautiful necklaces nowadays but it's not too expensive or difficult to make your own completely unique pieces with just a few materials and tools.
I love red. (I know - shocker!) It's so bright and warm. I wear quite a lot of red, I have a pinterest board dedicated to beautiful red things and I love these cute little red teardrop beads. They are acrylic and really inexpensive but as soon as I saw them I knew I "needed" a cluster of them on a necklace of some sort.
This project really came together as I went along, I didn't do masses of planning, I just played about until I had something I was happy with. I took some photos of the process and I've drawn a little diagram too so hopefully this will all make sense in case you want to try making your own.
Some of the materials used to make this necklace were provided for me by Pandahall.com
I love red. (I know - shocker!) It's so bright and warm. I wear quite a lot of red, I have a pinterest board dedicated to beautiful red things and I love these cute little red teardrop beads. They are acrylic and really inexpensive but as soon as I saw them I knew I "needed" a cluster of them on a necklace of some sort.
This project really came together as I went along, I didn't do masses of planning, I just played about until I had something I was happy with. I took some photos of the process and I've drawn a little diagram too so hopefully this will all make sense in case you want to try making your own.
To make this Cluster Drop Necklace you will need:
Acrylic Beads (Mine are these transparent drop pendants from Pandahall)
Small round jump rings (mine are these 4mm from Pandahall)
Larger jump ring (mine are 7mm oval, from my stash)
1 lobster clasp (mine is this one from Pandahall)
Larger jump ring (mine are 7mm oval, from my stash)
1 lobster clasp (mine is this one from Pandahall)
You'll also need to use:
Jewellery making or small pointy pliers
First set out your beads in a design you like. This was what I started with.
First set out your beads in a design you like. This was what I started with.
Attach an oval jump ring to the top of each bead.
Then working from this diagram attach more jump rings to the beads to form chains - which will make them drop lower on the necklace.
Add a small round jump ring to the top of each "chain".
The 3 centre sections have 2 chains attached to the same small round jump ring.
Mine looked like this when I'd finished:
Cut your necklace chain to the length you want. Mine is 45cm (17.5"), I'd err on the generous side if you are not sure, you can always make it shorter once the beads are attached and you can see how it falls on you.
Start in the middle and using another little 4mm jump ring attach the middle cluster to the chain.
Working your way out from the centre, add the next cluster in the same way to the 5th link along on the chain. This one is a little shorter, so dangles down a little less. Continue adding the chains, with the beads on the ends following the diagram as a guide. Leave 5 chain links between each one so it's all nice a even.
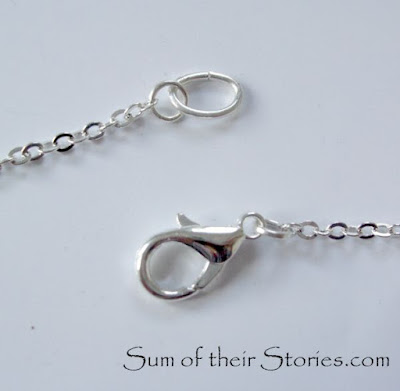
Check you are happy with the length and the beads cluster in the right place for you. Then add the lobster clasp to one end of the chain using a jump ring and a larger oval jump ring at the other end.
Your necklace is ready to wear.
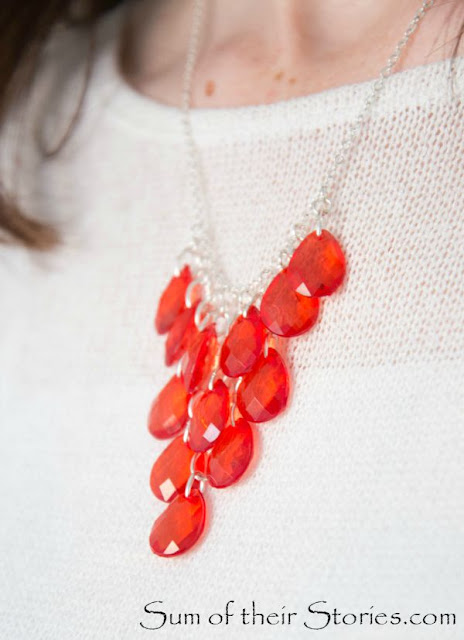
When it's on, the necklace falls in a lovely cluster.
I had my poor daughter take dozens of photos until I was happy, I honestly think this looks way better in real life. It moves about when you move. It's not a fixed "bib" style necklace, more a shimmery waterfall of beads.
You could adjust this idea and make any design you like, I think a rainbow of colours would look amazing, or you could use a thicker necklace chain and join everything with oval jump rings (I had to use the little ones as my chain was so fine the bigger jump rings wouldn't fit) Or you could spread the dangling chain out a bit, or bunch them up closer... Oooh I want to make another one now!
But for now I'm very happy with this one, see how the beads catch the light... and it's red. Did I mention that I like red?!
Sunday, 12 July 2015
Thursday, 9 July 2015
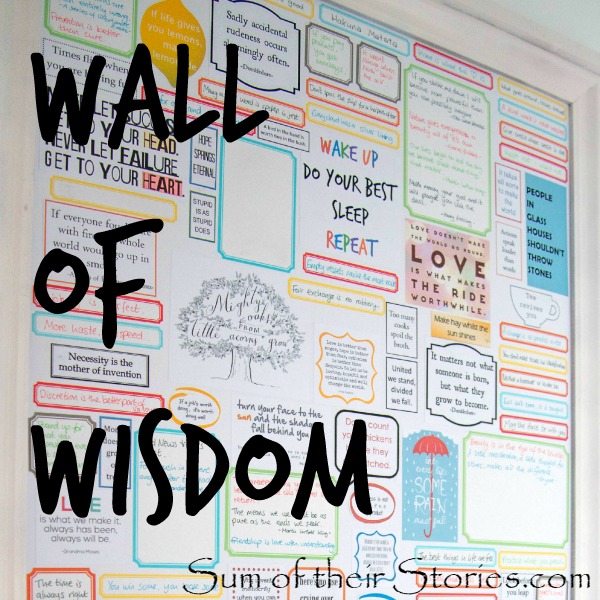
If you love a good quote, saying, expression or motivational poster maybe you'd like to create a "wall of wisdom".
Our new house has a good sized downstairs toilet (privy, lav, loo, cloakroom, john, WC ... any more names?) It is much nicer than the teeny one we had at the old house but possibly the most boring décor on the planet. It was just a white box.
In the old house we created a "wall of wisdom" by writing quotes, sayings, expressions directly on the wall using sharpies. It was simple, fun and always a talking point but had two major flaws: the sharpies smudged when splashed with water and when we moved we had to leave it behind. For the new smarter loo I wanted to recreate the Wall of Wisdom in a better, cuter and more flexible way.
The only casualty in the move was the glass in a large wooden picture frame. The frame itself survived so I gave it a few coats of white spray paint and used it as the basis of our new wall. One of the best things about the wall we had in the old house was that anyone could add to it as they wanted. I was keen to keep that interactive element so thought by using a glass-less frame and label stickers to organise the space this could be an ongoing thing.
As well as my big ol' glass-less frame I reused a couple of frames that I'd spray painted turquoise years ago (from our bedroom at the old house) and a couple of Ikea Nyttja frames in red. I also picked up a load of very cute Martha Stewart stickers on sale at our local Staples store. The colours of these stickers were perfect for the colours I had imagined for our new Wall of Wisdom.
I did have to buy a large sheet of poster board, which I cut to fit the frame. Without the glass the back was too loose and the white board gave me a great base to start sticking.
When we did this at the old house we had made a list of all the quotes and expressions in alphabetical order. Just so when someone had a new one we could quickly check it wasn't already there! You think you are going to know what up there but we'd had a couple of duplicates that I had to paint over, it's worth making a list.
I scoured the internet for the quotes and saying we wanted to keep from the list, looking for cute printable versions in the right colours.
1:http://www.lovepapercrafts.com/free-printable-home-decor/
2: http://sarah.theworkexperiment.com/hurihia-to-aroaro-ki/
3: http://brightlybeautifulblog.blogspot.co.uk/2013/09/you-will-always-look-lovely.html
4: http://nhne-pulse.org/quote-vivian-greene/
5: https://www.umpquabank.com/fromcanyonville/#inspiration-1
I also used quite a few from this lovely collection from Thirty Hand Made Days
The rest of the small quotes that are printed are either picked up from pinterest and I can't find the source or I made them myself. I used my old favourite Picmonkey to make some, I created speech bubbles on word documents and added text boxes, and I added text boxes over bits of clip art.
Everything else I hand wrote, in my best writing, onto the cute labels with coloured pens.
I just started in one corner and worked my way up. I tried to keep everything straight and lined up, and I tried to keep a good balance of small and large items.
I actually did the smaller red frame first, kind of like a practice run, then moved onto the big frame.
In the old turquoise frames I used 2 beautiful printables that I printed out their original size.
The "As we arise each morning" printable quote comes from Simple as That and the "Change your Thoughts" one comes from Mama Miss.
The Map art quote is one I made. It's really simple to make with your computer, printer and an old map book or road atlas.
I had come across two road atlas's when packing for our move and held on to them with a map art type project in mind. It's a good thing I kept both as I had a bit of a fail on my first attempt! You can see the full tutorial, including details of my blunder and how to avoid it, over at The Pinning Mama here.
I love our new Wall of Wisdom SOOOO much! There are a few gaps on a couple of the stickers so more fabulous quotes can be added in the future.
It really represents all of the family too, quotes from everyone from Jane Austen to Doctor Who, Shakespeare to Dumbledore, The Dalai Lama to Star Wars!
It took a little while to get this all together, not the quickest project I've ever done but at least now people have something to read whilst they are in the smallest room in the house!
I'll be linking up this project at all these lovely link parties, pop over for a look at loads of projects from other blogs.
Our new house has a good sized downstairs toilet (privy, lav, loo, cloakroom, john, WC ... any more names?) It is much nicer than the teeny one we had at the old house but possibly the most boring décor on the planet. It was just a white box.
In the old house we created a "wall of wisdom" by writing quotes, sayings, expressions directly on the wall using sharpies. It was simple, fun and always a talking point but had two major flaws: the sharpies smudged when splashed with water and when we moved we had to leave it behind. For the new smarter loo I wanted to recreate the Wall of Wisdom in a better, cuter and more flexible way.
The only casualty in the move was the glass in a large wooden picture frame. The frame itself survived so I gave it a few coats of white spray paint and used it as the basis of our new wall. One of the best things about the wall we had in the old house was that anyone could add to it as they wanted. I was keen to keep that interactive element so thought by using a glass-less frame and label stickers to organise the space this could be an ongoing thing.
As well as my big ol' glass-less frame I reused a couple of frames that I'd spray painted turquoise years ago (from our bedroom at the old house) and a couple of Ikea Nyttja frames in red. I also picked up a load of very cute Martha Stewart stickers on sale at our local Staples store. The colours of these stickers were perfect for the colours I had imagined for our new Wall of Wisdom.
When we did this at the old house we had made a list of all the quotes and expressions in alphabetical order. Just so when someone had a new one we could quickly check it wasn't already there! You think you are going to know what up there but we'd had a couple of duplicates that I had to paint over, it's worth making a list.
I scoured the internet for the quotes and saying we wanted to keep from the list, looking for cute printable versions in the right colours.
1:http://www.lovepapercrafts.com/free-printable-home-decor/
2: http://sarah.theworkexperiment.com/hurihia-to-aroaro-ki/
3: http://brightlybeautifulblog.blogspot.co.uk/2013/09/you-will-always-look-lovely.html
4: http://nhne-pulse.org/quote-vivian-greene/
5: https://www.umpquabank.com/fromcanyonville/#inspiration-1
I also used quite a few from this lovely collection from Thirty Hand Made Days
The rest of the small quotes that are printed are either picked up from pinterest and I can't find the source or I made them myself. I used my old favourite Picmonkey to make some, I created speech bubbles on word documents and added text boxes, and I added text boxes over bits of clip art.
Everything else I hand wrote, in my best writing, onto the cute labels with coloured pens.
I just started in one corner and worked my way up. I tried to keep everything straight and lined up, and I tried to keep a good balance of small and large items.
I actually did the smaller red frame first, kind of like a practice run, then moved onto the big frame.
In the old turquoise frames I used 2 beautiful printables that I printed out their original size.
The "As we arise each morning" printable quote comes from Simple as That and the "Change your Thoughts" one comes from Mama Miss.
The Map art quote is one I made. It's really simple to make with your computer, printer and an old map book or road atlas.
I had come across two road atlas's when packing for our move and held on to them with a map art type project in mind. It's a good thing I kept both as I had a bit of a fail on my first attempt! You can see the full tutorial, including details of my blunder and how to avoid it, over at The Pinning Mama here.
It really represents all of the family too, quotes from everyone from Jane Austen to Doctor Who, Shakespeare to Dumbledore, The Dalai Lama to Star Wars!
It took a little while to get this all together, not the quickest project I've ever done but at least now people have something to read whilst they are in the smallest room in the house!
If anyone spots their quote art here and I've not linked it to your source, please do let me know and I'll get that linked properly. I've included everything I could find, but one of two things I used from pinterest had links that went nowhere and Google image search wasn't able to help me either.
All the top quality photos in this post were taken by our daughter, you can find her website here
You might also be interested in:
|
|
|
|
Monday, 6 July 2015
It's easy to make your own art for your walls, and specimen art is so simple to make to suit any colour scheme.
This is another "change things we already have to suit our new house décor" post. Catchy title eh! Previously I've shared changes to our bedroom things here and here. I've not wanted or needed to buy all new in our new home, some things can just be tweaked to feel like new.
We had a couple of small pictures in the old bedroom that I had made quite a few years ago, both turquoise to match the wallpaper we had.
One was made from a lovely laser cut birthday card I had been given. It was just too pretty to not keep so I simply framed it in a box frame with a vibrant turquoise card behind.
I'll be linking up this project at all these lovely link parties, pop over for a look at loads of projects from other blogs
This is another "change things we already have to suit our new house décor" post. Catchy title eh! Previously I've shared changes to our bedroom things here and here. I've not wanted or needed to buy all new in our new home, some things can just be tweaked to feel like new.
We had a couple of small pictures in the old bedroom that I had made quite a few years ago, both turquoise to match the wallpaper we had.
One was made from a lovely laser cut birthday card I had been given. It was just too pretty to not keep so I simply framed it in a box frame with a vibrant turquoise card behind.
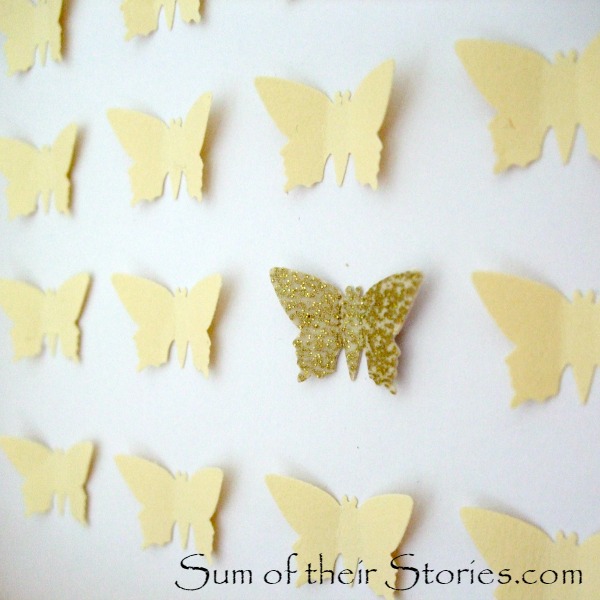
The other was a simple specimen butterfly picture.
This was so easy (and cheap) to make using a butterfly punch and paint swatches.
I still really like both pieces but in our new bedroom there are no turquoise accents, we have a much more subtle colour pallet of just white, cream and gold so rather than get rid, I gave these two little pieces of art a do-over.
Did you see my post a few weeks ago about making drawer dividers to help get my dresser drawers organised? I mentioned I had wall paper samples left over from another project. This is that other project! I chose a gold and cream striped wallpaper and used the gold sparkly sections for both these projects.
The laser cut one was super simple.
I took the back off the frame and the turquoise card was replaced by a piece of the gold wallpaper. The stripes of the wallpaper weren't quite wide enough so I joined two pieces, glueing them to the paper that came in the frame originally, then trimming them to size.
I then just reassembled the frame, so the laser cut is right up against the glass and the gold wallpaper layer is at the back.
For the specimen art picture I thought about using a different punch but I do really like the butterflies still. This time, instead of paint swatches I used cream card and a scrap of the gold sparkly wall paper.
I punched out 19 butterflies from the cream card and one from the sparkly wall paper and arranged them on a piece of good quality white paper. I didn't measure, I just lined them up by eye, but you could be precise and measure this all out if you want.
I folded the wings of the butterflies up a little, then carefully glued just the bodies to the paper. I just did them one at a time, so I didn't mess up the arrangement and spacing.
The sparkly paper is actually way more sparkly that showing up in these photos.
I have no idea if specimen art is still in fashion or not, I just know it is really easy to DIY and I like it! It needs zero artistic skills and can be made to suit any décor. It's worth getting a punch as it makes it so simple but at a push you could just cut shapes with a pair of scissors.
You might also be interested in:
|
|
|
|
Subscribe to:
Comments (Atom)
Labels
Air Hardening Clay
Blogging
Christmas
Clever ideas
Craft show
Crochet
Doctor Who
Easter
Felt
Geekery
Gift Wrap
Gifts
Hand Lettering
Handmade Monday
Home Decorating
Kids activities
Knitting
My Favourite Finds
Needle case
Party ideas
Pattern review
Pinterest Challenge
Sewing my Stash
Silent Sunday
Valentine
Wedding
accessories
art
bags
buttons
cakes
cooking
cushions and pillows
doodle
embroidery
gardening
gift ideas
greeting cards
jewellery
organising ideas
papercraft
papercutting
pretty ideas
recipes
recycling/repurposing
refashion
sewing
their stories
thrifty tips
tutorials
what can go wrong


