It's easy to make your own art for your walls, and specimen art is so simple to make to suit any colour scheme.
This is another "change things we already have to suit our new house décor" post. Catchy title eh! Previously I've shared changes to our bedroom things here and here. I've not wanted or needed to buy all new in our new home, some things can just be tweaked to feel like new.
We had a couple of small pictures in the old bedroom that I had made quite a few years ago, both turquoise to match the wallpaper we had.
One was made from a lovely laser cut birthday card I had been given. It was just too pretty to not keep so I simply framed it in a box frame with a vibrant turquoise card behind.
The other was a simple specimen butterfly picture.
This was so easy (and cheap) to make using a butterfly punch and paint swatches.
I still really like both pieces but in our new bedroom there are no turquoise accents, we have a much more subtle colour pallet of just white, cream and gold so rather than get rid, I gave these two little pieces of art a do-over.
Did you see my post a few weeks ago about making drawer dividers to help get my dresser drawers organised? I mentioned I had wall paper samples left over from another project. This is that other project! I chose a gold and cream striped wallpaper and used the gold sparkly sections for both these projects.
The laser cut one was super simple.
I took the back off the frame and the turquoise card was replaced by a piece of the gold wallpaper. The stripes of the wallpaper weren't quite wide enough so I joined two pieces, glueing them to the paper that came in the frame originally, then trimming them to size.
I then just reassembled the frame, so the laser cut is right up against the glass and the gold wallpaper layer is at the back.
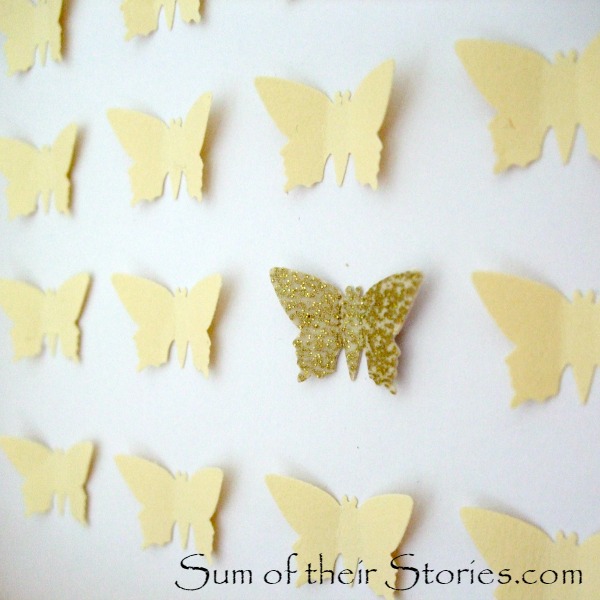
For the specimen art picture I thought about using a different punch but I do really like the butterflies still. This time, instead of paint swatches I used cream card and a scrap of the gold sparkly wall paper.
I punched out 19 butterflies from the cream card and one from the sparkly wall paper and arranged them on a piece of good quality white paper. I didn't measure, I just lined them up by eye, but you could be precise and measure this all out if you want.
I folded the wings of the butterflies up a little, then carefully glued just the bodies to the paper. I just did them one at a time, so I didn't mess up the arrangement and spacing.
The sparkly paper is actually way more sparkly that showing up in these photos.
I have no idea if specimen art is still in fashion or not, I just know it is really easy to DIY and I like it! It needs zero artistic skills and can be made to suit any décor. It's worth getting a punch as it makes it so simple but at a push you could just cut shapes with a pair of scissors.
You might also be interested in:
 |
| Flower Collage Canvas |
|
 |
| Geometric DIY Art |
|
 |
| Personalised Wedding Picture |
|
 |
| Share a Coke with Picture |
|
I'll be linking up this project at all these lovely link parties, pop over for a look at loads of projects from other blogs


What a difference the change in colours make, and so easy to do too, thanks for sharing.
ReplyDeleteThis is a really beautiful idea and how fun would it be to paint/create the butterflies! Thank you for this!
ReplyDeleteThanks Echo A, it would be fun to really go nuts embellishing the butterflies if you are an arty type. I guess what I like about easy ideas like this is that they can be as simple or fancy as you want.
DeleteSo cute I love the butterfly collection
ReplyDeleteI love laser cut stuff. We have a laser cutting machine down at the workspace and it does amazing stuff with leather, card and even plastic. The fumes are a bit of a problem though.
ReplyDeleteHow brilliant to have access to a machine that can make this sort of fancy laser cut. I just knew as soon as I opened this birthday card, at least 5 years ago, that it was a keeper!
DeleteYou are so creative. I, on the other hand am not. These are beautiful pieces of wall art!
ReplyDeleteI honestly think even the most creatively challenged could punch out shapes and stick 'em on a piece of card! That's why I like dead easy projects like this - anyone can get good results (I think!)
DeleteLove the laser cut and do hold onto beautiful gift cards as don;t like to part with them.
ReplyDeleteIt's lovely isn't it Carolee, some cards are like works of art and people can put lots of time and effort into choosing them, Ii hate the thought of putting them into the recycling after a couple of weeks.
DeleteWhat beautiful wall art! :) Lisa
ReplyDeleteThis looks so cool! Great job!
ReplyDeleteThis is so fun! Thank you for sharing it at last week's Tips & Tricks linky party! This week's party just went live... hope you can join in the fun again, this week!
ReplyDeleteBeautiful art piece! I love specimen art and you have shared a great tutorial. Thank you for linking up to Friday Favorites this week. We hope to see you share this week. I have also pinned your post to my DIY Wall Art pinterest board. I welcome you to reshare your post to my DIY Wall Art Blog Hop going on this week. I am sure people would enjoy your butterfly specimen wall art. :) http://www.casawatkins.net/2015/07/diy-wall-art-blog-hop-doily-medallion.html
ReplyDelete