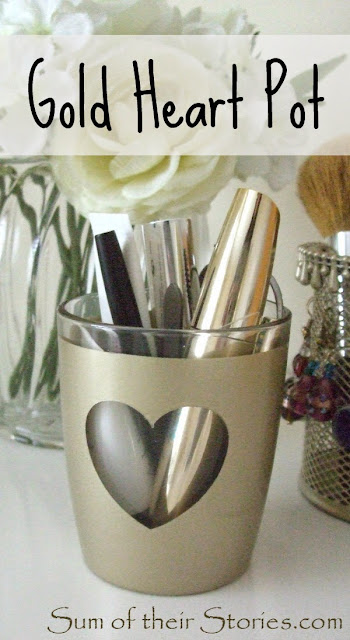
Continuing my efforts to make old things fit with out new bedroom décor I've made a useful pot for putting things in (Winnie the Pooh anyone? Eeyore's Birthday Present?)
I am so pleased with how this project turned out. It was really simple and fun to do too.
There was a sneak peek of this in my post the other week "Buying New verses Using Old", now I'm ready with some photos to share how you can make this if you fancy having a go.
My original inspiration for this came from something I pinned AGES ago, in fact one of my first pins ever!
But I had done that lazy/newbie thing and pinned a good idea without checking the source. Turns out my pin lead to one of those sites that takes images and makes a long tutorial pin from someone else's work. I have managed to track down the original post at heart. love. always. and re pinned from there - phew! (Thank goodness for Google image search) You can find my new properly linked pin here.
This is what you need:
A glass (mine was one of those Nutella ones, great for recycling but didn't stack nicely with our other glasses as it's a different height and we only had 1 - perfect for this!)
Spray Paint
Stickers
Scrap Paper
Washi tape or decorators tape
First wash and dry the glass, then stick whatever sticker you have where ever you like on the glass. I'd had these peel off stickers for a long time but hadn't really used them, I think they were probably free with a magazine.
The design on the sticker doesn't matter - just the size and shape. I chose a heart and put it centrally.
You could put lots on if you want, just don't put anything too close to the top edge.
Next take a piece of scrap paper and roll it up to fit inside the glass and secure it with some tape. Take your time with the tape, make it nice and straight.
I found it easiest to take short lengths rather than trying to do it all in one go. Also by using a tape with a pattern I was able to line everything up with the top of the glass, keep it all straight.
Give the whole thing a coat of gold spray paint. The paper will stop the paint going on the inside.
Now the most fun bit. As soon as the paint is dry carefully peel off the sticker and tape.
Give the whole thing a couple of days for the paint to really dry thoroughly and then fill with lovely things.
Now here is a second bonus project for today: The mirror frame you can also see in the "Buying New verses Using Old" post was another item that's had a makeover. It was natural wood colour and it has also had a spray of gold.
I don't think this really deserves a whole post dedicated to it: I took the mirror out, sprayed it gold, put the mirror back, hung it on the wall - job done.
I really do have the Midas touch at the moment - everything I spray turns to gold!
You might also be interested in:
 |
| Paper Cutting first attempt |
|
 |
| Share a Coke with Picture |
|
 |
| Washi Tape Berry Baskets |
|
 |
| Recycled Pen Tub Tutorial |
|
I'll be linking up at these lovely link parties


Crafty people so impress me. Just the fact that you thought about how to make it beautiful, and then you did. Kudos!
ReplyDeleteGreat transformation! I could certainly use a holder like that in my bathroom or bedroom for my odds and ends that seem to never have a place to call home. I like the heart shape too.
ReplyDeleteGot to have a "useful pot for putting things in"! All part of life's ongoing quest to keep tidy of course!
DeleteWow! I love the transformation! What a great different after you had sprayed it. Thank you for sharing it with us #pintorials
ReplyDeleteSmall touches make the difference. Love it!
ReplyDeleteI love how your project turned out, it is so sophisticated!
ReplyDeleteThanks for stopping by to share on Friday Features this week, I hope you have a great weekend!
Karren
Wow, that is so pretty and it doesn't sound too tough to do. Putting it on my Pinterest board!
ReplyDeleteBy the way, I'd love to have you post on my new blog hop (open all weekend) at www.myflagstaffhome.com, if you're interested.
Jennifer
Simple, cute, and inexpensive....my favorite type of craft! And bonus points if it provides extra needed storage. :) Thanks so much for sharing this with us at Merry Monday! We hope you'll join us again this week!
ReplyDeleteTurned out pretty! Thank you so much for sharing this over at Bewitchin Projects Block Party!! Hope you will join us again this week!!
ReplyDelete-Shonee
www.hawthorneandmain.com
Oh this is so pretty! Love it!
ReplyDelete#Pintorials
Thanks for bringing this one over to the blog hop, too!!!
ReplyDeleteJennifer
What a brilliant use for a plain glass. The paintwork is so smooth am sure if I tried would end up a real mess.
ReplyDeleteThat's what I love about spray paint, it comes out so smooth. I have a big old box that I use outside for spraying. As long as you don't get too close or spray one place for too long it seems pretty easy (I have done both of those things though!)
DeleteThis is so pretty :)
ReplyDeleteThanks for sharing at Creative Mondays
They look great, and well done for searching out the owner of the original pin. A huge thanks for the advice you gave me on my blog too.
ReplyDeleteThanks Lucy, pins that go where they shouldn't always annoy me! Hope some of it helps - I did ramble on a bit!
DeleteFor some reason, my husband has a weird aversion to letting me loose with a can of spray paint... I'm sure I could handle it really - and these items are both fab! I will be trying out some spray painting with my next upcycling project whether he likes it or not! xx
ReplyDeleteYou go for it! Just maybe outside... on a still day - and pop the project in a big old cardboard box, or you'll end up spraying everything. I have black shoes with a faint gold shimmer by mistake!
Deleteso useful and pretty too , you are a clever gal x
ReplyDeleteThis would make a pretty addition for added storage. Great for a work desk or dressing table.
ReplyDeleteJan x
Good idea Jan, this would be a lovely pen pot too - very classy for a desk!
DeleteWow! That looks incredible. I’m so impressed. Pinned and tweeted. We appreciate you stopping by to party with us. We hope to see you, tonight at 7 pm. Happy Monday! Lou Lou Girls
ReplyDeleteLove this! The original inspiration from Pinterest was one of my first pins too! :)
ReplyDeleteNew Pinterest, Twitter and Instagram follower
Libby x
http://un-junkt.blogspot.co.uk/
Simple, but very effective.
ReplyDeleteI love this! It is so simple but really gives a whole new look to the space. It's the perfect storage for makeup. I hope you'll share this project over at Motivational Monday this week: http://makingitinthemitten.blogspot.com/2015/06/motivational-monday-june-14th.html
ReplyDeleteThat is such a fun transformation! Thanks so much for linking it up at Tips & Tricks last week... I hope you'll join us again this week - the party just went live (and, one of the cohosts chose to feature this project - so fun!).
ReplyDelete-Heather
www.stringtownhome.net
Beautiful makeover! Love the metallic paint!
ReplyDelete