Sunday, 16 July 2017

Handmade Monday #34

Welcome to another Handmade Monday link up, it's so good to have you join us this week. This is the place where we share our makes, bakes and other handmade craft ideas, find some new inspiration and connect with our fellow bloggers.

Have you all had a good week? I was away for a few days at the seaside so not much crafting time. I know some people take a project with them but I usually take holidays as a chance to read. I finished up A Storm of Swords (book 3 of A Song of Fire and Ice/Game of Thrones series) Oh my goodness, this is the book when all the things happen to all the people - I couldn't have put it down to stitch or crochet even if I had taken something with me!

I have a little cautionary tale for you all too. I took a cute little film with the Boomerang app of the waves coming in on the sand one evening. I was going to share it with you here and on Instagram. It was cute and it was summery ... Did you know you have to save Boomerang films if you don't share them straight away? Apparently I did not. No cute film to share :-( 

Never mind, let's get on with the features from last weeks linky, this week I've gone for a bit of a crochet theme:
This house from Kat Kat Katoen is just the cutest thing, that top window reminds me of a slice of Battenberg cake!
If you like little projects that use up scraps then you can't beat these little key rings from AnneMarie's Haak Blog. She shares links to free patterns for both the fish and the owl.

Congratulations to both of you, here is a "Yay! I was featured" button for your blog.


Instructions: Select all code above, copy it and paste it inside your blog post as HTML

Handmade Monday is all about building a craft community, please so take a few minutes to visit some of the other links, leave a comment, and maybe share your favourites on the social media of your choice if you can.
We have a facebook group where we share useful or interesting things so send a request if you'd like to join us. 

The rules for Handmade Monday are simple:
  • Did you make it? Yes - hooray, we'd love to see it!
  • Add the link to a specific blog post, not your main site URL.
  • Link up to 3 posts each week.
  • Mingle - visit some of the other links - comment - share - let's support one another and grow our craft community.
If you're not sure on anything, more information can be found here.


read more

Wednesday, 12 July 2017

Christmas Ornament Recycling

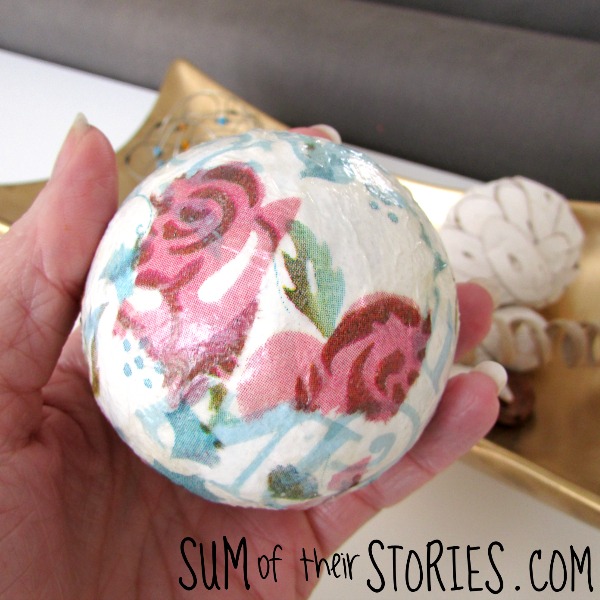
Got an old broken Christmas bauble? Here's how you could turn it into an all year round decorative ball.
Up date a broken Christmas ornament for all year round
What are these things called? Decorative balls, deco balls, ornamental spheres? I'm not sure but I know lots of people like to have a dish of them on the mantelpiece or side table.
We have a decorative dish with miscellaneous bits and pieces collected over the years so when one of our larger Christmas baubles had lost it's hanging bit, rather than just throwing it away, I gave it a little makeover so it can be on show all year round.
upcycle a broken christmas ornament
It was really simple, cost next to nothing and looks pretty.

To do the same you will need:

An old Christmas bauble or similar sphere (I guess you could splash out and buy a polystyrene ball at a push)
Mod Podge or PVA glue
A paper napkin/serviette
A paint brush
White paint
A cocktail stick or skewer
christmas ornament upcycle
Rip your paper serviette into pieces.
Stab the ornament with the cocktail stick to form a handle, then paint the whole thing with white paint and let it dry.
This give a nice base for the floral serviette, if you miss this step the colours from the old ornament can show through a bit.
Next apply a layer of Mod Podge and apply the pretty floral paper serviette pieces. As the serviette is very flimsy just dab it on, don't fuss it too much. Less is more here!Christmas ornament recycling
Finally cover with another layer of mod podge to seal and leave it to dry. I stabbed mine into my pin cushion as you can see.
Once it's dry remove the cocktail stick and you are ready to pop your new decorative ball/sphere on display.
Christmas ornament recycling
Our bowl has an eclectic mix, some bits of pot pourri, shells, beads, a metal wire mandala relaxation thingy (that I bought in a street market in Saint Tropez in 1986 and thought was the coolest thing ever!) and a wooden egg that belonged to my nan. No idea what the wooden egg was for but I like it! 
Christmas ornament recycling
recycle broken Christmas ornaments to enjoy all year round
These are affiliate links, if you make a purchase when clicking through from here Sum of their Stories will receive a small commission. The cost to you is the same.
Shop this post UK:


Shop this post USA:

read more

Sunday, 9 July 2017

Handmade Monday #33

Hello everyone, welcome to this weeks Handmade Monday Craft Link up.
It's great to have you join us this week for another craft link up. This is the place where we share our makes, bakes and other handmade craft ideas, find some new inspiration and connect with our fellow bloggers.

Is everyone ok? All ready for another week?

It's lovely to see how Handmade Monday is growing with new faces joining us most weeks and 'old' faces returning (you all know that I don't mean your faces are old right?! #awkward) 
Thank you all for supporting Handmade Monday. 
Don't forget to stop by and visit a few other folks. It doesn't take long and everyone likes a comment or two!
Lots of you are sharing one another's projects on various social media's during the week. You know who you are and you are wonderful people! 

Now on to the features from last weeks linky:
Liz from Howling at the Moon is on a mission to make things she has pinned on pinterest and has made some great things over the last few months. I LOVE this unicorn pendant that she shared with us last week.

Ann from The Apple Street Cottage showed us how to make this flamingo planter.  I feel this might be one of those 'every home should have one' type things, I think I should very much like a world full of flamingo shaped planters!
Congratulations to both of you, here is a "Yay! I was featured" button for your blog.


Instructions: Select all code above, copy it and paste it inside your blog post as HTML

Handmade Monday is all about building a craft community, please so take a few minutes to visit some of the other links, leave a comment, and maybe share your favourites on the social media of your choice if you can.
We have a facebook group where we share useful or interesting things too so send a request if you'd like to join us. 

The rules for Handmade Monday are simple:
  • Did you make it? Yes - hooray, we'd love to see it!
  • Add the link to a specific blog post, not your main site URL.
  • Link up to 3 posts each week.
  • Mingle - visit some of the other links - comment - share - let's support one another and grow our craft community.
If you're not sure on anything, more information can be found here.


read more

Friday, 7 July 2017

Inspired By - Upcycled shirt bags

It's SO easy to make useful little bags from old shirts, perfect for traveling or just at home for containing all the things!
Upcycled shirt bags
Every now and again I see an idea on another site that is just too good not to try. Sure, I pin A LOT of stuff on Pinterest that I may/may not ever get to, but some of those pins do actually get made. 
So I'm starting a new feature here at Sum of their Stories - Inspired by: - so I can share with you the "saw it, pinned it, did it" projects. They won't be long posts with lots of step by step instructions because you'll be using the link to the original inspiration if you want to try them out too. Just a few photos to show how it all went.
Starting this "Inspired by:" feature off is this mind blowingly simple idea from the fabulous Pam at Threading My Way. She called them "Easiest Travel Storage Bags You'll Ever Make" and she's not wrong!

I started with this fabulously red shirt. I have a whole bunch of these, donated to me by my brother when he changed jobs.
Upcycled shirt bags
I was able to get 3 bags from the shirt.
Upcycled shirt bags
I just made various sizes as Pam suggested.

The littlest one has the flap opening the wrong way really but this was the placket opening bit on the sleeve so because of where the seam was it couldn't be helped. I think it'll be fine.
Upcycled shirt bags
These bags didn't use all the shirt, I also managed to get 3 metres of bias binding (with my fab new bias binding gadget) and a few flags for some more bunting that I'm making out of it. 
Upcycled shirt bags
They really are the simplest things to make. Pop over to Threading My Way to see just how easy it is.

read more

Wednesday, 5 July 2017

Upcycled Gift Box

It's really simple to give an old gift box a new look with just a magazine and some glue.
Easy upcycled gift box
If you are a 'keeper' like me you will have a small stash of little boxes that are just too good to throw away! Maybe they had jewellery, a watch, a mug or new gadget in them, some packaging is just too good to just throw out ... and here is an easy way to make it pretty.
easy floral upcycled gift box


What you need is:
An old box, this one had jewellery in it originally
An old magazine or seed catalogue
Mod Podge or similar pva glue
A craft knife (you could use scissors at a push)
A brush for the glue

Select a suitable image from the magazine, my magazine was last month's Mollie Makes which had these gorgeous paper flowers in it. Rip the page out and then using a craft knife cut out the image.
magazine cut out for upcycled gift box
Be fairly careful but you don't have to be mega precise, especially if the flowers have wiggly petals like these. Do a few if you can, options are nice.
Now experiment for a moment selecting which image fits best on your box. I wanted to cover the marks and the writing on mine of course so turning the box sideways helped with the flower placement.
easy floral upcycled gift box
Cover the top of the box with a thin layer of Mod Podge, apply the flower then cover with another layer of the glue. It will crease or air bubble a little, that's ok. Smooth it with the brush as best you can but don't overdo it. Magazine paper is pretty thin and you don't want to rip it. 
You can see that a little of the stem went over the edge of the box here, I think that's a nice detail. You just glue that down in exactly the same way.

Just leave it to dry and ta-dah! You are done. What a pretty gift box you have made. 
easy floral upcycled gift box
I loved this so much I found a few more bits & pieces to stick my magazine paper cut outs onto. 
easy floral upcycled gift box
I covered the foam inside the old jewellery box with a little matching fabric too, just to make it more pretty.
easy floral upcycled gift box
I love the big bold flowers on the dark background especially. I think I'll start saving seed catalogues for more big floral cut outs. 
These are affiliate links, if you make a purchase when clicking through from here Sum of their Stories will receive a small commission. The cost to you is the same.
Shop this post UK:
Shop this post USA:

read more