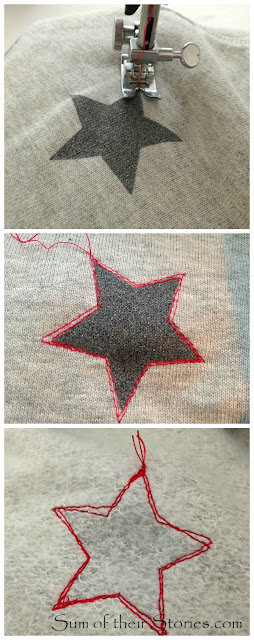
This grey star sweatshirt was just a little to monochrome for my taste so I've given it a little stitching makeover to add just a touch of colour.
This was my "before" sweatshirt.
I bought it about at the end of last winter from a large UK supermarket chain, I actually think it was being sold as Pyjamas. It was in the sale, it is warm, soft and fluffy, it's ok.... It's just a little bit un-colourful for my taste. Each time I wore it I felt like it was someone else's top.
The stars are actually sparkly close up which makes it a little bit nicer than my photo shows.
I thought about covering some of the stars with colourful fabric to start with but in the end I tried something a bit more subtle.
I fired up the sewing machine and just stitched round a random selection of the stars in different coloured basic sewing thread.
That bottom photo is just so you can see what it's like on the inside.
I went round each star twice and the whole thing took maybe an hour and a half with tea breaks. In all I stitched round 20 of the stars in 5 different colours.
This has been extremely difficult to photograph in a way that shows you the difference, which I admit is subtle. I wear it with bright jeans and a scarf usually. Here I'm wearing it with the infinity scarf that I shared a while back on The Pinning Mama. It's made from an old T-shirt and covered in little bright tassels.
You can find the tutorial with full instructions on the Pinning Mama here.
This sweatshirt makeover was what I was doing MONTHS ago when I instagramed this picture.
I don't know if this little tweak can really be called a "refashion" but I'm not sure what else to call it. It was a simple, cheap way to add just a touch of colour to a grey top. Best if all it can still just bung in the washing machine, no need to worry about colours running as the thread is completely colour fast.
The difference in colour in these photos is because they were taken about 3 months apart and probably at completely different times of the day - I promise they are the same sweatshirt!
It's not a massive difference but now when I look down I see colour so the top feels like mine! Maybe you have a top that needs a tiny pop of colour adding and a row or two of machine stitching in a bright colour would work for you?
You might also be interested in:
 |
| Lace Top Refashion |
|
 |
| Stripe T Shirt with Floral Trim |
|
 |
| Check and lace shirt refashion |
|
 |
| Stripy T shirt Refashion |
|
I'll be linking up to all these great link parties, why not go and have a look!


This is a great idea to add colour. I've recently bought a sewing machine as well so this is a good trick to try out.
ReplyDeleteHow exciting - owning a sewing machine is brilliant, start with small easy projects and you'll be making your own clothes and curtains in no time!
DeleteLove what you have done here. Last time I tried machine embroidery it was a bit of a mess, I think I'll give it another go now.
ReplyDeleteI think calling this machine embroidery would be overstating it a bit! I did try that once and messed up the tension of my machine so badly I had to take it to a repair shop. Now a days I stick to simpler stuff, this was really easy, just a little bit time consuming as the lines of stitching are short so you have to go slow.
DeleteA wonderful idea to brighten up a clothing piece. Love the scarf idea
ReplyDeleteThanks, it is more noticeable in real life than in the photos so I'm happy with just a little bit of colour on my grey grey top.
DeleteIt's a great way to brighten it up, and I'm in awe at your machining skills - I could probably do it by hand but not with my machine!
ReplyDeleteI did think about doing this by hand, maybe with an embroidery thread that would be thicker and therefore show up more but then I worried about washing it in the machine. This wasn't difficult, just a case of slow and steady - plenty of cups of tea!
DeleteWho would of thought that little bit of colour would make such a difference. The little outlines lift the grey nicely and it's great that it can be washed as normal. It looks well with the scarf.
ReplyDeleteYes, being able to bung it in the washing machine still was a major factor. The scarf is fun to wear on a grey day too!
DeleteGorgeous idea! I love it! x
ReplyDeleteThank you Emma, and thanks for stopping by.
DeleteWhat a great idea! I0m not sure I could manage those stitches with my sewing machine. Not savvy enough. But I could do it by hand, surely!
ReplyDeleteThank you for sharing at the Really Crafty Link Party this week! Pinned!
It wasn't too hard Teresa, the trick is to go slow so the machine doesn't run away with you, but hand stitching would work great too. I would think use several threads together, maybe 4 or 5 so you get a thicker line of stitching.
DeleteThank you for sharing at the Thursday Favorite Things blog hop
ReplyDeleteSubtle and so, so effective, Julie!!!
ReplyDeleteFeatured today...
Delete