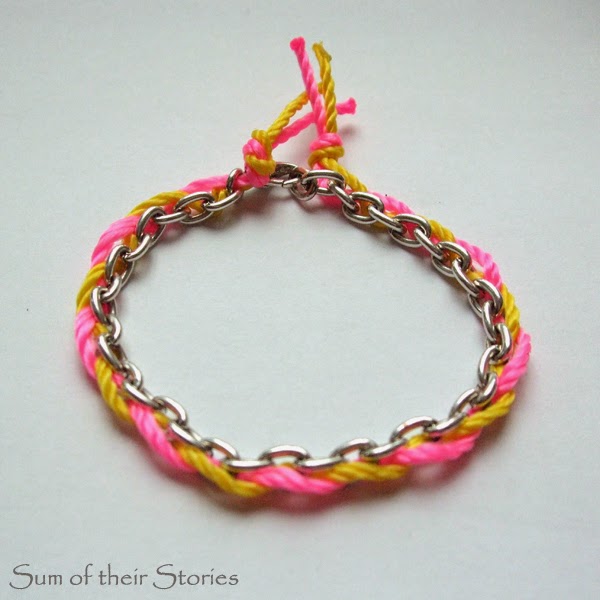
I keep seeing lovely bracelets everywhere made with a chain and coloured threads. They are so pretty and summery (I even saw one in a magazine the other day for £235!) I figured it wouldn't be that hard to fashion a DIY version so when a old bracelet needed a make over I thought I'd have a go.
This cute little charm bracelet was a present from a lovely friend a few years ago.
I do love it but it was starting to get a bit worn in a few places.
See the little jump rings are no longer silver coloured and there are scratches on all the charms.
It was pretty easy just to remove the charms with pliers.
For the thread I used the pink cord from my pink bracelet experiments. I'd also bought some yellow since then for something else. (It was a Father's Day gift so I guess I'll share that in May next year!)
They are the same make and price (£3.98 from the hardware shop B&Q) but slightly different size and texture. No matter - it turned out fine.
I store them like this, with elastic bands round them to stop them unravelling everywhere.
I experimented with a few different ways of threading & knotting. I knew I wanted both colours together - I think they look dead summery. I discovered the cord only just fitted through the chains so that limited things a bit. If you make one, what you can do will depend on the chain link size and the thickness of your threads.
- First cut a length of each cord a good 3 inches longer than your chain bracelet. My synthetic thread is very unravel-y so I melted the ends carefully (just in the flame of the gas hob), that worked WAY better than the nail varnish I'd used before.
- Tie a knot about 1/2 inch from one end.
- Hold the chain in one hand and lie the threads above it. I held the chain flat so every other link was facing me - these were the links I used - every other one.
Sadly it was impossible to hold the chain, thread the cord and take photos all at the same time, with just my 2 hands and no-on else was home when I was doing this. Instead I have drawn you little step by step diagrams.
- Poke the pink thread up through the first link that's facing you from back to front.
- Take the pink back up to the top of the chain.
- Now take the yellow thread over the pink and then poke it through the next chain link facing you (ie miss one link and thread through the next) again from back to front.
- Bring the yellow thread back up to the top.
- Take the pink again and repeat, so take it over the yellow thread and up through the 2nd link along.
By missing every other link you keep the whole thing straight, I found if I tried to weave in every link the whole thing started to twist. I like the way the threads sit on the top of the chain in a nice straight pattern.
- You just carry on to the end, going over the opposite thread then up through the next link facing you.
When you get to the end just check the whole bracelet is flat and smooth and none of the links are bunched up in any way. If they bunch up the bracelet will be shorter and won't fit you any more!
- When you are happy just tie the ends in another knot, trim off to about 1/2 inch and melt if necessary.
If the knots start to work undone you can just add a tiny dab of super glue to hold them. It depends what kind of thread you use. Mine is quite springy!
It's just what I was hoping for, pretty and summery.
I'll probably wear it with a whole stack of others, more like this:
I'm thinking any type of chain would work in principal, you might just need to weave it a little bit differently. It would work well with a few strands of embroidery thread too I reckon, lots of colours together would look good.
You might also be interested in:
 |
| 3 Pink Bracelets |
|
 |
| Earrings organised Update |
|
 |
| Old bracelet to new statement necklace |
|
 |
| Crocheted Owl Brooch |
|
I'll be linking up at these great link parties,


This is just too fun! What a great idea, and totally one that I can do with my older girls for our next Mommy Daughter crafting night.
ReplyDeleteThanks Sarah. I have to say Mummy daughter crafting nights sound awesome, I wonder if I can get my daughter interested in having one with me when she is home for the holidays - enjoy!
DeleteLooks great! Nice picture explanations, too! I've done this with a few strands of each color and I really like the look!
ReplyDeleteThanks Becky, I was worried about how to show what I did with no photos, it's good to hear the drawings make sense. I just couldn't juggle it all!
DeleteSo cute and simple! Thanks for sharing. My daughter would love this!
ReplyDeleteHappy Sharefest! I hope you have a lovely weekend.
I love these kinds of bracelets. Need to get me some chain bracelets.
ReplyDeleteThanks for sharing.
They are lovely aren't they? It's nice when there is a fashion that is so easy to DIY.
DeleteWhat a great DIY!
ReplyDeleteThanks Midnight Cowgirl, (What a great name!)
DeleteLovely! Great tutorial, thanks for sharing!
ReplyDeleteHope you have a wonderful week!
Hugs from Portugal,
Ana Love Craft
www.lovecraft2012.blogspot.com
So cute! I love the colors you used. :) I saw your link at the Link It or Lump It party!
ReplyDeleteGlad you like it Lila, I think I was going for a sort of neon/tropical look!
DeleteI think this is a fantastic idea! I may just have to make one for a first!
ReplyDeleteThis would be a great "first" Betty, make sure you share it with us.
DeleteSo love this bracelet and excellent tutorial. Your hand drawn pics are quite explanatory, am person that desperately needs to have photo how to, I get lost in written how to's. What can I say? Your bracelet is so pretty with yellow/pink threads. I'll have to see what I have. Think I still have some plastic canvas yarn that will work perfectly, very similar to what you used. I love to make things for grand daughters to surprise them. At 14 and 17 it's hard to find things they haven't seen before, at least I hope not, lol.
ReplyDeleteSo glad I clicked on your link from Silver Pennies Sunday link party. Are you English or Canadian.?Noticed how you spelled colours. Happy summer days. If you choose to reply please do so to: FurryKidzPaperworx@gmail.com
Hi, I'm in the UK - my spelling, £ signs and sarcastic comments give that way I think! (though I do try to keep a lid of the sarcasm as much as possible)
DeleteI need lots of pictures too, even with recipes I like lots of pictures so I know what I'm aiming for. We are just visual people, that's all!
What a cute way to brighten up a chain bracelet. It does look very summery.
ReplyDeletelooks great and very summery!
ReplyDeleteMiss 6 is all into making bracelets right now... A new craft to try.
ReplyDeleteLove your descriptive images!
#Pintorials
I really like the mixed media look of this one!
ReplyDeleteMixed media makes it sound very grand - I like it! Thanks for stopping by and taking the time to comment.
DeleteSomething old made new, with summer pizzaz......It's very cute.
ReplyDeleteHow very pretty! I am inspired to do a navy and white creation for a nautical flair.
ReplyDeleteOooo, navy and white would be lovely, maybe just a tiny dash of red in their too!
DeleteGreat idea! Love how it looks. Thanks for sharing @ Monday handmade Linkup Party!
ReplyDeleteWhat a great way to liven up an old bracelet!
ReplyDeleteLove this! I think I'm going to check our local Goodwill (thrift store) for bracelets. I'm thinking about doing it with a Girl Scout troop.
ReplyDeleteSounds like a fun idea Barb. I think this simple weaving, wrapping would work for most types of chain but I guess your Girl Scouts could get creative and try out their own ideas too.
DeleteYou could even make it inexpensive by getting a long length of chain from the hardware shop. Maybe the threads could even be used to tie it on in some way instead of having to buy fasteners. Or perhaps you could use those little plastic hooky things that all the kids are using for their loom band bracelets at the moment.
Or maybe you will get super lucky in your local thift/charity shops - good luck.
Can you tell I am just thinking aloud in this comment...
Super cute! And great tutorial. Thanks so much for sharing it with us at The Makers. :)
ReplyDeleteThis is a great way to have the soft and hard together... matches so much in your wardrobe. great job on the tutorial! Thanks for sharing with Creative Style!
ReplyDeleteThanks April. And yes, I do seem to have a lot of pink/brights in my wardrobe - always have, I don't really do pastel or grey/black, that looks better on other people!
DeleteThank you so much for stopping by last weeks Creative Spark Link Party! I hope you stop by to link up again this week! http://bit.ly/1vvIGjo
ReplyDelete