Tuesday, 27 May 2014

Paper Cutting First Attempts

It was my birthday last weekend! I have wanted to have a go at paper cutting ever since I saw people making lovely wedding invitations on one of Kirstie Allsopp's "Come on people, have a go at making beautiful things" programmes. (That's not the actual name of the programme, but she's done quite a few now and I've watched them all and can't remember what I saw on which, sorry)
paper cutting for beginners from sum of their stories
Anyway, a decent craft knife was on my "what I'd like if you want to get me a present" list. I was lucky enough to be given a lovely set of X-acto craft knives and a Fiskars swivel blade craft knife. 
I've been playing with my new kit! This was the very first thing I did.
paper cutting for beginners from sum of their stories
It's kind of fun, I just drew a quick design on the back of my paper and started cutting. Not quite Rob Ryan but the techniques take some getting used to! I started looking on the internet to get some tips and found this great site and tutorial from Robin Wilson Owen.

I experimented a little more and made a little initial. I think I'll make it into a bookmark for my niece Faith.
paper cutting for beginners from sum of their stories
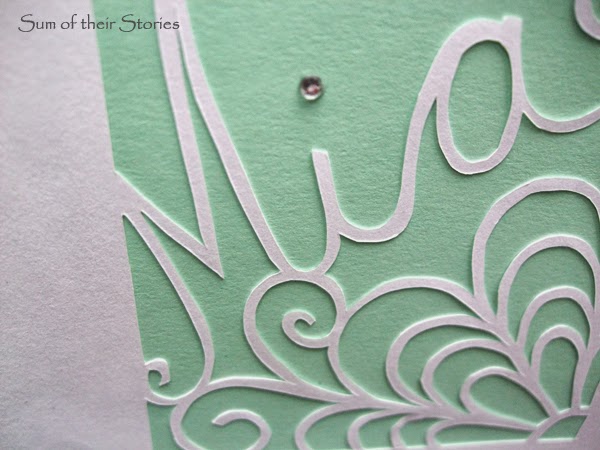
Then I got a bit more ambitious and thought I'd make a greeting card. First I drew the name Mia and a simple flower on a bit of regular scrap paper.
paper cutting for beginners from sum of their stories
I turned it over and placed it face down on a bit of nice thick drawing paper. Then I scribbled all over the back to transfer it to the drawing paper. This way the writing will be the right way when it's finished.
paper cutting for beginners from sum of their stories
Then I just started to cut it out. Slowly and carefully!
Robin Wilson Owen's tips are great so definitely check them out. 
I got a bit carried away so there are no mid process photos of that design, however I did think to take photos of the design I tried next. I did this in exactly the same way, so the photos will now jump from design to design, sorry about that!
paper cutting for beginners from sum of their stories
When it was all cut out it looked like this:
paper cutting for beginners from sum of their stories
Whatever you do don't try to rub the pencil lines out, those little bits of paper will pucker & rip even if you go dead gently (apparently!) It's the wrong side anyway so no-one will ever see.
paper cutting for beginners from sum of their stories
Turn it over to see the right side and the writing the right way round.
paper cutting for beginners from sum of their stories
I am not the tidiest person when I'm being creative, perhaps I should have taken my own advice and made an envelope bin!
I mounted the finished pieces onto coloured paper then card.
paper cutting for beginners from sum of their stories
I haven't worked out if there is a clever way to dot the i's yet so I added a little gem.
I am LOVING paper cutting. Yes, it is time consuming and very fiddly but the results are just so darn cute!
My first attempts are so far from the beautiful intricate designs I have started to collect on pinterest now but they are not too shabby either. I'm sure paper cutting experts can see all my mistakes, the lines are not very even or fine and there are a few little paper fibres in some of the corners.
I will practice, practice, practice because this is a lovely craft hobby and I just want to do more! Not one for the kids - those knives are really sharp and not for people who like instant results. However worth a try if you want something different with beautiful results and no big outlay on lots of equipment.
You might also be interested in:
Using Sketches for Card Making
Circle Card Crazy
Circle card Crazy
Washi Tape Berry Baskets
Recycled Pen Tub Tutorial
I'll be linking up this project at all these lovely link parties, pop over for a look at loads of projects from other blogs.

read more

Wednesday, 21 May 2014

Tetris Tote Bag

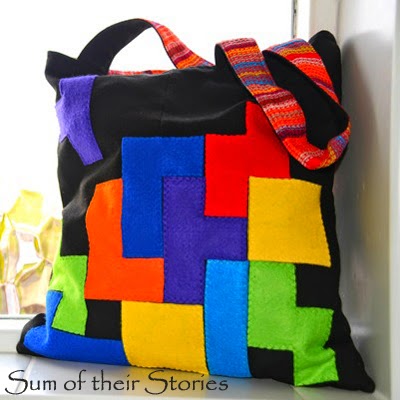
I'm not a big gamer type person but I did love Tetris back in the day. The shapes are so instantly recognisable I thought it would be fun to put them on a bag.
Tetris Tote Bag Tutorial
I made this bag from an old pair of my sons school trousers, 2 tea towels and some felt. You could just use regular fabric, or whatever you have. 
Tetris Tote Bag Tutorial
I stitched my felt Tetris shapes on but you are not really into sewing you could use a fabric glue. 

You could even just add the shapes to an existing bag if you have one. Make it as easy or complicated as you like. 

First prepare the felt Tetris pieces
I made templates from card, 4x4cm squares, in the right shapes.
Tetris Tote Bag Tutorial
The ones like the L shape you only need to do once, as you can just flip the template to cut the ones that are the opposite way round. 
These are the shapes and colours you need:

Unfortunately I don't seem to have photographed my pile of Tetris shaped pieces, sorry, you'll see them in just a second.
Next prepare the fabric bag pieces
I used 2 tea towels to line my bag, so they determined how big it could be. I chopped a piece of the top to use for the handles, like so:
Tetris Tote Bag Tutorial
I used the lining fabric to measure my outer fabric from the trouser legs.
Tetris Tote Bag Tutorial
Then I used the off cut pieces to make the handle pieces. As my fabric was limited I had to join shorter pieces to make the long handles I wanted. If you have more fabric you can just cut longer pieces all in one. Or you could have shorter handles!
So I ended up with 12 pieces:
  • 2 x 41 x 44cm outer "trouser" fabric
  • 2 x 41 x 44cm tea towel lining fabric
  • 4 x outer fabric handle pieces 7 x 41cm (or cut 2 x 7 x 79cm if you have enough fabric)
  • 4 x lining fabric handle pieces 7 x 41cm (or cut 2 x 7 x 79cm if you have enough fabric)
Tetris Tote Bag Tutorial

Attach the felt shapes
Before you make the bag you want to add the decoration to one of the large outer fabric pieces.

what can go wrong: If your felt needs ironing do it before you cut the shapes out, I did mine after and they pulled out of shape so I had to trim them again to make them fit - doh!
Play around with your pieces until you are happy with the arrangement, I was/am a Tetris fan so it was important to me that the pieces fitted like they would in the game. Remember if a line is all filled in it disappears (and you get points!) so you need to leave gaps on every line.

Once you you are happy pin them centrally to the bag front piece.
Tetris Tote Bag Tutorial
I attached each piece by stitching it on with a zig zag stitch, I wanted the thread colours to match so I stitched all the yellow, then all the green etc changing the threads as I went. It was a bit of a fiddle but worth it.
Tetris Tote Bag Tutorial
This is what the back looked like, I kind of like it!
I secured all the threads on the front by poking them all to the back with a needle, then tying them together in pairs.
Tetris Tote Bag Tutorial

Now make the bag
Once the decoration was on, I joined the 2 outer pieces and the 2 lining pieces, right sides together, pinning then sewing down the side, along the bottom then back up the other side.
Tetris Tote Bag Tutorial
Leave a 3 inch gap in the bottom edge of the lining fabric in the middle. This is important, you'll need this gap later.

Next make the handles
Join the handle pieces you cut out earlier in pairs by stitching the short edges. If you had more fabric and were able to cut longer strips you won't need to do this.
Tetris Tote Bag Tutorial
You should end up with 2 long thin strips of your main fabric and 2 of your lining fabric.
Tetris Tote Bag Tutorial
Pin 1 outer and 1 lining, right sides together, then stitch down the long edges.
Tetris Tote Bag Tutorial
To turn them right side out, put a safety pin on the end and push through the tube...
Tetris Tote Bag Tutorial
Just sort of bunch, them pull, then wiggle it through, go gently if your fabric is as fray-ee as my tea towel fabric.
Tetris Tote Bag Tutorial
Press flat with the iron then top stitch if you want to. I like how it neatens it up. Make the other handle in exactly the same way.
Tetris Tote Bag Tutorial

Now your handles are ready you can position them on the bag. Pin them to the outer bag, one handle on the front and one on the back, right sides together. Mine were 6cm in from the edge.

Tetris Tote Bag Tutorial

Turn this outer bag inside out again and turn the lining bag right side out. Insert the lining bag into the outer bag so the right sides are together.
Tetris Tote Bag Tutorial
Pin then stitch the two bags together along this top edge.
Tetris Tote Bag Tutorial
Pull the lining bag out and find that gap you left in the bottom edge. Now this is where the magic happens! 
Tetris Tote Bag Tutorial
Gently pull the whole bag through that hole till it's all right side out.
Tetris Tote Bag Tutorial

Tetris Tote Bag Tutorial

Stitch the gap in the lining, either by hand or by top stitching on the sewing machine. Push the lining back inside the outer bag and Voilà! A beautifully lined bag - how cool is that!
Tetris Tote Bag Tutorial
I top stitched that top edge to neaten it and to strengthen where the handles join, but that is optional.

Tetris Tote Bag Tutorial
All the top quality photos in this post were taken by our daughter, you can find her website here
You might also be interested in:
T Shirt and Tops Refashions
T shirts and Tops Refashions
Infinity Loop Scarf
Infinity Loop Scarf
Cornishware Ruffled Shopping Bag
Tea Towel Totes
Tea Towel Totes
I'll be linking up to all these great link parties, why not go and have a look!

read more