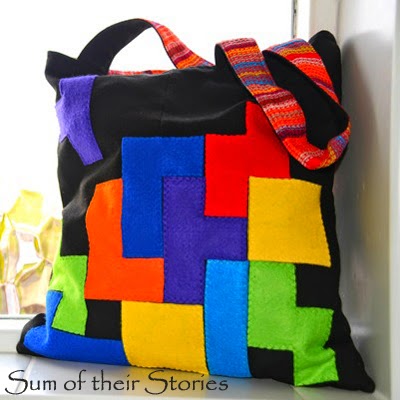
You could even just add the shapes to an existing bag if you have one. Make it as easy or complicated as you like.
First prepare the felt Tetris pieces
I made templates from card, 4x4cm squares, in the right shapes.
The ones like the L shape you only need to do once, as you can just flip the template to cut the ones that are the opposite way round.
These are the shapes and colours you need:
Unfortunately I don't seem to have photographed my pile of Tetris shaped pieces, sorry, you'll see them in just a second.
Next prepare the fabric bag pieces
I used the lining fabric to measure my outer fabric from the trouser legs.
Then I used the off cut pieces to make the handle pieces. As my fabric was limited I had to join shorter pieces to make the long handles I wanted. If you have more fabric you can just cut longer pieces all in one. Or you could have shorter handles!
So I ended up with 12 pieces:
- 2 x 41 x 44cm outer "trouser" fabric
- 2 x 41 x 44cm tea towel lining fabric
- 4 x outer fabric handle pieces 7 x 41cm (or cut 2 x 7 x 79cm if you have enough fabric)
- 4 x lining fabric handle pieces 7 x 41cm (or cut 2 x 7 x 79cm if you have enough fabric)
Attach the felt shapes
Before you make the bag you want to add the decoration to one of the large outer fabric pieces.
what can go wrong: If your felt needs ironing do it before you cut the shapes out, I did mine after and they pulled out of shape so I had to trim them again to make them fit - doh!
Play around with your pieces until you are happy with the arrangement, I was/am a Tetris fan so it was important to me that the pieces fitted like they would in the game. Remember if a line is all filled in it disappears (and you get points!) so you need to leave gaps on every line.
Once you you are happy pin them centrally to the bag front piece.
I attached each piece by stitching it on with a zig zag stitch, I wanted the thread colours to match so I stitched all the yellow, then all the green etc changing the threads as I went. It was a bit of a fiddle but worth it.
This is what the back looked like, I kind of like it!
I secured all the threads on the front by poking them all to the back with a needle, then tying them together in pairs.
Now make the bag
Once the decoration was on, I joined the 2 outer pieces and the 2 lining pieces, right sides together, pinning then sewing down the side, along the bottom then back up the other side.
Leave a 3 inch gap in the bottom edge of the lining fabric in the middle. This is important, you'll need this gap later.
Join the handle pieces you cut out earlier in pairs by stitching the short edges. If you had more fabric and were able to cut longer strips you won't need to do this.
Now your handles are ready you can position them on the bag. Pin them to the outer bag, one handle on the front and one on the back, right sides together. Mine were 6cm in from the edge.
Turn this outer bag inside out again and turn the lining bag right side out. Insert the lining bag into the outer bag so the right sides are together.
|
|
|
|


I one hundred percent utterly adore your site's name!! Your patterns and ideas are great too, am pinning and following it all in a second! visiting from Humpday happenings
ReplyDeleteThank you so much Corlie, I'm glad you like what I have to share.
DeleteWhat an inspirational idea. I adore your bag. Brilliant tutorial also.
ReplyDeleteAli xx
PS I've made the mistake with ironing felt, live and learn :)
Glad you like it Ali. Yes - mistakes are good as that is how we learn! I just keep telling myself that anyway.
DeleteI love/hate tetris. when it's going well, love it! But only takes one oops to mess up the whole thing. This tote, on the other hand, I love! Great tute as well!
ReplyDeleteOh I've loved Tetris ever since we had it on an original old beige Gameboy. Now the kids have it on DS's where you can play against each other, when you get a line it pushed them up (although it happens a lot more the other way round!) - they are SO quick and I am so rubbish but it is loads of fun! I don't do complicated games, if I can't learn it in 2 minutes it's not happening!
DeleteSuper cute tote! Lovely idea! Thanks for sharing!
ReplyDeleteHave a fabulous weekend!
Hugs from Portugal,
Ana Love Craft
www.lovecraft2012.blogspot.com
What a clever idea for a tote! Your tutorial images were very detailed. I notice things like that because I need to improve my blog tutorials. Yours are fabulous!
ReplyDeleteThanks Mitzi, that's really kind of you to say so. I wonder if I ramble on too much sometimes but I don't want to miss anything out in case it's important.
DeleteWhen I see other peoples tutorials I always like the ones with big clear pictures so try to do the same (as well as my photography skills/equipment will allow anyway)
Love it! Super cute!!
ReplyDeleteThanks for sharing @ my T.G.I.F. party. Have a great Memorial weekend!! :)
I LOVE Tetris and LOVE your bag! Thank you for sharing!
ReplyDeleteI love this idea - so simpler o do but it looks really effective. I've pinned it to my bag tutorials board on Pinterest to come back to when I have some free time.
ReplyDeleteWhat a unique and clever idea, Julia!!! And you've used pre-loved items to make it. An AWESOME tote!!!
ReplyDeleteThank you Pam. I actually nearly bought some black fabric, then remembered those trousers and fished them out of the rag bag just in time.
DeleteOk, this bag tells me that we must be besties starting this instant. Hand made bag + Tetris? You've got my number! Now, to raid my stash for the perfect fabrics. Would it look to cheesy with video game prints I wonder? Thanks for linking up with Creative Spark!!
ReplyDeleteVideo game prints would be amazing - If I had some that is what I would have used!
DeleteToo cheesy, I don't understand this concept - too cheesy !?!
I guess you're right, there is no such thing as too cheesy! I also wanted to let you know that I featured your project today at Creative Spark!
DeleteHi Julia, I've featured your bag today...
ReplyDeleteThat's amazing Pam, thank you so much.
Deletevisiting from Threading My Way. This is so so so cool
ReplyDeletethis is super amazing, nicely done. thanks for linking up at the countdown in style linky x
ReplyDeleteVery cute, Julia! Bringing back the 80s in just one bag! Thanks for the tutorial and linking up with Countdown in Style! Pinning!
ReplyDeleteThanks April. The 80's was my teenage years so it will always be my era!
DeleteAdorable bag, Julie!
ReplyDeleteI've been a great Tetris player in the 90s, I spent so many hours with my Nintendo ;)
Hugs,
Irene
SergerPepper.com
Great idea and meticulous instructions! I love the reminder that full lines disappear. I would've caught myself completely fitting the pieces together.
ReplyDeleteAh yes Lisa, it's important to stick to the rules! In fact it was my teenage son who pointed this out to me, he's good at details like that.
DeleteA totally gorgeous bag, thanks for sharing how to make it. Where did you get the idea from?
ReplyDeleteI saw a lovely Tetris game crocheted blanket in coloured granny squares, in fact I've probably pinned it somewhere and it set me thinking what else I could put those iconic tetris shapes on and how. I have a couple more ideas in the pipeline but they are still at the ideas in my head stage. They may or may not make it to actual projects (I have a lot of ideas in my head, they don't all make it out!)
DeleteI love Tetris too! Adorable bag : ) Thanks for sharing on Hump Day Happenings!
ReplyDeleteThis bag is AWESOME!!! I love Tetris, all-time fav video game, and this bag totally rocks! I wish I could sew to make one! LOVE IT!
ReplyDeleteThis makes the inner nerd in me very happy! I am not much of a sewer so fabric glue might be the way to go for me but this is absolutely adorable!
ReplyDeleteWe should always keep our inner nerds happy as much as possible! Glad you like it.
DeleteI love to play tetris! This bag look fab! What a brilliant idea! Thank you for linking it with us #Pintorial
ReplyDeleteThank you for sharing this post at City of Creative Dream's City of Links on Friday! I appreciate you taking the time to party with me. Hope to see you again this week :)
ReplyDeleteHi! Featuring this today in the weekend create link inspire features on Nap-Time Creations! I've posted on FB, twitter, G+ and tagged you where I could! I would love any reshares ;o) Happy Saturday! Emily
ReplyDeleteThanks Emily, I'll stop by and have a look as well as sharing where I can.
DeleteI love tetris and this bag is so cool!! Love the blocks applique!
ReplyDeleteI loved your Tip Me Tuesday link. {thanks girl!} Would you like Tip Junkie to feature your blog post to over 200,000 creative women? If you upload this blog post into your Tip Junkie craft room using at least 2 images, 2 steps, and blog post URL then I can easily feature it in my RSS feed, home page, and all my social networks instantly. {squealing with delight} ~ Laurie {a.k.a. the Tip Junkie}
ReplyDeletehttp://www.tipjunkie.com/post/how-to-add-a-craft-room-project-on-tip-junkie/
Thanks Laurie, I'll go over and have a look at what I need to do right now.
DeleteThis is fab looking and a great upcycle project too! I found you via Threading my Way :)
ReplyDeleteThanks, glad you like it. Threading my way is just a great source of ideas isn't it? :-)
DeleteThis is so awesome! I also loved Tetris (can't seem to get into any other more modern games!), and besides being a fun game, it's also very pretty to look at and instantly recognizable, so it's perfect for a bag like this! This would be such a great gift for a guy! :) Lisa
ReplyDeleteThanks Lisa, Yes, this would be a great man bag, I was thinking I could do a range of all retro games - things like Snake and Asteroids - but that's still only at the idea stage!
DeleteHave you tried 1010 or 2048? They are both a good simple games you can get on your phone or ipad which take 1 minute to learn how to play and can waste hours on a long train journey! Both super addictive though!
That's so funny, because as soon as I wrote that comment, I remembered that I have 2048 and spent months totally obsessed with it, until I had to wean myself off of it! Is 1010 similar?
DeleteThose other bags sound fantastic!
By the way, I also found this tutorial through Threading my way, like the commenter above! :)
Its hard to find tea towels where I live and I think I'll have to go on line. They have so many uses and so many colors and designs I could certainly never get tired of finding uses for them.
ReplyDelete