

Two things:
- I've always loved taking an item of clothing and making it a bit more interesting/unique.
- I do love a cardigan - cardigans are cool.
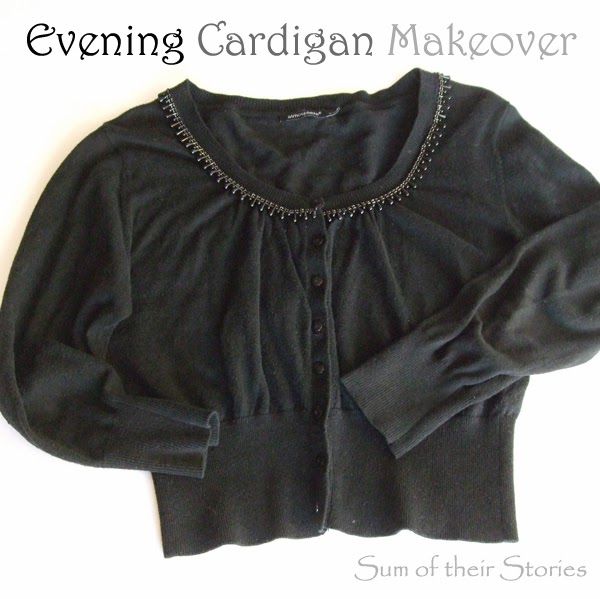
First up was a plain long line cardie with pockets.

I was inspired by a chunky jumper I had pinned a while ago which had lovely heart elbow patches. Turned out when I followed the pin link properly that this lovely jumper had the patches embroidered on and I fancied adding knitted patches to this cardie.
I couldn't find a free knitted heart pattern that suited what I wanted so had a little play and came up with my own.
To do a makeover like this you will need:
a plain cardigan or jumper
approx 25g ball of DK (worsted) wool in a colour of your choice
A small amount of contrast colour for attaching the patches
3.75mm knitting needles
Buttons in a matching colour
A sharp sewing needle with a eye large enough for your wool
First you need to knit two hearts:

Knitted Heart Pattern:
Using the DK wool and 3.75mm needles
inc = knit twice into stitch
cast on 3 stitches
row 1: k
row 2: k
row 3: inc in first st, k1, inc in last st (5 stitches)
row 4: k
row 5: inc in first st, k to last st, inc in last st (7 stitches)
row 6: k3,p1,k3
row 7: rep row 5 (9 stitches)
row 8: k3,p3,k3
row 9: rep row 5 (11 stitches)
row 10: k3,p5,k3
row 11: rep row 5 (13 stitches)
row 12: k3,p7,k3
row 13: rep row 5 (15 stitches)
row 14: k3,p9,k3
row 15: rep row 5 (17 stitches)
row 16: k3,p11,k3
row 17: rep row 5 (19 stitches)
row 18: *k3,p13,k3
row 19: k
repeat from * 4 more times (27 rows in total)
row 28: k3,p6,k1,p6,k3
row 29: k
row 30: k3,p5,k3,p5,k3
row 31: k2tog, k to last 2 stitches, k2tog
row 32: k3,p3,k4 pass last but one stitch worked over last st (like you are casting off) k1,p3,k3
row 33: k2tog,k6 turn (you are now just working on these 7 right side stitches, the others just stay on the end of their needle for a minute)
row 34: k3,p1,k3
row 35: k2tog,k3,k2tog (5 stitches)
row 36: k
row 37: k2tog,k1,k2tog (3 stitches)
row 38: k
row 39: cast of those 3 stitches
Rejoin the wool in the middle
row 40: k6,k2tog
row 41: k3,p1,k3
row 42: k2tog,k3,k2tog (5 stitches)
row 43: k
row 44: k2tog,k1,k2tog (3 stitches)
row 45: k
row 46: cast off

I made this up as I went along then checked it as I made the second one (hopefully it makes sense, out of interest this is what it looked like before I typed it up here - classy eh!)

Now put your cardigan on and pin your elbow patches over where your elbow comes to. This is MUCH easier if you get someone to help you!

Contrary to what this picture show you need to sew those ends in before you attach the patches. I thought at first I would get away with just tucking them in but no, please sew them in first!
Now take a length of contrast wool threaded on your large sharp needle and blanket stitch in the patches in place. You could use the same colour thread, that would be nice too, or a different colour altogether.

I seem to be sewing from right to left here, I think I normally blanket stitch from left to right. I conclude it doesn't matter. (unless someone knows better, please let me know!)
I added pink blanket stitch all round the edge of the button band to add a little more colour and changed the buttons for pink too. (the buttons are not all the same, I didn't have enough but I kind of like that effect)

Ta-Dah!


(Slightly over exposed photo - I am wearing a white top underneath, honestly!)
My youngest son & I had fun and games again taking these photos, on reflection it may have been better not to include the bird table and the dead leaves! It's a messy time of year in the garden!

You might also be interested in:
|
|
|
|


I love the cardigan, and the blanket stitch detail is really cute! You look awesome!! Now you're all ready for Valentine's Day!!
ReplyDeleteI feel a bit silly that I didn't even clock that it was seasonal! I just thought the hearts I'd seen were cute, I could have kept that to myself couldn't I!
DeleteHi Julie, I am now following you on google + and bloglovin and thanks for stopping by my blog and leaving that sweet comment on the knit scarf I made. I love this black sweater that you refashioned. I hope you have a nice weekend.
ReplyDeleteJulie at Julie's Lifestyle
Thanks Julie, I love seeing what others are up to, and with a name like that I couldn't not say hello! We Julie's must stick together!
DeleteI love the upgrade on the cardigan, Julie. Pink and black always make such a wonderful combination and you look fabulous!
ReplyDeleteAwh, bless you. Thanks Robyn. I've been cropping my head out of photos up to now, feeling a bit self concious - but these didn't seem too bad!
DeleteThis is such a great project! Elbow patches have been so popular lately and I think it's such a simple yet bold way of upgrading an old piece of clothing without having to buy a completely new one to follow the trend. Love the detailing you did on the front!
ReplyDeleteLook at me, all "on trend" ! I'm no fashionista that's for sure but I do follow a couple of fashion blogs so maybe something is rubbing off, who knows? I just like what I like and hope for the best usually.
DeleteHow cute & Valentine-y! :)
ReplyDeleteSweet! I love that Valentine refashion, it's a color combo I use and re-use: simply perfect!
ReplyDeleteMammaNene @ SergerPepper.com
Thanks Irene, I wear a lot of bright colours, especially pink so this cardie goes with lots of my t-shirts :-)
DeleteBeautiful, I love the addition of blanket stitch around the bands too.
ReplyDeleteThanks Lucy, I did the blanket stitch on the inside edge of the button band as I thought on the outside edge it might get a bit bobble-y too quickly, or I might catch it on something and unravel my hard work!
DeleteThe photo's are great, leaves and all. Love the heart detail and the splash of bright colour.
ReplyDeleteJan
I'll let my official photographer know, he'll be delighted. He's everso good, never moans about it despite the fact he is 14 and should really be a moody teenager! I do get him to take LOADS though as he is keen on a comedy shot or too!
DeleteI think this is super cute and unique! I love uniqueness when it comes to fashion and other things as well! I actually can crochet but I haven't done that or sewn in ages. I'm going to get back into them both. It will be a little scary but hopefully I will be able to find some experienced people I can get some help from. I pinned this for you!
ReplyDeleteThanks for pinning Brittnei. It is very satisfying to take something old and make it feel like new (and cheaper of course!) I love to crochet and knit but am by no means an expert - just have a go with something small - what's the worst that can happen! The internet is full of great tutorial videos too, if you get stuck!
DeleteEven using just the blanket stitch detail is pretty, love it. Here via CBC on FB For what it's worth.
ReplyDeleteGlad you came by Jeannie, this was my first time trying a link up there, it's a lovely supportive group.
DeleteI'm a cardi-lover/ re-fashion-ier too and I love what you've done here! So lovely!
ReplyDeleteCheers,
Vanessa
UlteriorAlterations.blogspot.com
Thanks Vanessa, I'll pop over and have a look at what you've been up to. Cardies are cool aren't they, they are just so useful !
DeleteThis is really cute! I am not much of a knitter but your directions give me hope that I can make a valiant effort, haha! Stopping by from Hoyby Crafts. I found you through the Craft Bloggers Collective.
ReplyDeleteThanks. I'd say give it a go - if you get stuck with the pattern just ask (and I will try to help!) although a crocheted patch or even a bit of fabric/felt would work too. See, the options are endless!
DeleteWhat a fun update to a cardigan! This looks so fun. We'd love it if you came and linked up to Do Tell Tuesday!
ReplyDeleteA great transformation
ReplyDeleteThis is so adorable! I haven't crocheted in years, but I'd love to add some little red hearts to my toddler's sleeves!
ReplyDeleteThat would be so cute, good luck getting them to stay still long enough to position the patches right! Maybe when they are asleep, or perhaps you could just dot a marker pen on their elbow as they dash past! (just remembering what mine were like at that age!)
DeleteSuper cute! I'm not sure I'd knit it, but I could definitely do something like it! Thank you for linking up and sharing at Countdown in Style.
ReplyDeleteApril
~~100lbcountdown.com~~
Thanks April. Elbow patches could be made anyhow really, I'm now thinking some polka dot felt that I saw in Hobbycraft the other day would work well - maybe next time!
DeleteWhat a cute cardigan! I especially love that it doesn't require any sewing machines! Thanks for linking up at Whatever Goes Wednesday. We'll be featuring this over at Someday Crafts tomorrow! :)
ReplyDeleteThank you so much, I'll pop by and have a look :-)
DeleteVery creative patch. I like the back on hot pink! Do you think that my fur would stick to the black though?
ReplyDeleteYes Ruckus, I think this is probably a project for humans, animal fur and black clothes don't normally make a happy partnership do they!
DeleteOh my goodness, I love this! Elbow patches always make things so much more fun!
ReplyDeleteThey really do, don't they! I'm now wondering if I could put them on all my clothes - or would that be too much???
DeleteCongrats! You are featured on Vintage Zest! Feel free to grab a button and link up to Do Tell Tuesday this week too. :) http://www.vintagezest.com/2014/01/do-tell-tuesday-8-with-features-co-host.html
ReplyDeleteDiane @ Vintage Zest
How exciting Diane, thank you. Funnily enough I'm wearing my cardie again today as I sit here typing!
DeleteHi Julia I am visiting from SITS Sharefest. I love this cardigan refashion. I recently started a new series called What Wives Wear on my blog Godlifehappywife.blogspot.com. It's a place for wives to share a favorite look offering inspiration to other wives and their personal style.I was wondering if you were interested in sharing some refashioned looks. I would love for you to share with wives how they can easily restyle their wardrobes by refashioning. If you are interested I would love to connect with you. My email is godlifehappywife@gmail.com I look forward to hearing from you. ~Sherri
ReplyDelete