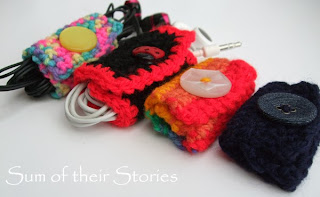
I should say that I LOVE crochet, it's so quick and so easy. I have two more crochet projects on the go at the moment. These took less than 30 minutes each to make, it took me longer to find suitable buttons!
I am assuming here that you can crochet. If not, I recommend looking for an online tutorial or buying The Happy Hooker, Stitch 'n Bitch crochet book. Its great, all the instructions are SO clear and its full of lovely patterns that you will actually want to make.
A little bit of wool (mine was DK, light worsted, but I really don't think it matters)
Small crochet hook (mine was 3.00mm which I think is somewhere between a C & D in the US)
A button about 1" in diameter (I guess if your button is smaller you could just make the button hole smaller too)
- Chain 11
- sc in 2nd chain from hook, work 9 more sc to end of chain (10 stitches)
- turn over, chain 1, sc in 2nd stitch then sc 9 to end (check you've still got 10 stitches!)
- work 3 sc
- chain 4
- work sc into 5th stitch along
- work 2 more sc to end
- continue with another 16 rows of sc. (I like to count my stitches at the end of each row because I find it very easy to gain or loose them as I go. Crocheting in circles is much easier!)
- Fasten off
- Sew a button on - you're done!
To make the stripy one I just changed colour every 2 rows. I love it but those ends were a pain to sew in!
To make the Red and Black one in the main picture, just sc all the way round the edge in a contrast colour, doing 3 in the same stitch at each corner. Obviously this one comes out a bit bigger but not much. I just wanted to use that cute little button.
If you look closely at this navy blue one you will see that I gained a stitch somewhere so the button hole end is slightly thinner than the other end. I don't think it matters. (see my note above about counting stitches at the end of each row!)
|
|
|
|


How cute is this? I am addicted to organizational whatnots and if I used earphones I'd be knocking out one of those navy blue ones for myself. Thanks so much for sharing at Link It or Lump It. Oh, and what a way to stash bust... may need to make some of these for gifts!
ReplyDeleteThey really do only take 15-20 mins to make, I made all 4 during one episode of Downtown Abbey! Super quick pressies.
DeleteCute! I really like the ladybug button! Thanks for sharing @ Submarine Sunday!
ReplyDeleteThanks, I thought I had a bee button too and was going to do one in black and yellow but couldn't find it anywhere. Must have used it on something else!
DeleteThat looks so easy maybe I could give it a try. My crochet is very basic!
ReplyDeleteJust count your stitches at the end of every row! That's what I do when making anything that's not round and round, otherwise I end up gaining or loosing. It's the end stitch, I can be hard to know which one to finish on, so stop where you think then count how many you have - you'll soon know if you stopped on the right stitch!
DeleteI love your idea. Simple solution to a problem. Nice instructions too!
ReplyDelete