Wednesday, 8 October 2014

Dictionary Page Card

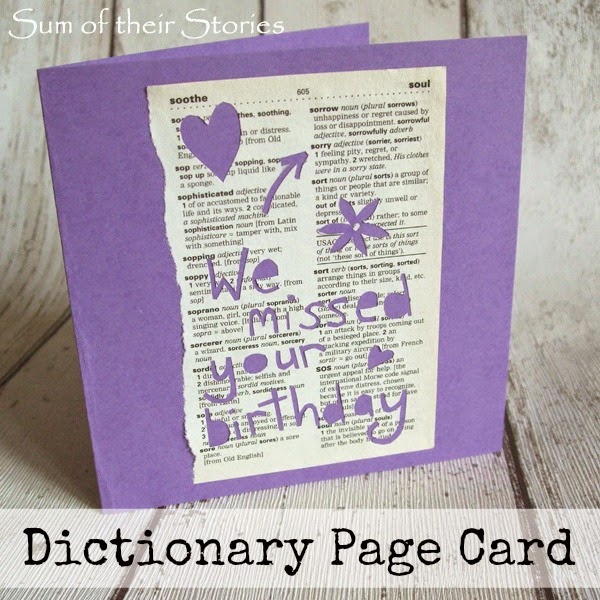
Paper cut dictionary page message card
I missed the birthday of a friend the other day so I wanted to make a card that was a little bit different to make it up to her.
At the same time my daughter was having a big clear out of her room and was throwing out her old school pocket dictionary. It was a bit damaged so not suitable for the charity shop but perfect for some papercrafting. I had seen this lovely Rob Ryan cut on pinterest and thought I could try a simple "inspired by" version.
The dictionary is pretty small, the pages are just 4.5" x 3". They are not a great quality paper either which meant I needed to make the paper cutting really basic or risk it tearing. 
So I ripped a page out of the dictionary with "sorry" on it.
Paper cut dictionary page message card
Then I wrote my message on it in pencil.
Paper cut dictionary page message card
Then cut it out with my craft knife. Like I said, I had to be careful as the paper is not much better than newsprint but it was not complicated so only took a few minutes.
Paper cut dictionary page message card
I added a few hearts and flowers too.
Paper cut dictionary page message card
See how the arrow points to the "sorry".
Paper cut dictionary page message card
Then I just stuck it to a 5" square card.
Paper cut dictionary page message card
I finished it off by sticking the hearts I'd cut out on the inside.
I like this idea so much I've done a few more pages to make into more cards.
Paper cut dictionary page message card
Some words are in awkward places on the page so I've not been able to do all the greetings I had in mind but it is fun to try to think of a good way to write a message.
Paper cut dictionary page message card
A bigger dictionary would give more scope for more similar projects, maybe even a picture, so I'll be keeping my eyes open at charity shops for a while. I've also found an old Thesaurus which I've been able to use to make a few more of these cards with.

Whilst I was in a "papercut-y" mood I also had a little go at this cute little person that I had seen by Priyam from Simple Joys ages ago.
Paper cut man hugging his knees
How cute is that? I don't know what to do with him now, he was just another "I made it just to see if I could" thing really! Priyam didn't give any instructions as he is pretty self explanatory, I did find I had to make his legs a lot longer than I thought I would so he could hug his knees. I also learnt the hard way that light pencil lines are a good idea because you can see the back of the paper when he sits up!
Paper cut man hugging his knees
This shows how big my guy is. His hands are held together with just a tiny dob of glue. Thank you Priyam for the fun idea. Check out Simple Joys for all sorts of ideas and tutorials.

You might also be interested in:
Birdcage Card Ideas
Birdcage Card Ideas
Circle Card Crazy
Circle card Crazy
Simple Speech Bubble Cards
Recycled Pen Tub Tutorial
I'll be linking up this project at these lovely link parties, pop over for a look at loads of projects from other blogs.

read more

Tuesday, 30 September 2014

Family Memory Game Cards


Personalised card game
 My gorgeous little nephew just turned 2 and I wanted to make something for him as part of his present. He's just starting to say a lot more, trying to get our names right and coming up to the age for learning to sit and play a simple game so I thought I could make him some memory game cards from family photos.
It came out kind of cool (if I do say so myself) so here's what I did if you want to have a go. Let me warn you know there now follows a weird mix of metric and imperial measurement - sorry, I am a UK child of the 70's, what can I say!

You need:
  • A photo of each family member
  • Thick 250 micron A4 laminating pouches
  • Wrapping paper
  • Scissors or a guillotine
  • Corner punch (optional)
I used Picmonkey to get my photos ready. 
  • Open Picmonkey and select Collage
  • Upload two of the photos you want to use
Personalised card game

Change the type of collage by clicking the little symbol on the right
personalised card game

Select "Cards" 5x7 and the one with just 2 photos
Family memory game cards

Rotate the canvas (red arrow) and pull the dividing line to the centre (green arrow)

memory game cards

Then you can just drag and drop your two photos, one in each rectangle. Save and then repeat for the next pair of photos.

I had 4 of each photo printed at a photo place. (I thought it would use too much printer ink at home) They ended up with a white border, not sure why but the photo is 5"x7" so each individual picture is 5"x3.5"
making memory game cards
I cut them out with the guillotine, trimming them so they were all exactly 82mm x 122mm
I rounded the corners with my corner punch. Next I cut the wrapping paper into A4 pieces and layered them in the laminating pouches with the photos spaced out on the plain side.
Then they just rolled through the laminator.
I cut them out, allowing an even border round the photos then rounded the corner again.
Then we had a quick play, just to make sure it worked.

Wooo, it's a pair!
Now I just needed a cute box for him to keep them in. I had a sturdy little box from Ikea, the smallest of a nesting set with a twirly design on the lid. (no before photo sorry, don't know what happened there)
I painted the lid with black paint
painting lid
box for card game
Then added some writing with a tipex pen
Box for memory game cards

There are 9 in Luke's family and 5 of us so that's 14 people, and I made 4 of each card. 56 cards is plenty. I thought only 2 of each might make the game too hard to play. If you have less people in the family you could have Grandparents, Aunts & Uncles, Cousins etc. 
Don't try to use card instead of wrapping paper, if it's too thick you end up with an air gap all round the photos when they are laminated. I don't think they would last as well.

Personalised memory game cards

Luke's big sisters have had lots of fun playing with the cards and promise to teach him to play the memory game once he is a little bit older.
personalised memory game cards
These cards can also be used for simple matching up and grouping games, something like "Find Auntie Julie?", Snap and other things I've not even thought of.
personalised memory game cards
I wondered about doing Domino Cards too but that will only work for 6 people. Unless people doubled up in the photos, humm, maybe next time...

This post is part of a Blog Hop/Series with 14 other amazing Bloggers all sharing lovely Gift ideas that you can make yourself. The collection has all sorts of ideas suitable for all sorts of potential recipients so have a little browse though and see if you are inspired to make a gift or two this year. 
Just click on the links below to see tutorials on how to make these other great gift ideas.


Hand Painted Recipe Box - Anderson and Grant

Bah Humbug Disclaimer: Normally I would be bemoaning that fact it is far too early for anything Christmas related but if you want to make gifts you probably do need to start thinking about it, gathering supplies, making a start - sorry!

You might also be interested in:
Patchwork Gift Box
Patchwork Gift Box
Circle card Crazy
Circle card Crazy
Personalised Wedding Picture
Wallpaper Birthday Banner
I'll be linking up this project at all these lovely link parties


read more

Friday, 26 September 2014

Tassel Button Key Ring

How to make a keyring with nylon thread and ombre buttons
This is the 3rd and last of my Button Key Rings. Made with ombre buttons and finished with a tassel. 

To make it you will need:

Synthetic Cord (same stuff that I used for the thread and chain bracelet and the pink cord bracelets)
Buttons in graduating colours
A metal ring (not photographed)
Cut two lengths of cord approx 12" or 30cm, seal the ends either with nail varnish or a flame and fold in half. I've got much braver with this stuff the more I use it and just carefully melt the ends in the flame of the gas hob now.
Arrange your buttons in the colour order you want. All your buttons must have 4 holes. In the photo there is one with just two hole but that was just a mistake.

Thread the buttons onto one of the cords, starting with the darkest through to the lightest. Then thread back in the other direction going through the opposite hole in each button. 
Line your button holes up carefully so the buttons stay lined up nicely. 
Now take the second cord and do the same again in the remaining holes.
Attach the metal ring to the loops - just watch that you don't let the buttons slide off whilst you do this.
Now you can push the buttons up about 1 cm from the metal ring. Tie a knot in the cords on the other end.
DIY tassel button keyring
Now add a tassel. This was a bit fiddly, there might be a better way, but this is how I did it.
I took a longer length of cord, about 70" and looped it through the gap between the bottom button and the knot over and over - as shown in the photo:
How to make a tassel button keyring
I pulled it down neatly to cover the knot and then tied it with another short piece of cord.
diy tassel button keyring

I wrapped that short cord round a few times, knotting it again and the securing with a dot of super glue.

diy tassel button keyring
Then I just trimmed the ends of the short cord close to the super glue.

How to make a tassel button keyring
Then I chopped the bottom of the tassel so all the cords were level. To finish off I sealed the ends of the tassel by melting them quickly in a flame.

How to make a keyring with nylon thread and ombre buttons

How to make a keyring with nylon thread and ombre buttons
This bright pink makes them perfect for Breast Cancer Awareness Month. Maybe you could give one to a friends with a Breast Awareness Printout from Breast Cancer Care that you can download from here.
You might also be interested in:
Giant Sparkly Button Key Ring
Giant Sparkly Button Keyring
Patchwork Gift Box
Patchwork Gift Box
Button Cluster Key Ring
Special DAte Coin Keyring
Special Date Coin Keyring
I'll be linking up this project at all these lovely link parties, pop over for a look at loads of projects from other blogs

read more