Wednesday, 2 December 2015
Easy Paper Serviette Poinsettias
December 02, 2015
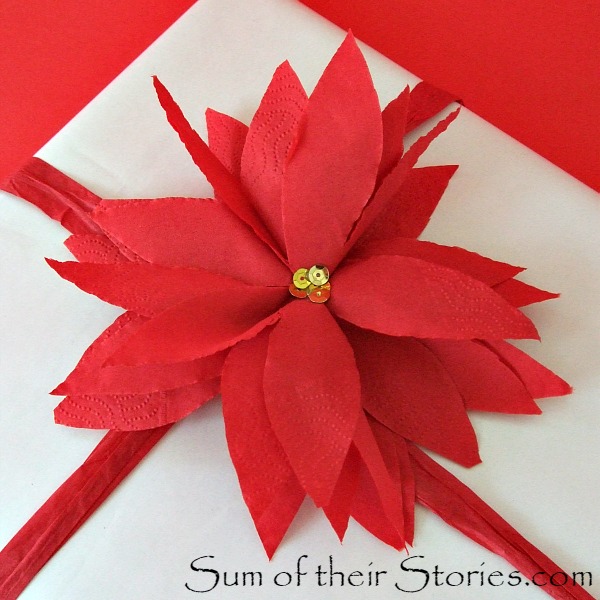
These pretty poinsettias are so easy to make from red paper serviettes or napkins.
Pop over here to see how to rustle up a bunch in no time at all.
I'm over at The Pinning Mama again today with a simple tutorial showing how to make pretty poinsettias from paper serviettes. I have no idea why I always seem to choose a project to share on The Pinning Mama which involves a transatlantic translation issue! Serviettes or Napkins - what do you call them where you are? I've always called them serviettes, I think a napkin is a very fancy damask thing you'd find in an episode of Downton Abbey! I gather though that, for all my US friends, these paper party thingumajigs are known as napkins.
Luckily the poinsettias are easier to make than the vocabulary is to work out.

Sum of their Stories
Hello, I'm Julie. I love making things and this is where I share my enthusiasm.
you may also like
Subscribe to:
Post Comments (Atom)
Labels
Air Hardening Clay
Blogging
Christmas
Clever ideas
Craft show
Crochet
Doctor Who
Easter
Felt
Geekery
Gift Wrap
Gifts
Hand Lettering
Handmade Monday
Home Decorating
Kids activities
Knitting
My Favourite Finds
Needle case
Party ideas
Pattern review
Pinterest Challenge
Sewing my Stash
Silent Sunday
Valentine
Wedding
accessories
art
bags
buttons
cakes
cooking
cushions and pillows
doodle
embroidery
gardening
gift ideas
greeting cards
jewellery
organising ideas
papercraft
papercutting
pretty ideas
recipes
recycling/repurposing
refashion
sewing
their stories
thrifty tips
tutorials
what can go wrong


They are beautiful! Perfect for the Christmas table!
ReplyDeleteWhat a lovely idea Zografia, you could make little ones to scatter on the table, or fill a shallow bowl with them.
DeleteI love poinsettias, and these are beautiful!! Yes we call them napkins in the states, at least I do. ;) I'll hop on over to the Pinning Mama and grab the tutorial, so I can make some of my own!! :) Thanks Julie!!!
ReplyDeleteGlad you like them Keri. We really are 2 countries divided by the same language sometimes!
DeleteVery cute and so pretty as a decoration or for a special touch to a gift. Thanks for sharing at My Flagstaff Home!
ReplyDeleteJennifer
Lovely, thank you for sharing at the Thursday Favorite Things blog hop. Watch for your feature on Monday xo
ReplyDeleteThese are lovely! They make a really nice change from bows to put on presents :) x
ReplyDeleteThanks Clare, my bow making can be a little lopsided sometimes but I do like to make presents pretty if I can.
DeleteThank you for sharing at the Thursday Favorite Things blog hop
ReplyDeleteSo pretty and such a good idea
ReplyDeleteSo cute! I want to make these!
ReplyDeleteGood - my work is done! (they are super easy - promise!)
DeleteThese are just perfect!
ReplyDeleteIf you have time, I would love for you to share this post over at the
Holidays Celebration link party that is live right now! It's such a neat idea, I'm sure our readers would love it too! (http://keepingitrreal.blogspot.pt/2015/12/holidays-celebration-link-party-4.html)
Thanks for the invite Teresa, I'll pop by.
DeleteThank you for linking up! Your post has been pinned to the party's Pinterest board (https://www.pinterest.com/pinteresab/holidays-celebration-2015/) and I will be posting the features later today!
DeleteThese are so sweet, love this idea :)
ReplyDeletePinning..Thanks for sharing at Creative Mondays
Thanks for sharing Claire, glad you like them.
DeleteThey're so pretty and great for the Christmas table! I always make mine into origami waterlilies, but that is much less festive! #creativemonday
ReplyDeleteI remember the water lily thing, isn't that where you do some folds them pop it upside down on a glass and pull the petals down into shape? This is easier, more cutting and sticking then origami!
DeleteFeatured tonight and pinned to our party board, What to do Weekends. Hope you are having a wonderful Christmas season. Linda @Crafts a la mode
ReplyDeleteThanks Linda, I'm so glad you like them, I feel very honoured.
Deletethanks for sharing- lovely touch to a present or can use it for other decorations :) x
ReplyDeleteThey are really pretty, perfect to cheer up any table.
ReplyDelete