Take a ready made cushion cover, scraps of fabric and a few simple embroidery stitches and you can make a pretty cushion / pillow.
This project was one I originally created for Cut out and Keep over a year ago and now, with their permission of course, I thought I could share it with you here.
To make one you will need:
- A cushion cover - ready made or homemade
- A design transfer sheet
- Hemming tape (that stuff you can use instead of stitching a hem up, the advert promises doesn't come off in the wash but we all know it really does!)
- Embroidery thread in various colours
- Scraps of fabric
- An iron
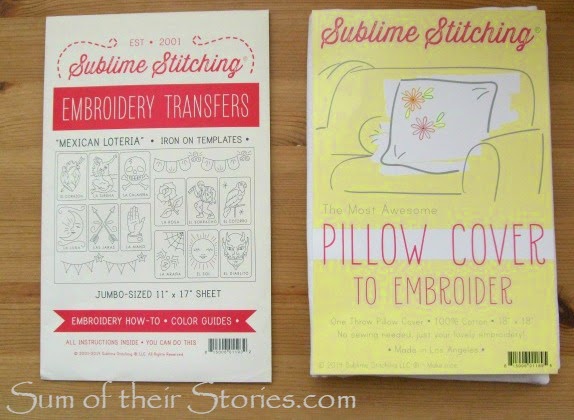
I was sent a lovely pre-made envelope style cushion cover by Sublime Stitches and a fun embroidery transfer sheet to try.
Sublime Stitches tends to put a very modern twist on embroidery design but I actually ended up with something fairly traditional looking. I guess that shows how versatile their designs can be! The sheet I received is called Mexican Loteria.
I'd not used a transfer sheet since I was a kid but it is very easy. Cut out the design element you want, then place it face down on your fabric and iron. You get full instructions explaining how hot and how long with the transfer.
I chose the bunting and La Rosa and ended up arranging them with the rose in the centre and bunting above and below. Originally I had thought I would have a bunting frame but I miss calculated the spacing a little and had to improvise. Be warned, once your ironed the design on - it's on - no rubbing it out and starting again so plan carefully!
Rather than just embroidering the outlines I thought I would try a little appliqué.
I ironed the bunting onto scraps of pretty fabric and cut them out. You can use each bit of transfer multiple times, I used each one about 8 times and although the last one was a lot fainter it was still fine.
I then cut little pieces of hemming tape in the same shape and made a "fabric sandwich".
Basically it is: Cushion cover - hemming tape - fabric scrap
You'd think I would take a photo of this vital step wouldn't you ? Hummm.
You press this "sandwich" with the warm iron and the hemming tape acts like a super thin double sided fuseable interfacing. The pretty fabric shapes are now attached to the cushion.
This pink fabric is tiny leftover from a nightie my mum made for me when I was little. I remember it had an elasticated top, ribbon ties on the shoulders and a wide gathered frill at the bottom. That's the thing about fabric scraps, they can be full of memories... I digress, back to the cushion!
At this point the cushion looked like this:
Now for some embroidery. I kept it pretty simple, with blanket stitch round the fabric, with backstitch details. I used two strands of my six strand embroidery thread throughout.
I wanted to personalise the cushion cover for a gift so I just chose a font I liked on the computer, mine is "Vladamir Script" and printed the name in font size 140.
I just placed the paper inside the cushion cover, positioned it nicely and then traced over the letters with my air disappearing pen. A faint pencil line would work too. The printed words showed through the white fabric with no problem.
Then it was just a case of embroidering them too. I used backstitch and three strands of embroidery thread this time, just to make the lettering stand out a little.
You can see I did little ribbon roses at the top of each bunting "swag". I'll show how I did that another time, this post has gone on long enough for today!
Spoiler - they are very easy and fun to make, it feels a bit like magic and my family can confirm how excited I got as I made them.
You might also be interested in:
 |
| Simple Embroidered Tote |
|
 |
| Making Toys from Kids Drawings |
|
 |
| Cornishware Ruffle Tote |
|
 |
| Running Stitch Embroidered Cushion Cover |
|


Lovely thing!
ReplyDeleteWow! I love it!
ReplyDeleteTrish - tales from trish
This pillow is so pretty and how sweet that it has special memories in the fabric pieces too! You do beautiful work, thanks for sharing your tutorial. XO-Wendi@H2Obungalow
ReplyDeleteThanks Wendi, I have a lot of fabric scraps that all tell a little story, I just hate to throw them away so it's nice to get to use them.
DeleteCongratulations! This post is going to be featured over at Diana Rambles tomorrow and has been pinned in the Featured at Diana Rambles board at Pinterest, Tweeted, and Stumbled. Please grab a featured button off my button page or via the post guidelines graphic. Thanks for sharing this awesome idea!
ReplyDeleteAwh, thanks Diana, that's such a lovely surprise.
DeleteHi, Julie ~ This is so cute! I used to love embroidery, but I haven't done it in ages. This makes me want to dig all of my supplies out and get busy! :0) Thanks for sharing this at the Merry Monday Link Party!
ReplyDeleteI really enjoyed dabbling in a little embroidery after a LONG break, it's very satisfying - good luck if you do "get busy"!
DeleteSo lovely pillow! Hugs. Monika
ReplyDeleteBeautiful combination of embroidery and applique, Julie. And also a great way to use up tiny pieces of scrap fabric.
ReplyDeleteHi Julie, I've featured your cushion in a roundup of scrap busting projects...
DeleteI'm always so amazed by you! This looks so good! Pinned and tweeted. I appreciate you taking the time to party with us. I hope to see you on Monday at 7. Happy Monday! Lou Lou Girls
ReplyDelete