Showing posts with label Inspired by. Show all posts

Wednesday, 15 November 2017

Inspired by - Felt Scrap Garland

Use left over felt scraps to make a upcycled Christmas garland. 
Upcycled felt Christmas garland
This post contains affiliate links, if you click through and make a purchase then the cost to you is the same but Sum of their Stories receives a small commission
Today I'm sharing another project inspired by another fantastic blogger - part of my "Inspired by" series. This time it's a lovely felt garland made from felt scraps inspired by one I saw a couple of years ago over at Pillar Box Blue.
What I love about this project is that it uses the teeny tiniest scraps left over from all my recent felted jumper projects. 
It's super simple. Take little left over bits of felt, cut them into pieces approx 1" square and then thread them up to make a garland.
I've been on a bit of a 'felting old jumpers and cardigans' crazy recently and have been making all sorts of things with the felt. I've already shared a few here, some felt flowers & these felt lavender bag houses and I have quite a few more to come. What this has generated is a lot of tiny scraps and I was really pleased to remember this garland idea.
It was so quick to make up and saves all the little pieces from the bin. Yay! 
Upcycled felt Christmas garland
I used a Green Pearl Thread and made my garland about 145cm/57" long (plus the tassels) . It actually gets pretty heavy so this feels long enough.
I finished the ends of my garland with a few beadsand a tassel made from more of the embroidery thread.  
Upcycled felt Christmas garland
You can see the felt from my felted jumpers and cardigans came out in different thicknesses, that doesn't matter at all for this project. Not all my pieces were perfectly square either, I used every little corner so as to not waste a scrap! 
Upcycled felt Christmas garland
Pillar Box Blue has a lovely bauble idea too along the same lines if you want more options, check out it out here.
I wanted something to use up my tiny felt scraps - job done! 

read more

Wednesday, 18 October 2017

Inspired by - Twinkle Star Glasses Case

Today I have another project for you, inspired by another amazing blogger. This time it's a super colourful glasses case totally inspired by the amazing Red Haired Amazona and her fabulous Twinkle Star Hand Mitts pattern. 
Twinkle star crochet glasses case
This post contains affiliate links, if you do decide to click through and make a purchase using these links the cost to you is the same but Sum of their Stories will be paid a small commission.
Let me tell you the story..... Back in July some very pretty colourful crochet appeared on Instagram feed of Louise, The Red Haired Amazona (well, I say appeared, her whole feed is pretty and colourful, but this was especially so!) and 'huzzah!' in August Louise publish the free pattern for the most beautiful hand mitts she named Twinkle Star. 
I promptly made a pair (which I love and have given to our daughter as she loved them too) and as I was sewing it all up it struck me that they would be a great size for a glasses case.

To make one you will need:

Yarn - about 2oz in total of as many different colours as you like. I used 6 (pink, blue, purple, yellow, dark blue and grey)
4mm crochet hook (I think these are just THE BEST)
Fabric for lining 8.5" x 8" (22cm x 20cm)
Matching thread
A button

I'm not going to go into great detail about how to make the basic rectangle of crochet as you can find all that over on The Red Haired Amazona. Pop over here and follow the wonderful and VERY detailed how too (honestly I thought I did a lot of photos for a tutorial but I'm a photo lightweight in comparison!) 

You can see I mixed the pattern lines up a little for the glasses case. I only did stitches and pattern rows from the original hand mitts pattern, I just mixed them up and did whatever took my fancy in whatever colour came to hand. 
This is the most brilliant stash buster project! Once my piece of crochet was approx 7" or 18cm I stopped. (it was 8" or 20cm wide)
Please excuse these next few terrible photos, it was evening and I was excited to get this finished!
Ahhhh, look at all those ends to sew in!!!

I used all the ends to sew the side seam of the case up so I was sewing them in (aka tidying them up) at the same time. I found it easiest to do the larger bits first, the places where a few rows are the same colour.
Then where there was just one thin row I simple tied the ends and sewed them in, like this:
Sew the bottom up too.
Cut a piece of fabric just a little larger than you crochet has ended up.
Twinkle star crochet glasses case

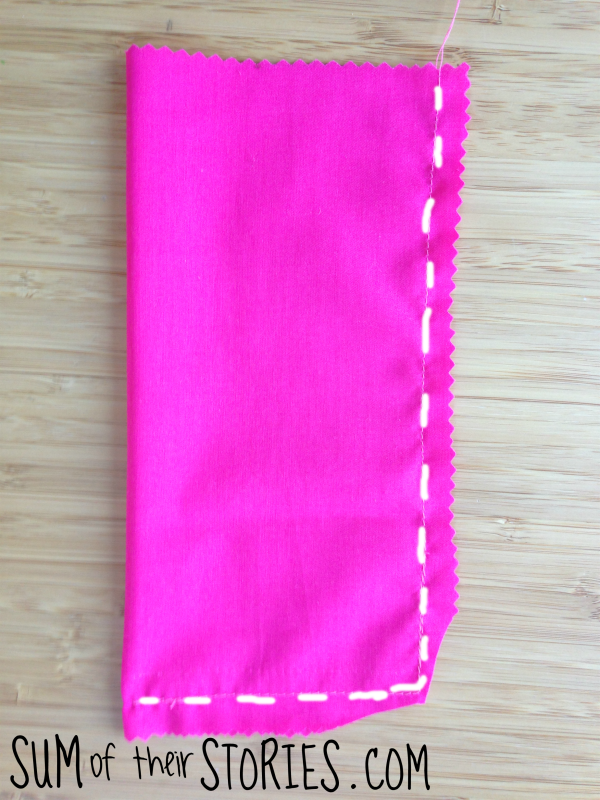
Now stitch the side and along the bottom. I used a thread the same colour so I've drawn in some comedy sized stitches to show you where.
Trim the corner seam allowance as shown then slide the lining into the crocheted case.
Twinkle star crochet glasses case
Fold the top over neatly, tucking the raw edge inside and pin.
Twinkle star crochet glasses case
Then slip stitch all around the top to attach the lining to the crochet.
Twinkle star crochet glasses case
Sew a button on the front in the centre and then make a chain loop on the centre of the back. Join the yarn to the centre stitch, chain enough to go round the button fairly tightly (I did 10 chain) and then slip stitch back into the centre stitch. Sew the ends in. 
Twinkle star crochet glasses case
Ta dah! Finished. I think this is one of my favourite makes ever (and yes, I know I say that a lot!)
Twinkle star crochet glasses case
Out of interest, here are some photos of the Hand mitts that I made first, following the pattern from the Red Haired Amazona properly.
Twinkle star crochet hand mitts
Aren't they pretty?
Twinkle star crochet hand mitts
I made these mostly out of the left overs from the Rainbow Heart Bunting and Carnival Cushion I made ages ago with just a few other little left over bits thrown in.
Twinkle star crocheted glasses case
Do you think you'll try The Red Haired Amazona's gorgeous pattern and make pretty hand mitts for someone this Christmas? Or adapt the idea and make a glasses case? OR you could do a smaller version as a phone case or a bigger one for an ipad .... or wouldn't it make the most lovely little purse, handbag, coaster, cushion...

read more

Wednesday, 20 September 2017

Inspired by - Clasp frame Purse

Today I've got another project I've tried which was inspired by another blogger - sewing a clasp frame purse.
Sewing a purse with a clasp frame always looked kind of complicated to me so I'd never given it a try. Then about 6 months ago the lovely and very talented Anna from Tea and a Sewing Machine shared a tutorial which made it look quite do - able.
I picked up a couple of clasp frames inexpensively from the Stitching, Sewing and Hobbycrafts show in July so I could have a go.
Things don't always happen very quickly round here so it wasn't until last weekend that I finally got round to facing my fears and making a purse with a clasp frame.
I used some scraps of left over polka dot fabric and an old yellow shirt for the lining. I did a little embroidery on the polka dot fabric first, before making it into the purse.
It's the same style as the embroidery I did earlier in the year on this tote bag.
Then I just followed Anna's instructions to make up the purse and attach the purse frame. 
It was a bit fiddly but not as complicated as I had feared. 
I kept getting my thread caught on the clasp which slowed me down and finishing off the thread was tricky as the clasp was in the way, but I managed.
The inside of my purse is not quite as neat as I might have liked but over all it's pretty cute. Because of the spacing of the holes in the frame my stitches seem large to me and casting off was tricky as the frame is in the way. Any tips - please leave them in the comments!
All in all this was a fun little make, i
f you fancy having a go I'd say 'go for it!' 
Head over to Tea and a Sewing Machine for all the details, Anna show how to create your own pattern from whatever sized clasp you have and then breaks it down step by step. 
Shop this Post: These are affiliate links, so if you make a purchase after clicking through the cost to you will be the same but Sum of their Stories will receive a small commission

read more

Friday, 21 July 2017

Inspired by - Comfy Flip Flops

Today another idea I've tried, inspired by another blogger. This time it's super comfy flip flops.
comfy flip flops
This was inspired by Kristen of Down Home Inspiration, she shared a little video back in 2014 showing how to make flip flops more comfy by swapping the plastic straps for stretchy fabric.
I have a love/hate relationship with flip flops, they are great for summer but some just really hurt my feet. It doesn't seem to matter what style, some rub and some don't, you just can't tell before you buy them which way it's going to go! 
I had a pair that were definitely in the 'rub my feet' category so with nothing to lose I chopped the plastic bits off and had a go. 
I used some jersey fabric left over from this top and just had enough. I didn't have quite enough to include the knot in Kirsten's version, my fabric wasn't quite long enough but it still worked out ok.
And here they are on my feet, on the beach last week.
comfy flip flops
 This is how they look without my feet in them!
comfy flip flops
They are SUPER comfy, it's amazing.
My only downside is I'm not sure how long the fabric with last before it wears through on the underneath where the knots are.
I wore these to walk down to the beach for 5 days and they are holding up just fine for now. You can see I didn't trim the fabric very close to the knots. You'd think it would make an uncomfortable lump but it doesn't seem to.
I think another time I would choose a fabric that actually matches with the foam flip flop bottoms! This time was an experimental 'just use what I have' situation!
If I want to take them on holiday for more than a week, I might take a few strips of spare fabric with me, just in case repairs are necessary. 
Get the full video tutorial on how to make them from DownHome Inspiration here.
My conclusion - definitely worth a go.

read more

Friday, 7 July 2017

Inspired By - Upcycled shirt bags

It's SO easy to make useful little bags from old shirts, perfect for traveling or just at home for containing all the things!
Upcycled shirt bags
Every now and again I see an idea on another site that is just too good not to try. Sure, I pin A LOT of stuff on Pinterest that I may/may not ever get to, but some of those pins do actually get made. 
So I'm starting a new feature here at Sum of their Stories - Inspired by: - so I can share with you the "saw it, pinned it, did it" projects. They won't be long posts with lots of step by step instructions because you'll be using the link to the original inspiration if you want to try them out too. Just a few photos to show how it all went.
Starting this "Inspired by:" feature off is this mind blowingly simple idea from the fabulous Pam at Threading My Way. She called them "Easiest Travel Storage Bags You'll Ever Make" and she's not wrong!

I started with this fabulously red shirt. I have a whole bunch of these, donated to me by my brother when he changed jobs.
Upcycled shirt bags
I was able to get 3 bags from the shirt.
Upcycled shirt bags
I just made various sizes as Pam suggested.

The littlest one has the flap opening the wrong way really but this was the placket opening bit on the sleeve so because of where the seam was it couldn't be helped. I think it'll be fine.
Upcycled shirt bags
These bags didn't use all the shirt, I also managed to get 3 metres of bias binding (with my fab new bias binding gadget) and a few flags for some more bunting that I'm making out of it. 
Upcycled shirt bags
They really are the simplest things to make. Pop over to Threading My Way to see just how easy it is.

read more