Showing posts with label Gifts. Show all posts

Wednesday, 8 November 2017

Chocolate Chip & Orange Porridge Oat Cookies

Mix, bake and cool slightly, these chocolate chip and orange flavour porridge oat cookies can be ready to eat from start to finish in about 30 minutes.
I don't know if a Terry's Chocolate Orange is a specifically British thing or if they are available worldwide but I do know in my family Christmas is not Christmas without a Chocolate Orange. "Don't tap it, Whack it" "One of my 5 a day"  and "It's not Terry's it's mine" are all common catch phrases linked to this most Christmassy of treats.
So for me chocolate and orange just go together, especially at this time of year and I've been experimenting with a family favourite cookie recipe to give them a chocolate orange twist.
You might notice I am calling these cookies too, not biscuits as I should do, being an English girl and all. They are quite cookie like though I think as they are slightly chewy inside.

Chocolate Chip & Orange Porridge Oat Cookies

Makes between 25 and 30
230g Baking Margarine or butter
230g caster sugar
2 eggs
2 tsps orange essence
300g SR flour
150g porridge oats
Zest of 1 orange (optional but makes it more orangy)
100g plain chocolate chips
100g milk chocolate chips
100g chocolate for decoration
* you can get an easy print version of this recipe with a conversion to cups too here.

Heat the oven to 180 c   350 f   gas 4

Beat the margarine and sugar until light and fluffy. If you have a lovely food mixer use that (you lucky thing you!) or use an electric hand whisk or a wooden spoon.
Beat in the eggs and orange essence.
Stir in the flour, porridge oats, chocolate chips and zest if using.
Mix until it forms a stiff dough and you can't see the flour anymore.
Use a desert spoon to spoon out blobs of mixture and roll them lightly in your hands. Place them on the baking tray and press lightly with a fork to flatten them slightly.
These cookies don't really spread very much as they cook so whatever size/shape you make them now is pretty much how they will end up.
Bake for 12 - 15 minutes until golden brown, then cool on a cooling rack.
Melt the remaining chocolate and drizzle over the cookies to finish.
Enjoy!
I'll be sharing this recipe at some of these linkups.

read more

Wednesday, 4 October 2017

10 ways to make Felt flowers

Simple and beautiful flowers made from felt.
10 easy ways to make flowers from felt
It's really easy to make brooches and corsages from old felted jumpers and cardigans, but with so many different ways to make them it can be confusing. So I've been testing out various methods to see which I like best.
This is what I started with, the scissors give some sense of scale, this cardigan had shrunk down pretty small!
felted cardigan repurposed into felt flowers
I cut the cardigan along the seams so I could see what useable pieces I had.
Then, with the help of my pinterest board, I just started making flowers

The Rolled Rose
10 easy ways to make flowers from felt

This one is fun and fairly difficult to get wrong. 
Draw around something round, a side plate or lid of something is ideal.  
Cut out the circle and the cut a spiral, leaving a bit of a round in the middle. I forgot to photograph this stage so you have to manage with a picture instead!
 
Now roll the spiral up starting from the thinnest point, the outside of the circle. You can glue every few cms with a hot glue gun or stitch the layers together with thread the same colour.
When you get to the end, the round in the middle forms a nice tidy base. Glue or stitch round it.
Then you can add a brooch fastening or glue or stitch it to something else.

Rolled Rose take 2
10 easy ways to make flowers from felt
This rolled rose is the same as the one above except this time it was a little bit smaller and the spiral cut was wiggly.

Simple Embroidery

10 easy ways to make flowers from felt
This time I made 2 flower patterns. The larger is 9.5cm in diameter and the smaller one 6.5cm. 
Take a piece of scrap paper and fold it in half.
Fold in in thirds, then mark just over 4.5cm from the point and 2.5 cm on each side. 
Draw a curve joining all the points and cut out.
When you open it out you should have a flower shape with 6 petals. 
For the smaller flower just make your marks 3.75cm and 2cm from the point respectively.

Cut out 2 large and 1 small flower.
Embroider using 2 strands of embroidery thread as takes you fancy on the petals then use french knots through both layers to join them together. Just don't waste too much time on embroidery that won't be seen on the larger flower underneath.
To finish it off I used the 2nd of the larger flowers and stitched the 2 together using a navy blue sewing thread and an oversew stitch to cover the back neatly and added a brooch pin. 

Gathered Rolled Flower

10 easy ways to make flowers from felt
I tried this out to use a long scrap of felted cardigan (the sleeve) than wasn't big enough to make a rolled rose.
I simple cut a length about 5cm at it's widest point by 45cm and made it taper off at one end. Using sewing thread doubled up for strength I stitched a line of running stitch all along one side and pulled it up to gather the strip of felt.
I rolled it up and stitched it together to secure.
I added a leaf shape of green felted jumper to the back of this one to tidy it up, then stitched on a brooch pin. 

Button Centre Flower

This flower is made from separate petals so is great for using even the tiniest scraps. 
10 easy ways to make flowers from felt
Make yourself a petal template, this photo gives you an idea of the shape you are aiming for. 
Cut 6 petals from felt, then pinch each petal in half at the flat end and stitch or glue them together. Then you just attach all the petals to one another in a circle. I didn't seem to take any 'as I go along' photos here but it's pretty self explanatory.
I added a button to cover the small hole left in the centre.
I tidied up the back with a circle of felt and added a broach fastening. 

These are the 5 methods of making felt flowers that I've tested so far but there are loads more. I've got a Pinterest Board dedicated to all kind of flower making which you can check out. Plus I've found some more lovely ideas from other websites:

These roses from Pillar Box Blue are also made from old felted knitwear. There are great step by step instructions to show you how to make these.


These loopy flowers from Stamp Talk with Tosh are so much fun, they look really easy to make too.

What about these lovelies from Craft your Happiness? You can make them in just 5 minutes, I love a quick craft don't you? 

Just look at these embellished beauties from Sewn Up, so pretty.

Last but by no means least what about this stunning faux succulents vertical hanging wall garden from Julie Measures. Julie has mixed felt and pinecones, what a brilliant and completely mess free idea. 

So much choice! 
10 easy ways to make flowers from felt
Do you have a favourite?


read more

Wednesday, 16 August 2017

Long & Short Handle Bag

Sometimes you want a shoulder bag and sometimes you want a hand held shopper. Well this bag can be both - yay! 
Adjustable long and short handles bag tutorial and pattern
Today I'm sharing a reasonably simple bag pattern which I made for a friend recently. It's an adaptation of the Velvet Topped Print Bag from the fabulous book 'The perfect Handmade Bag' by Claire Youngs. I LOVE this book, if you like making bags I cannot recommend it highly enough. I've added some links to buy it on Amazon at the bottom of this post. 
This project started when I saw a fabric pack at a reduced price at my local Hobbycraft store.
 
The pack had 12 10.5" squares of fleecy fabric in it, in 5  different designs. For this bag I used most of 10 of them. I have a few scraps left. You will also need something plain to line it, I used an old sheet. 

This bag is patchwork but that was because of the size of these squares. You could do any type of patchwork or simply use bigger pieces of fabric. 

The finished bag measures approx 14.5" x 17.5" or 37cm x 44cm

Because I used 10.5" squares and you may not, it makes more sense to list the sizes of the pieces you need to end up with, once any patchworking is done. 
Just join your pieces however you fancy with whatever fabric you have. Just make sure you end up with: 
2 outer pieces of fabric 15"x18" (38cm x 46cm)
2 pieces of lining fabric 15"x18" (38cm x 46cm)
4 pieces of pattern fabric 3"x4" (8cm x 10cm) for handle loops
2 pieces of patterned fabric 2.5" x 32" (7cm x 81cm) for the handles

Use a 1/4" seam allowance throughout.
Press any patchwork seams open before you start joining the bag up.

Join the outer pieces on 3 sides:
Join the 2 lining pieces in the same way as the outer pieces but LEAVE A 4" GAP in the bottom middle. THIS IS IMPORTANT!
Now box the corners:
Starting with the outer bag, press the seams open, then fold the bottom corner sideways so the side and bottom seam line up. Measure a line straight across 2" from the point and stitch across, making sure you reserve a few stitches at each end to make the stitching secure. Repeat for the other corner of the outer bag and both the lining corners.
This is what they look like from the outside.
 
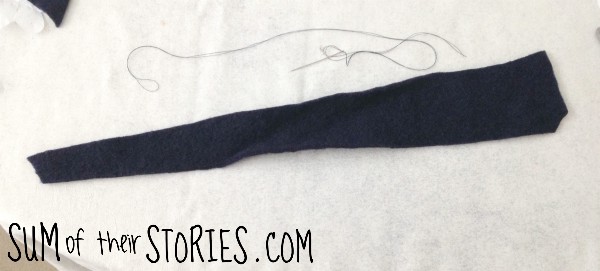
Next make the handles by pressing a 1/4" hem on each long edge, then folding the handles in half lengthways. Pin and top stitch to close them but leave a good 2" open at each end.
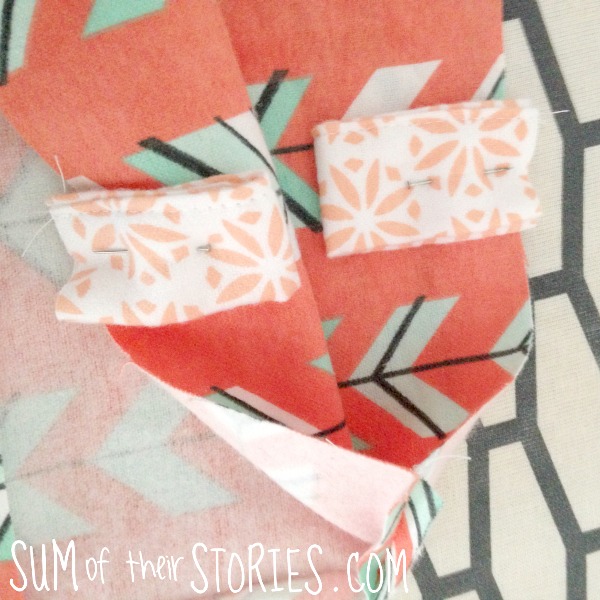
Next you need to make the handle loops. Take the 3"x 4" pieces and fold then sew each one in exactly the same way as the handles - just much shorter!
Once your handle loops are made, fold them in half and position them, raw edges together, on the top edge of the bag outer, 2.5" from the seam edge.
I left them just pinned but you could tack them in place. You just need to be careful later if you leave them just pinned.
At this point you may wish to add a ribbon loop too - I forgot this step! If you do, just add a 4" (10cm) length of ribbon in the centre of the outer back, exactly the same way round as the handle loops.

Turn the bag lining right side out, and place it inside the bag outer. Match up the seams and pin then stitch the lining to the outer bag around the top edge. Go slowly when stitching over the handle loops and your machine will thank you.
Turn the bag right side out through that gap you left in the lining. Do this very carefully if you left the pins in the handle loops! 
bag making
Stitch the gap in the lining closed (on the machine or by hand) then give everything a nice press with the iron. 
Push the lining inside the bag then top stitch the top edge to keep everything neat and tidy. Again, go slowly over where the handle loops are, that's a lot of layers of fabric for your machine to deal with. 

Now thread your handles through the handle loops. One handle through the loops on the front of the bag and one through the loops on the back.

Join the handles up by placing the right sides together on those open ends and stitching across. You can see in this photo I only left about 1.5" at the ends and it was a bit of a fiddle, I think leaving 2" would make this easier! 
Turn the raw edges inside and top stitch to close.
Finally, add a button to the centre of the bag front. If like me you forgot to add the ribbon loop, just sew it on now as neatly as you can.
button bag closure
You could use a popper or velcro instead or leave a fastening off altogether. 

Adjustable handle bag tutorial
Your bag is complete! You can use it with the handles pulled up double to carry it in your hand or as a shoulder bag with the handles long.
Adjustable long or short handle bag tutorial

Adjustable handle bag tutorial
I went for a floppy sort of bag feel but if you wanted your bag to be more substantial you could add an interfacing of some sort quite easily too. 
Adjustable handle bag tutorial
Here are links to the book I mentioned at the top of the post, in case you are interested. These are Amazon Affiliate links.
To shop Amazon UK:

To shop Amazon USA:

read more