Showing posts with label Geekery. Show all posts

Wednesday, 21 December 2016

Yoda Snowflake attempt

Last year on a dull day in December when I should have been doing a whole number of things, I sat with a cup of tea had a go at making a Star Wars paper snowflake instead. When shared it on my personal facebook page some of my friends seemed interested to know how so I thought you might to see too.
Yoda snowflake
I downloaded and printed a template from Anthony Herrera Designs and got to work. There is a great little video too that is worth watching before you start, with some info about how to fold the paper and tips on cutting out.

I could have made a whole blizzard of regular paper snowflakes in the time it took to make this, but who wants a whole blizzard when you can have a Yoda snowflake?

You make these with regular printer paper and sharp scissors but you also need a good sharp craft knife. This is not something for young kids to do in the holidays!

The most difficult bit was the internal shapes like the eyes and mouth as there are just so many layers to get through. I found it helped if I cut the shape with my knife, lifted as many layers as I could then cut again, repeating 3 or 4 times.
I did tweak mine a little and joined Yoda's ears up, on the template the are not.

My precious Yoda snowflake got packed away with the decorations and by a miracle was still intact when we got the deckies out again this year. I've run it through the laminator, after all my hard work I hate the thought of it getting ripped.
Yoda snowflake

Now it's taped to the window for all the world to see. (Well, the people who walk down our street anyway!) The street light makes one Yoda really glow at this angle.
Yoda snowflake
There are some Frozen Paper snowflake designs over on Anthony Herrera Designs too if that's your sort of thing as well as Guardians of the Galaxy and Harry PotterI really love the Groot and baby Groot snowflake designs in the Guardians of the Galaxy collection ..... next time I have another "not really spare" moment I'll have to have a go!

read more

Friday, 18 November 2016

Themed Mandala Greeting Cards

If you can draw a really simple cartoon or doodle then you could make Mandala style birthday cards in a theme to suit the birthday person.
Themed Mandala Greeting Cards
This post has been a long time in the making. Way back in January I shared how to draw mandala designs for greeting cards and then a rare thing happened, I got all organised and ahead of myself and made cards for our kids for their 2016 birthdays.
This time I picked a theme from something they like and used that for the basis of the design.
I've had to wait all year until all their birthdays passed before I can share the idea with you!

First was this Star Wars themed card for our Star Wars super fan son. He has many other fandoms too but I really wanted to do a mandala with loads of little Yoda heads so that was that!
Star wars Themed Mandala Greeting Card
If you look closely, the doodles are VERY simple versions of the iconic Star Wars symbols, space ships and characters. I am a doodler not a great artist.
Star wars Themed Mandala Greeting Card
The words are basically all my favourite Star Wars quotes (and quotes from his favourite bits too of course!) 
  • Help me Obi-Wan Kenobi, you're my only hope
  • When 900 years old you reach, look as good you will not
  • These aren't the droids you are looking for
  • I love you. I know
  • I find your lack of faith disturbing
  • You were the chosen one (oh the feels!!!)
  • He's holding a thermal detonator
  • That's no moon
  • No, I am your father

I also wanted to include "Not if anything to say about it I have" but there just wasn't space in the end :-(

Next in the year was our oldest son's birthday and for him I did an Superhero themed card. He is also into all sorts of other things that I know nothing about so I thought it was best to pick a theme that I am at least a bit familiar with. Initially I thought it would be an Avengers theme but when I ran out of ideas that were simple enough* I extended it out to a more general superhero theme.
Superhero Themed Mandala Greeting Card
Again for the words I just picked out my (and his hopefully) favourite quotes:
  • I think our first move should be calling the Avengers
  • With great power comes great responsibility
  • I'm always angry
  • The price of freedom is high
  • Like the old man says - together
  • Baskin-Robbins always finds out
  • Hulk smash?
  • By Odin's beard
  • Genius Billionaire Playboy Philanthropist
  • I'm multitasking
  • I am burdened with glorious purpose
  • Is the sun come up?
  • We're just like Kevin Bacon
Superhero Themed Mandala Greeting Card

Last in the year, but actually the first I made, was this Harry Potter themed card for our daughter. She is a massive HP fan so picking this theme was a no brainer.
Harry Potter Themed Mandala Greeting Card
The words are "always" (again, the feels!!) and the rest are spells and of course no unforgivable ones.
Harry Potter Themed Mandala Greeting Card

To make one you just need to research your theme and start doodling.
Practice the elements first on scrap paper and simplify everything*
Check out the X wings and Yodas on the Star wars card to see what I mean by simplifying.
You really don't need to be super artistic (just see my lion in the Hogwarts shield above!) It's much more about creating a recognisable nod to each item rather than a work of art. 
The mandala is built up in the same way as I set out in my How to draw Mandala Cards tutorial.
You'll need a square shaped card blank, a compass to draw circles, a soft pencil and a decent eraser and then whatever pens you want to draw with. I used a black fine liner and just regular kids colouring felt pens. These cards were a bigger size than the other mandala cards I'd made, they are about 20cm(8") square. 

This whole thing was totally inspired by a fellow member of Dawn Nicole Designs Art & Hand-lettering Class Facebook Group. Dawn does a daily challenge which I have dabbled in now and again. She give a word prompt for hand-lettering or doodling and everyone shares their attempts. On Jan 1st 2016 the prompt was Mandala. I started drawing them and just couldn't stop - hence turning them into cards - and one talented member shared a Harry Potter themed mandala they had created. I took her brilliant idea and ran with it! After asking the group for help I've been able to find that is was a talented Photographer called Robyn, you can find her facebook page here to check out her photography and digital scrapbooks. 
If you like hand-lettering and art then this is a fabulous group to join. There are members from all over the world and they are so talented, friendly and supportive. As well as the daily prompts there are discussions about equipment, hints and tips etc. 

Have I sparked your imagination? What themed mandala card you could make for someone special?


read more

Friday, 7 October 2016

Tetris Note Book

Plain note books given a simple retro gaming makeover.
Tetris Notebook
I am old, I can admit it, so when it comes to computer games I'm the generation who actually played Pong on the TV at my friends house and thought it was the coolest thing ever! We sat down at those table Space Invader Machines at the chip shop, played Pacman in the arcade at the seaside and when we got a computer (joint Christmas present between my brother and me) it was an Amstrad 64. We would buy computer magazines that had games printed in them in Basic and type it in, line by line and save the games on cassette tapes! "Syntax error on line 1340"
So when it comes to gaming I love simple things, Bejewelled, 2048, Minesweeper, these are my kind of games and of course the classic Tetris. 

At my day job I have to have a notebook on the go at all time, it's full of "to do" lists mainly and other scribblings that I can't manage without. But I do like my notebook to be either pretty, interesting or fun to look at.
Tetris Notebook
We were clearing out some desks as part of a reorg and came across packets and packets of these little stickers, they are the kind that you get with wall planners. They come in different sizes and colours and it seemed wasteful to throw them away so they became decoration for my next notebook.

This is SO easy:
Take a plain black notebook, lay a ruler or piece of card just a cm up from the bottom edge (don't draw a pencil line on the black cover, it is too difficult to rub out without marking) and working from the bottom up, place square stickers in a Tetris design.
I looked up the shapes and colours from the original game.
I had to do some compromising as the sticker colours don't match exactly. It's almost like the wall planner manufacturers weren't thinking about Tetris when they made them!
I used the tiny stickers to do a design on a smaller notebook too.
You can see here I had to cut some long yellow stickers into squares, I had loads of left over stickers but not much variety in shape and colour. I was trying to reuse something that was heading for the bin, rather than buying something new so a bit of compromise and improvising was part of the fun.
Tetris Notebook
The tiny stickers were a bit fiddly and I used a pair on tweezers in the end to place them, the slightly larger stickers were easier to work with, quicker and therefore more fun.

I covered my notebook fronts with clear stickybacked plastic (that stuff you used to cover school books with) to make the super cool Tetris design last.Tetris Notebook
I'm thinking now this would be fun to do on a whole stationery set, you could do a pen pot, magazine files, ring binders .... all sorts!

If you like this slightly geeky idea you might also like the Tetris bag I made a couple of years ago.

I might even take 5 minutes now for a quick game of Tetris - with the sound off of course, that song drives me nuts!

You might also be interested in:
Doctor Who scarf Bracelet
Doctor Who Scarf Bracelet
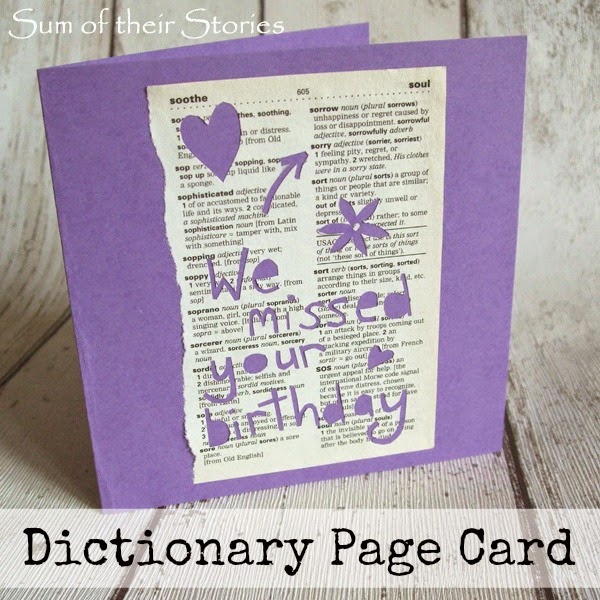
Dictionary Page Card
Recycled Comic Book Pen Tub
Recycled Comic Book Pen Pot
Adipose Cushion
Adipose Cushion
I'll be linking up to these link parties

read more

Thursday, 9 July 2015

Wall of Wisdom

If you love a good quote, saying, expression or motivational poster maybe you'd like to create a "wall of wisdom".
framed quotes

Our new house has a good sized downstairs toilet (privy, lav, loo, cloakroom, john, WC ... any more names?) It is much nicer than the teeny one we had at the old house but possibly the most boring décor on the planet. It was just a white box.
In the old house we created a "wall of wisdom" by writing quotes, sayings, expressions directly on the wall using sharpies. It was simple, fun and always a talking point but had two major flaws: the sharpies smudged when splashed with water and when we moved we had to leave it behind. For the new smarter loo I wanted to recreate the Wall of Wisdom in a better, cuter and more flexible way.

The only casualty in the move was the glass in a large wooden picture frame. The frame itself survived so I gave it a few coats of white spray paint and used it as the basis of our new wall. One of the best things about the wall we had in the old house was that anyone could add to it as they wanted. I was keen to keep that interactive element so thought by using a glass-less frame and label stickers to organise the space this could be an ongoing thing.

As well as my big ol' glass-less frame I reused a couple of frames that I'd spray painted turquoise years ago (from our bedroom at the old house) and a couple of Ikea Nyttja frames in red. I also picked up a load of very cute Martha Stewart stickers on sale at our local Staples store. The colours of these stickers were perfect for the colours I had imagined for our new Wall of Wisdom.
wall of wisdom

I did have to buy a large sheet of poster board, which I cut to fit the frame. Without the glass the back was too loose and the white board gave me a great base to start sticking.

When we did this at the old house we had made a list of all the quotes and expressions in alphabetical order. Just so when someone had a new one we could quickly check it wasn't already there! You think you are going to know what up there but we'd had a couple of duplicates that I had to paint over, it's worth making a list.
I scoured the internet for the quotes and saying we wanted to keep from the list, looking for cute printable versions in the right colours.
1:http://www.lovepapercrafts.com/free-printable-home-decor/
2: http://sarah.theworkexperiment.com/hurihia-to-aroaro-ki/
3: http://brightlybeautifulblog.blogspot.co.uk/2013/09/you-will-always-look-lovely.html
4: http://nhne-pulse.org/quote-vivian-greene/
5: https://www.umpquabank.com/fromcanyonville/#inspiration-1

I also used quite a few from this lovely collection from Thirty Hand Made Days


The rest of the small quotes that are printed are either picked up from pinterest and I can't find the source or I made them myself. I used my old favourite Picmonkey to make some, I created speech bubbles on word documents and added text boxes, and I added text boxes over bits of clip art.
Everything else I hand wrote, in my best writing, onto the cute labels with coloured pens.
I just started in one corner and worked my way up. I tried to keep everything straight and lined up, and I tried to keep a good balance of small and large items.

I actually did the smaller red frame first, kind of like a practice run, then moved onto the big frame.

In the old turquoise frames I used 2 beautiful printables that I printed out their original size.
The "As we arise each morning" printable quote comes from Simple as That and the "Change your Thoughts" one comes from Mama Miss.

The Map art quote is one I made. It's really simple to make with your computer, printer and an old map book or road atlas. 
I had come across two road atlas's when packing for our move and held on to them with a map art type project in mind. It's a good thing I kept both as I had a bit of a fail on my first attempt! You can see the full tutorial, including details of my blunder and how to avoid it, over at The Pinning Mama here.

framed quotes, sayings and expressions

I love our new Wall of Wisdom SOOOO much! There are a few gaps on a couple of the stickers so more fabulous quotes can be added in the future.
It really represents all of the family too, quotes from everyone from Jane Austen to Doctor Who, Shakespeare to Dumbledore, The Dalai Lama to Star Wars!
framed quotes and sayings

It took a little while to get this all together, not the quickest project I've ever done but at least now people have something to read whilst they are in the smallest room in the house!
If anyone spots their quote art here and I've not linked it to your source, please do let me know and I'll get that linked properly. I've included everything I could find, but one of two things I used from pinterest had links that went nowhere and Google image search wasn't able to help me either.
All the top quality photos in this post were taken by our daughter, you can find her website here
You might also be interested in:
Personalised Wedding Picture
Papercut Quotes
Papercut quotes
Share a Coke With Picture
Simple Speech Bubble Cards
I'll be linking up this project at all these lovely link parties, pop over for a look at loads of projects from other blogs.

read more

Tuesday, 30 June 2015

My Favourite Finds June 2015

Well, June has gone in a flash - how can we possibly be at the end already?
I did manage to find a few lovely things to share this month though, here we go:

Inside the Fox Den have some lovely kitchen printables with quotes from books about food and drink. This one is my favourite, but then anything that mentions tea is fine by me!

There are 3 to choose from and they are free to download.

This gorgeous planter started it's life as an inexpensive plastic salad bowl! 

Christine from Where the Smiles have been totally transformed it using a paint technique that looks like magic to me!

I've not picked up any crochet for ages but this pretty blanket from 5 Little Monsters is going onto my list.

It's a "join as you go" method which means no sewing up at the end which would suit me down to the ground. The pattern is free and there are loads of instructions to help too.

And finally for this month, a Doctor Who craft. I've not talked about anything Doctor Who for 4 months now so it's definitely long overdue - have I mentioned I'm a big fan???
Nikki from Tikkido has a full step by step tutorial for this two hearts tardis fabric t-shirt. She made it for her daughter but I'm thinking it would be just fine in adult size too! Nikki has LOADS of fabby Doctor themed projects, especially party ideas. Worth a look if you have a Whovian in the family. 

read more

Friday, 21 November 2014

Comic Book Glasses Case


There is exciting news here at Sum of their Stories, I am now a contributor to The Pinning Mama and this is my first contribution. Hop on over here to see a rather long, but hopefully very thorough step by step tutorial on how I transformed this rather awesome (if I do say so myself) glasses case.


read more