Showing posts with label gardening. Show all posts

Wednesday, 31 May 2017

Easy Plant Pot Hack

What do you do when your house plant doesn't fit in the decorative pot you have for it? This is a simple fix I've used for years, you may all know it already but just in case not, let me explain.
Simple trick to make decorative planters a better fit for your house plants
Just the other day I was looking for a pot to put this little cyclamen in. This red bucket was a Christmas gift from a neighbour a few years ago, it had a sweet little glitter covered Christmas tree in it. The tree didn't survive but the bucket is very cute so I held on to it.
Lots of people seem to be planting their plants straight into decorative pots nowadays. I've done that myself occasionally but really I think you are better leaving the plant in it's plastic plant pot and dropping that into something decorative.
  • Better drainage for the plant
  • Your decorative pot won't be damaged being against wet compost. On terracotta the wet seeps through and can lift any paint or unstick glue - been there, done that! Metal tins can start to rust at the joints - been there, done that too!
  • Less mess when your plant needs re-potting or you fancy a swap round
But what if the decorative pot is too big? This is what I do:
Simple trick to make decorative planters a better fit for your house plants
Take a decorative pot, a plant, a piece of foil and a container of some sort. Here I used a little glass pot that had a lovely mini cheesecake in it. What you choose depends on the size of your pots, you might find just an old lid will be enough.

Put the container upside down in the decorative pot...
Easy plant pot hack
Shape the foil roughly into a dish shape and tuck it in on top. Press it to the sides to make it as snug as you can. 
Now pop your plant in on top.
Simple trick to make decorative planters a better fit for your house plants
If your plant needs lots of drainage you can put a layer of gravel or pebbles on the foil first.
Now the plant is up at the right level, the pot is protected from the wet compost and when you water your plant the water will sit in the foil dish and not at the bottom of the decorative pot where the plant can't get it.
Simple trick to make decorative planters a better fit for your house plants
I've done this quite often, especially with those super tall ceramic pots you sometimes get with orchids. They are great for orchids that must not sit in water but not so good if you want to use the pot for something else. An upturned empty yoghurt pot is a good size for them.
It's not life changing I know, not rocket science either, but a simple trick that has helped me out which you might find handy one day.

read more

Monday, 29 May 2017

The Chelsea Flower Show 2017

Highlights of our visit to the RHS Chelsea Flower show 2017.
Something a bit different today. I was lucky enough to visit the famous Chelsea Flower Show on Friday last week so I thought I'd share my highlights. Spoiler alert - this is a very photo heavy post!
The show has been held in the ground of the Royal Hospital in Chelsea, London since 1912 and is organised by the Royal Horticultural Society.
There are a load of show gardens both big and small, a huge marquee they call the Grand Pavilion which is full of displays from plant growers from all over the place, and lots of beautiful stalls selling pretty much everything gardening related you can think of.
Everything was just beautiful but my personal favourite was the BBC 2 sponsored "Anneka Rice Colour Cutting Garden" by Sarah Raven, my photos don't really do it justice, it was a riot of colour and general loveliness.
There were some great gardening quotes in modern calligraphy all over the place.
I love how they used painted upturned jam jars as an edging in this 'Senses' garden designed to encourage kids away for their screens and into the outdoors.
This seems about right:
There were some beautiful pieces from sculptor Simon Gudgeon:
Leaf Spirit
Firebird
We all loved the amazing animal sculptures made of drift wood by James Doran.

There's that Joe Swift bloke off the telly!:
If you do ever plan a visit here are my top tips:
  • Book early, apparently it got sold out this year.
  • Go to Victoria train station and get the shuttle bus instead of the tube. It takes you right to the gates, you'll be walking all day so save your energy.
  • Take a packed lunch and plenty to drink - it's really expensive and once you are in you can't come out to get food and go back in - no stamp on your hand for re-entry here, it's not a festival!
  • Use the money you save to treat yourselves to a jug of Pimms when it's 'Pimms o'clock' - it's practically the law to have a nice cold glass of Pimms on a hot sunny day here in the UK!
  • It's really crowded, especially around the show gardens but people are all nice and there to have a good time. Just wait to get in close, chat to the people standing next to you, you'll get your chance eventually.
  • If you can, watch some of the coverage on the tv before, so you can plan the things that you really don't want to miss.
This was a once in a lifetime, special family ladies day out for us, we just had the best time. We got SO lucky with the weather, warm and sunny.
Without exception every member of staff was just lovely too, friendly and helpful. One steward in particular went over and above the call of duty to help us at one point. It was like they really did care and actually wanted us to have a good day.
There are lots of garden shows all over the place but the setting for this one is just fabulous. Yes it's expensive, really expensive, but if gardens are your thing I'd definitely recommend adding it to your bucket list. 

read more

Saturday, 18 March 2017

Upcycled Spring Vase & Pen Pot

Spring has definitely sprung in our part of the world so here's a simple upcycling idea for bringing a little spring prettiness into your home.
Upcycled Spring vase and pen pot
If you are in the southern hemisphere and heading into Autumn, maybe just pin for now and come back to this in 6 months! 


In order to bring you this craft project I was provided with some products by Hobbycraft.

Perfect for an Easter Table centerpiece or just as a fun way to brighten your indoor space, this vase started it's life as a jam jar. I don't know why we call them all jam jar's here in the UK when this jar didn't contain jam at all! It actually contained mincemeat that we used for mincepies last Christmas, it's a good size jar, 13cm/5" tall - perfect for a vase. 

To make this vase or the pen pot you will need:
  • Faux grass - mine was this one from Hobbycraft
  • Artificial daisy heads - I used these also from Hobbycraft
  • A clean old jam jar for the vase
  • A clean old food tub of some sort for the pen pot
  • Scissors
  • A hot glue gun - mine is one of these
This is a super quick project, it took longer to clean up afterwards that it did to make the vase and pen pot! 

Simple cut the faux grass to fit in a band around your jam jar. I made my band about 7cm/3" wide as I wanted a little glass and therefore stems showing top and bottom, yours can be as wide or narrow as you wish.
It's really easy to cut with regular scissors, but it is a little messy as you can see. Just rub your hands over the grass after you've cut it to remove all the loose bits and to fluff it up a bit. 
Now hot glue it to the jam jar. No photos of this bit I'm afraid as I can't hot glue and take photos simultaneously but I'm sure you can work it out! 
Just be careful of your fingers with that hot glue. Once it's attached, just press firmly to the glass for a few seconds until the glue cools down and hardens.

Next take the artificial daisy heads and glue them to the grass. I did a fairly regular pattern but you could dot them randomly all over or place them in a line, whatever takes your fancy.
That's it! Simple as that. Fill your jar with water and pop in some spring flowers. I went for daffodils as they scream Spring and Easter to me.
Upcycled Spring vase and pen pot
This would make a great Mother's Day gift too, maybe not for small children to do with the hot glue but anyone else could rustle this up easily. 
Jam Jar upcycled to a Spring vase
You could even just add a grass wrap around an existing vase and just tie it on firmly with twine if you wanted a large bunch of flowers for an Easter celebration, that way once you were finished with it you could easily remove it and stash it away for next year. Some sort of rustic twine could look great with the grass and daisies, tied in a bow, maybe with an Easter tag. 

Making the pen pot uses exactly the same method. 
Upcycled Spring diasy pen pot
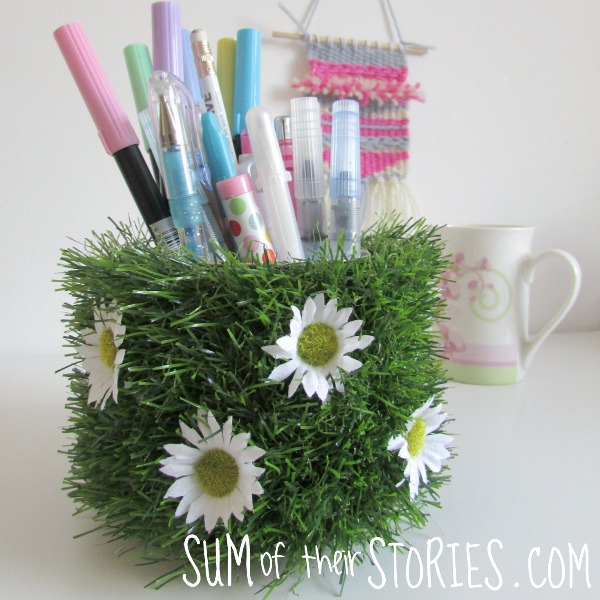
This time I covered a coffee tin but covered it completely in the faux grass. It was just a case of cutting the faux grass to size, hot gluing it on and then adding the daisies. This time I just used white daisies - just mixing things up a bit!
The tin gets surprisingly warm inside as the glue is cooling, I guess the metal holds the heat but it was never dangerously hot.  
Once it had cooled I popped my prettiest pens in and added it to the desk. 
Coffee tub upcycled into a daisy pen pot
This tin could be a planter too of course, as long as your recycled container is water tight you could add a potted plant in there instead - now that really would be ideal for Mother's day. 
Just bear in mind that metal tins used as planters will rust at the bottom eventually. You can read my cautionary tale about that here.

I've got a few more Easter and Spring crafting ideas in the pipeline made from the products Hobbycraft provided, plus they have loads more ideas here if you are in an Easter decorating mood now!
You might also be interested in:
Carrot Treat Bag
Carrot Treat bag
Tassel Button key Ring
Tassel Button Key Ring
Washi Tape Berry Boxes
Wedding Day Emergency Kit
I'll be linking up this project at some of these lovely link parties

read more

Friday, 13 May 2016

Cross Stitch Planter

The simplest of cross stitch to upcycle an old tin into a plant pot.
recycled tin cross stitch planter
I used to do a lot of cross stitch. I designed and sold a range of kits at craft fairs and had a few of my designs published in Cross Stitch magazines back in the late 80's/early 90's. Then I had kids, cross stitch went out of fashion a bit and that was the end of that! I made the kids samplers with their birth details but not much else since then.

I think cross stitch might be due for a bit of a revival. On pinterest I've been seeing quite a bit of really nice cross stitch again and as part of my post moving house sorting out ("why on earth did I keep this?" you know the sort of thing) I found some 14 count Aida. This is the big stuff for beginners with large squares. We used to use this at primary school to make coasters and other lovely gifts for our parents! It has 14 little squares to the inch, hence the 14 count!

Just as I was thinking that I may as well use this Aida fabric to make something, at work my boss finished the last of her tin of Yannoh. It's a weird (sorry) coffee substitute thing that she drinks but it comes in a nice tin with no sharp edges and an easy to remove label. It's a recyclers dream!

To make your own cross stitch Planter you need:
  • An old tin or container to cover (plain is best as any label will show through the holes in the fabric a bit)
  • 14 count Aida fabric or similar
  • Embroidery threads in your choice of colours
  • Needles, scissors, hot glue gun
  • Something to line your tin if it's not watertight
Remove the label from your tin if you can.
Cut the fabric to fit round your tin.
Using 3 strand of embroidery thread, stitch a design centrally on your strip of fabric. 
You can get the chart for mine here or just right click on the chart below and then print. 
You should end up with something looking like this.
simple cross stitch planter
Wrap the fabric round the tin then fix with a couple of lines of hot glue on the short edges, just where the fabric joins. I couldn't photograph this stage, hot glue on a metal tin cools pretty quickly so you need to be quick. Also I have only 2 hands! Here is what it looks like now. The glue is clear so any small bits that ooze though the holes in the fabric don't show too much.
cross stitch planter from an old tin
This tin is not watertight so I've lined it with a piece of thick plastic bag. The plant is still in it's original plastic pot, just dropped into the fancy planter.
I shared some problems I'd had with tins as planters last week here and how I got round them.
After saying last week that herbs were a bit to much work for a windowsill I have backtracked and now have some flat leafed parsley in my Cross Stitch planter. 
recycled tin cross stitch planter
It was from an IKEA set of 3 paper wax lined cups with seeds to grow mint, basil and coriander that I was lucky enough to get as a gift at a baby shower. The mint didn't germinate at all so I just have cups of coriander and basil that are doing rather well at the moment. The IKEA cup fitted perfectly into the tin so for a little while I am actually back to living my dream of herbs on my kitchen windowsill - lovely whilst it lasts!
You might also be interested in:
Felt Heart Brooch
Felt Heart Brooch
Cross Stitch Planters
Ikea Cactus gift wrap
Ikea cactus gift wrap
Taking succulent cuttings
I'll be linking up at these great link parties, why not check them out!

read more