Here's how I got on adapting the New Look K6483 pattern that came with Sew Style & Home Magazine to make a summer top from an old shirt.
This post contains affiliate links, if you do decide to click through and make a purchase using these links the cost to you is the same but Sum of their Stories will be paid a small commission.
A heady combination of all the amazing Me Made May challenge inspiration and one of my most favourite programmes "The Great British Sewing Bee" being back on the telly was too much for me recently. So whilst in the supermarket I found the June Issue of Sew Style and Home magazine just fell into my trolley before I could stop it! It's a great magazine with loads of projects inside with downloadable patterns but one what really caught my eye was the actual real paper pattern that comes with it. New Look K6483, a quick and easy summery top with 5 variations, different combinations of neckline and arm hole/sleeve.
I had an old man's shirt (the shirt is old not the man that used to wear it!) that I wanted to upcycle to make myself a summery top and thought this pattern would be just right. It was!
Making new clothes from old clothes is both easier and more difficult than making from new fabric. Things like hems can be reused to save you time and effort but you have less raw material to work with so compromises sometimes have to be made. You also need to adjust for features on the original garment you want to keep.
The first thing I did was cut the shirt open by cutting the side seams and removing the collar and sleeves. I also took off the pocket from the front.
I choose style B from the pattern as my basis and thought I would have the buttons from the front of the shirt go down the back of the new top. Sadly I lost concentration for a second and promptly cut out the front of the top from the front of the shirt so that was the end of that!
It's a little awkward to fold the shirt in half with the buttons attached but not impossible. I adjusted the neckline a little so that the top button was nice and close to the neck edge.
I then cut the back of the top from the back of the shirt, on the fold. The pattern has a seam centre back so I reduced the width by overhanging the paper pattern over the fabric the width of the seam allowance.
The New Look K6483 pattern has facing to finish the neck and arm hole edge in one streamline piece. I really like this way of finishing a garment edges as it looks so sleek. I had planned to use the sleeve fabric to cut the facing but there wasn't quite enough fabric. I thought there would be plenty but apparently not.
I put the darts in and joined the front and back pieces as per the pattern instructions then I found this great tutorial from Sewaholic to add bias binding to necklines.
I'd saved it on Pinterest a while ago (love pinterest!)
I had enough sleeve fabric to make bias binding for the neck edge
and then found some white shop bought binding in my stash for the arm holes.
The last thing was to sort out the buttons. I had wanted the buttons on the back because men's shirts have much larger gaps between buttons than ladies, I was worried about gaping. The solution was to take all the unused buttons from the shirt (very top, sleeve plackets, the spare inside ones) and add them in between the existing buttons.
I didn't need to do button holes, the top fits over my head without undoing it, this is just decorative. I just stitched the buttons right through the layers, no gaping now!
I see a little puckering with my top stitching round the neck hole in the photos. Would you believe me if I said they really don't notice in real life?
This is a great pattern, easy to adapt and I will definitely be using it again. (maybe next time with enough fabric to do the proper facings) It is a lovely comfy loose fit, but you could easily add some long darts in the back if you like a more fitted look. The bust darts are just right for me. My top is longer than the pattern as I used the shaped bottom edge of the original shirt.
All it all, after a few set backs and complications of my own making this was a really easy make.
Friday, 10 June 2016
Tuesday, 7 June 2016
Make a fabric stash busting greeting card with a sweet mini bunting message.
This post contains affiliate links
I was lucky enough to win a beautiful book from a fab giveaway over on Cut out and Keep recently.
As soon as it arrived I was itching to try out one of the projects. I needed a special card for someone whose birthday I'd missed (a quick text on the day is one thing, but when you miss the date by a week I think the card needs to be something special to make up for it!) so the Mini Bunting Card idea really caught my eye.
This is a photo of the project in the Banners, Buntings, Garlands and Pennants Book
This is a great idea for fabric stash busting, you can use up the smallest of scraps.
I varied my card just a little bit from the one in the book in a few places, just to use what I already had.
To make a Mini Bunting Card you need:
- Fabric Scraps
- Alphabet stamps
- Some sort of permanent ink
- Thread
- Sewing Machine
- A blank card
Cut out triangles of fabric of a size to suit your letter stamps. The book has a template to enlarge on a photocopier but it is just a simple triangle and you can vary the size to fit your letters. I cut mine out with the pinking shears because I thought it would be cute.
How many you need will depend on what message you want to send, but remember to include blank triangles between words and at either end.
This worked so much better than I thought it would. I did choose fabric without too much texture or pattern. Just make sure you remove any fluff before you stamp or your letters will look patchy.
Lay out your message, (cut more triangles if you have miscounted!) You can see I didn't stamp on the more patterned triangles but used them as word spaces instead.
Then you just stitch across the top of each triangle with the sewing machine, leaving a long tail at either end. It's quite difficult to photograph as it is long and thin, but you get the idea.
Then you just wrap it round the card - write your message inside first! - and attach with a little bit of washi tape.
Because the card is left plain when the recipient unwinds their super cute bunting, I added a very quick doodle bunting to the card first. You could spend longer and do something a little bit more spectacular.
Once it's all wound round it is a bit of a squeeze to get into the envelope, another time I would maybe trim 1/2 cm or so from the blank card before I started to make it a bit easier.
My gorgeous book prize is Banner, Buntings, Garland & Pennants by Kathy Sheldon and Amanda Carestio, published by Larkcrafts. It's so packed with beautiful projects I really want to make them all! So many varied ideas for different types of bunting and garlands and so many different ways to use them. You can find it on Amazon in the UK here: Banners, Buntings, Garlands & Pennants: 40 Creative Ideas Using Paper, Fabric & More
You might also be interested in:
|
|
|
|
Thursday, 2 June 2016
A little roundup of how I got on in Me Made May 2016
So it's over, Me Made May 2016, and I've really found it so interesting and inspiring.
Way back at the end of April I pledged to join Me Made May saying I would attempt to wear all the wearable things I own that I've made during the month of May. I included refashions and accessories just to make it a bit easier on myself.
I've been sharing how I got on over on Instagram throughout the month. I had some spells of several days in a row, some days I even managed 2 items I'd made at the same time. Other days, not so much. I actually didn't manage my challenge :-( and had 3 skirts, 2 maxi dresses and 1 necklace that I missed out, I'm blaming the weather!
This is what I learnt:
The one on the far right here didn't even make it to Me Made May, not sure how I missed that one.
I have a quite a few tops that I've made, some refashioned from old clothes, some made from new fabric.
I also have quite a few jewellery bits I've made, I seem to be especially fond of bangles.
The tutorials for these are all here on the blog:
Cluster Drop Necklace
Fabric twine Bracelet
Cath Kidstone Notepaper Bangle
Doctor Who Scarf Bracelet
And just to finish here are just a couple of photos that didn't quite seem Instagram worthy!
Participating in the challenge was such a great experience, a combination of this and Sewing Bee being on the tv at the moment and I'm super inspired to sew more clothes.
You can see loads more participants and what they wore all month on Instagram, just look for #memademay2016 or #mmm16
Do you fancy joining in next year?
So it's over, Me Made May 2016, and I've really found it so interesting and inspiring.
Way back at the end of April I pledged to join Me Made May saying I would attempt to wear all the wearable things I own that I've made during the month of May. I included refashions and accessories just to make it a bit easier on myself.
I've been sharing how I got on over on Instagram throughout the month. I had some spells of several days in a row, some days I even managed 2 items I'd made at the same time. Other days, not so much. I actually didn't manage my challenge :-( and had 3 skirts, 2 maxi dresses and 1 necklace that I missed out, I'm blaming the weather!
This is what I learnt:
- I used to make more clothes than I have done recently
- I keep some things for a long time - I found a wrap skirt I made over 20 years ago, sadly the weather just wasn't warm enough to wear it this May
- I'd like to make more clothes for myself
- There are some super talent sewist out there making some amazing outfits
- I no longer own a single jumper or cardigan I've knitted for myself even though over the years I've made loads
- I found some forgotten gems lurking in the wardrobe
- I found some "Oh dear, back to the drawing board" items lurking in the wardrobe
- People who really get good results often make a test garment first, a muslin, and those of us who don't often don't get such good results!
- I need to work on honing my mad selfie skills
Here is just a selection of the "Me Made" things I've been wearing this May.
Turns out I've made quite a few dresses into skirts over the years - the simplest refashion / alternation of them all!
Chop the top from the dress and add a simple casing at the top for elastic - job done! The one on the far right here didn't even make it to Me Made May, not sure how I missed that one.
I have a quite a few tops that I've made, some refashioned from old clothes, some made from new fabric.
I also have quite a few jewellery bits I've made, I seem to be especially fond of bangles.
The tutorials for these are all here on the blog:
Cluster Drop Necklace
Fabric twine Bracelet
Cath Kidstone Notepaper Bangle
Doctor Who Scarf Bracelet
And just to finish here are just a couple of photos that didn't quite seem Instagram worthy!
Note to self - Don't try to pose and maybe move the bag of compost!
Ops, some days it got a bit breezy....(plus where are my shoes???)Participating in the challenge was such a great experience, a combination of this and Sewing Bee being on the tv at the moment and I'm super inspired to sew more clothes.
You can see loads more participants and what they wore all month on Instagram, just look for #memademay2016 or #mmm16
Do you fancy joining in next year?
Friday, 27 May 2016
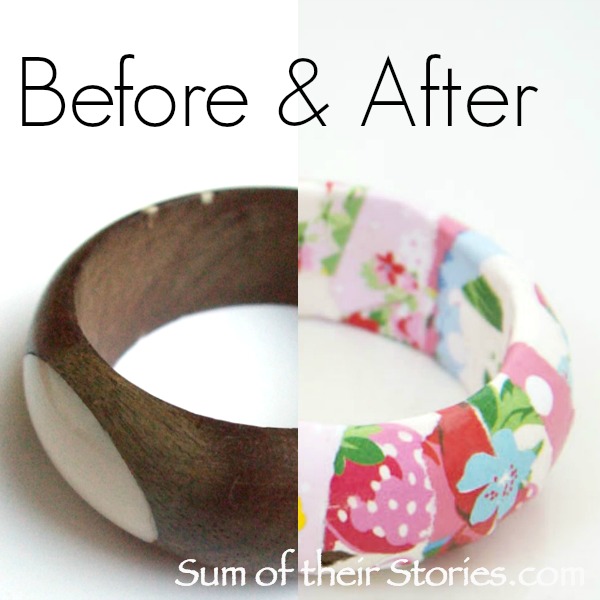
I love Cath Kidston's beautiful designs so used some scraps of pretty floral notepaper to makeover an old bracelet.
About a year ago I was a guest over on The Pinning Mama with this tutorial, but when I wore this bracelet the other day and shared it on Instagram as part of Me Made May I thought it was high time I added it here too.
It all started when I fell over a wooden bangle in a charity shop for 50p.
Then I saw something similar done with pages from a book, which was lovely, except I thought it would have to be a book I love and I just can't bring myself to ruin a book on purpose! It would only be ok if the book was already falling apart. What does it say in A Series of Unfortunate Events? - "there are few sights sadder than a ruined book". I'm not sure that is strictly true but still...
I found some old sheet music which might have worked but then I remembered I had some beautiful Cath Kidston writing paper.
I'll be linking up at these great link parties,
About a year ago I was a guest over on The Pinning Mama with this tutorial, but when I wore this bracelet the other day and shared it on Instagram as part of Me Made May I thought it was high time I added it here too.
It all started when I fell over a wooden bangle in a charity shop for 50p.
Some of the cream coloured bits were chipped and the wood was a bit discoloured so it was perfect for a makeover.
My first thought was to cover it with comics, a bit like my pen pot.
I found some old sheet music which might have worked but then I remembered I had some beautiful Cath Kidston writing paper.
I had already used a lot of this for other crafts, you can see the little scrappy bits on the left in the box. Perfect.
Do you want to make one? This is what you will need:
- An old bangle
- Scraps of paper
- Mod Podge or PVA glue
- Fine sandpaper
- Spray Sealer (optional but highly recommended)
First I gave the bangle a quick going over with sandpaper, just to rough it up a bit.
Then I tore a load of the pretty papers into long strips.
I started sticking the strips onto the bangle with Mod Podge. I spread glue all over the bangle, stuck the paper on then spread another layer of glue over the top.
If any of the bits were more than 1 cm wide I gave them a few little tears sideways to make them curve round the bangle better.
When it was almost all covered, leaving a gap of an inch or two I left it to dry hung up on a chop stick.
Once it was dry (about an hour) I covered the gap with more paper strips and left it to dry again.
Whilst I was waiting I cut some flowers from more paper scraps using my craft knife.
Then I glued them on any parts of the bangle that I thought were a bit plain or where there were any little creases to cover.
Once this was all dry I gave the whole thing a few layers of clear sealer spray.
This stuff kind of stinks so I did this out in the garden.
You don't have to use the sealer but I've found I can wash my hands without having to worry about getting my bangle splashed. I've had this bangle a year now and have worn it often. This photo from instagram was taken just last week and as you can see, no peeling or damage at all.
So on reflection I would recommend at least 2 layers of sealer of some sort if you want your bangle to last.
Do you have an old bangle that could do with a pretty paper makeover? What kind of paper would you use?
All the top quality photos in this post were taken by our daughter, you can find her website here
You might also be interested in:
|
|
|
|
Subscribe to:
Posts (Atom)
Labels
Air Hardening Clay
Blogging
Christmas
Clever ideas
Craft show
Crochet
Doctor Who
Easter
Felt
Geekery
Gift Wrap
Gifts
Hand Lettering
Handmade Monday
Home Decorating
Kids activities
Knitting
My Favourite Finds
Needle case
Party ideas
Pattern review
Pinterest Challenge
Sewing my Stash
Silent Sunday
Valentine
Wedding
accessories
art
bags
buttons
cakes
cooking
cushions and pillows
doodle
embroidery
gardening
gift ideas
greeting cards
jewellery
organising ideas
papercraft
papercutting
pretty ideas
recipes
recycling/repurposing
refashion
sewing
their stories
thrifty tips
tutorials
what can go wrong