Sunday, 10 August 2014
Thursday, 7 August 2014
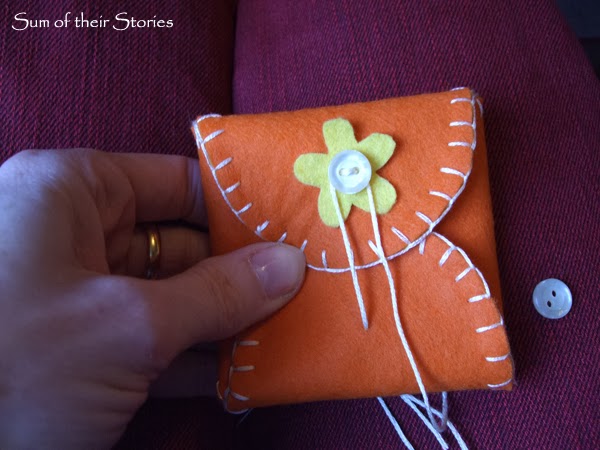
This is a tutorial for my Simple Felt Needle Case that first appeared in February as a guest post at Chic on a Shoestring Decorating.
One of my work friends confessed a little while ago that she only had one needle in her house. One needle, how is that possible? I must have hundreds! What if she looses it? I was very worried for her so I made her a quick little felt needle case with a few extra's in it. I feel better knowing she will be ok now!It was pretty easy and cute. Would you like to have a go? Here's how:
You will need:
Felt (I used 3 different colours but you can use whatever you like)embroidery thread, 2 little buttons, this pattern and a sharp needle!
Cut out your felt pieces.
I chose for the darker orange to be the outside so attached the flower and one button as marked on the pattern.
The other side looked like this (but it won't be seen so it doesn't matter):
Now layer the other main piece on the wrong side, lining up carefully and pin in place.
Using 3 of the 6 strands of the embroidery thread, blanket stitch around these two layers.
When I get back to the beginning I just do a little oversew stitch to join. I did take lots of pictures of how to blanket stitch but they didn't come out! There is a good tutorial from futuregirl here if you need a bit of help.
Now fold your middle section in half and pin in position where marked on the pattern.
Using the 3 strands of embroidery thread again, stitch along the pinned line to hold the "pages" in place.
You are going through 3 layers of felt here so you might find it easier to stab right through to the other side and pull the thread right through for each stitch, that way you get nice even stitches on both sides. I think this is a stab stitch but don't quote me!
Carry on round the whole "square". Hard to describe, the picture shows this best.
Now it just needs the loop fastening. Fold the case up to a square like the photo below (sides in, bottom up, top down!) and using all 6 strands of the embroidery thread this time, come up from the inside where marked on the pattern/shown on the photo below. Don't pull the thread right through, leave an end. Then go round the button and back down just next to where you came up.
Come back up with the thread to the right side and use it to sew the 2nd button on.
On the reverse, tie the ends in a double knot.
The knot looked a bit messy so I covered it with another little felt flower with a few stitches to hold it in place and make a centre.
Pop a few needles in and your done!
Simple and easy. This would be perfect for children or beginner sewers, or the more advanced could put a lot more fancy embroidery on it.
You might also be interested in:
|
|
|
|
Wednesday, 6 August 2014
Further to my less than awesome Party Ideas post earlier this week I can at least share how I made the Gold & Silver Birthday Banner.
It cost £0.00 which I was very pleased about. I already had some bits for it (ribbon, sharpie pens), hence the £0 price tag but even if you had to buy some things it still works out as a bit of a bargain!
To make it you need:
Wallpaper samples - mine were silver and gold
Sharpie pens - again silver and gold
Glue (mine is Pritt stick)
Ribbon - how much you need depends on how long your message is. You can always reuse it afterwards.
A bit of scrap card
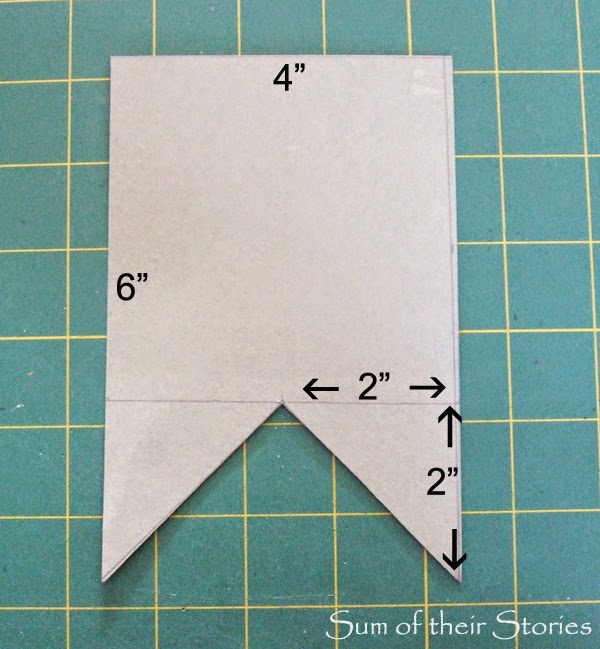
First make a template of the "flag" shape on the scrap card:
Place this on the back of the wallpaper and draw round in pencil.
I'll be linking up this project at all these lovely link parties, pop over for a look at loads of projects from other blogs
It cost £0.00 which I was very pleased about. I already had some bits for it (ribbon, sharpie pens), hence the £0 price tag but even if you had to buy some things it still works out as a bit of a bargain!
To make it you need:
Wallpaper samples - mine were silver and gold
Sharpie pens - again silver and gold
Glue (mine is Pritt stick)
Ribbon - how much you need depends on how long your message is. You can always reuse it afterwards.
A bit of scrap card
First make a template of the "flag" shape on the scrap card:
Place this on the back of the wallpaper and draw round in pencil.
Just cut as many as you need, that depends on what you want to say! I ended up needing 17 flags, 9 silver and 8 gold. Here is a glimpse of the high tech way I calculated how many G (gold) and S (silver) I needed!
Then just cut them out carefully.
Now to decorate them. You can do whatever you like, I used my lovely 2" circle punch to cut wallpaper circles.
Stick them onto the flags centrally,
then use the Sharpies to write the letter. I also added a border to the flag and the circle.
I kept the letters REALLY simple, if you can do fancy calligraphy you should do that!
Cut a little slot at the top corners of each flag with a craft knife.
Then thread the ribbon through.
Now it's ready to hang up!
You might also be interested in:
|
|
|
|
Monday, 4 August 2014
I am not a very organised blogger.
I love those posts where people show you lots of great party photos, themed food and decorations, lots of ideas and inspiration.
So when it was our son's 18th, and we had family & friends dropping in all day and evening I took the chance to photograph the things I prepared, thought I'd make a nice "party ideas" post for you.
Sadly I was so busy putting food out, making drinks, chatting (imagine that!) that I took zero photos of the finished things. I asked our daughter to take photos during the day and we have great shots of family & friends and not much at all of the lovely table laden with beautiful dishes of goodies.
I'll just share what I do have and try to do better next time!
We went for a Gold and Silver theme. I bought 2 metres of inexpensive gold satin from our local market to use as a table cloth £1.99 per metre so almost as cheap as a disposable cloth but this one we get to keep. (Could have run the iron over it couldn't I?- see photo above - honestly in real life it looked WAY less wrinkled!)
I borrowed some nice silver platters for most of the food and looked for some inexpensive gold bowls for crisps, popcorn etc. In the end I bought some clear plastic bowls, £2 for a pack of 3, and spray painted the outside with gold.
That way the food doesn't touch the paint but the bowls look pretty. (The grass grew and the gold was mowed off - it's all good)
I made cup cakes using gold and silver paper cases, iced them with vanilla buttercream then sprinkled them with gold and silver pearls.
I also made some little cupcake toppers based on all Joe's favourite things.
I took images from the internet and just printed them out on nice thick paper.
I'll be linking up this project at all these lovely link parties
I love those posts where people show you lots of great party photos, themed food and decorations, lots of ideas and inspiration.
So when it was our son's 18th, and we had family & friends dropping in all day and evening I took the chance to photograph the things I prepared, thought I'd make a nice "party ideas" post for you.
Sadly I was so busy putting food out, making drinks, chatting (imagine that!) that I took zero photos of the finished things. I asked our daughter to take photos during the day and we have great shots of family & friends and not much at all of the lovely table laden with beautiful dishes of goodies.
I'll just share what I do have and try to do better next time!
We went for a Gold and Silver theme. I bought 2 metres of inexpensive gold satin from our local market to use as a table cloth £1.99 per metre so almost as cheap as a disposable cloth but this one we get to keep. (Could have run the iron over it couldn't I?- see photo above - honestly in real life it looked WAY less wrinkled!)
I borrowed some nice silver platters for most of the food and looked for some inexpensive gold bowls for crisps, popcorn etc. In the end I bought some clear plastic bowls, £2 for a pack of 3, and spray painted the outside with gold.
That way the food doesn't touch the paint but the bowls look pretty. (The grass grew and the gold was mowed off - it's all good)
I made cup cakes using gold and silver paper cases, iced them with vanilla buttercream then sprinkled them with gold and silver pearls.
I also made some little cupcake toppers based on all Joe's favourite things.
I took images from the internet and just printed them out on nice thick paper.
I've not done this as a printable for you as it is a very personal list of likes, but if you do happen to like Heroes, Maths, Sherlock, Doctor Who, Star Wars, Spiderman, QI, your name is Joe and you are 18 - just ask and I could email it to you!
Some I cut out and some I punched with my circle punch.
Then I just stuck them to cocktail sticks with a little bit of sellotape.
So here are my party post highlights:
And see how nice the table looked late afternoon! I think the grape stalks in the foreground look especially fetching along with an empty glass and green plastic Ikea bowl! It's like the kids didn't know there was a sophisticated colour scheme! And we all know that a party isn't a party without a tube of Pringles on the table.
The banner was free and came out pretty well, I've done a proper step by step on that now in case you fancy making one yourself. The cake was also a hit so I'll be sharing some better photos of that soon too.
So expert party planner/blogger - not so much. I do love it when other bloggers share their less than perfect moments though so now you have seen (one of) mine!
You might also be interested in:
|
|
|
|
Subscribe to:
Posts (Atom)
Labels
Air Hardening Clay
Blogging
Christmas
Clever ideas
Craft show
Crochet
Doctor Who
Easter
Felt
Geekery
Gift Wrap
Gifts
Hand Lettering
Handmade Monday
Home Decorating
Kids activities
Knitting
My Favourite Finds
Needle case
Party ideas
Pattern review
Pinterest Challenge
Sewing my Stash
Silent Sunday
Valentine
Wedding
accessories
art
bags
buttons
cakes
cooking
cushions and pillows
doodle
embroidery
gardening
gift ideas
greeting cards
jewellery
organising ideas
papercraft
papercutting
pretty ideas
recipes
recycling/repurposing
refashion
sewing
their stories
thrifty tips
tutorials
what can go wrong